Wednesday, July 28, 2021

Jaguar XJ13: Engine Part 1

 Yes, yes, I swore off 1/12 scale kits some time ago. They are expensive and take up a lot of real estate in the display cabinet. But then Model Factory Hiro issued the glorious XJ13, and I was hooked. 

Jag (and Aston Martin) dominated Le Mans in the '50s, beating Ferrari 6 times in spite of significant power deficits due to antiquated long-stroke, small-bore engine designs. Ferrari engines were best in class, with thoroughly modern big-bore, short-stroke designs. The 1957 contenders both had 3.8 litre engines, but the Ferrari made 360 hp to the Jag's 306. (See my separate description of the reasons for this by clicking here.) The reason for the wins was, in my opinion, disk brakes: Ferrari was extremely reluctant to adopt these, as he would later be reluctant to adopt monocoque chassis design; but once he did, Jaguar's run at Le Mans was over, and even the Lightweight E-Type, with IRS and inboard rear discs, was uncompetitive. Back in Blighty, Jaguar came up with the XJ13, driven by a modern 5-litre V12 that should have beaten Ferrari if Ford hadn't turned up with the even more powerful 427 Galaxie motor (that's 7 litres for the metric crowd). So while thoroughly gorgeous and likely as competitive as a Ferrari 5-litre 4-cam V12, the Jag was not going to beat the Ford GT and so the prototype was parked. (Some years later it was wrecked in an advertising stunt; the wreck was eventually rebuilt. And you can find today replicas with the SOHC V12 out of the XJS if you have the cash lying around). 

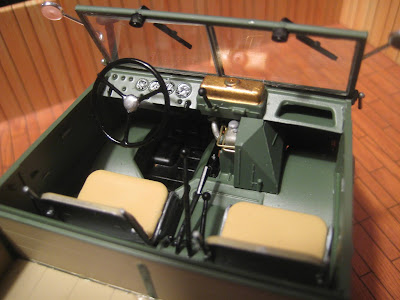
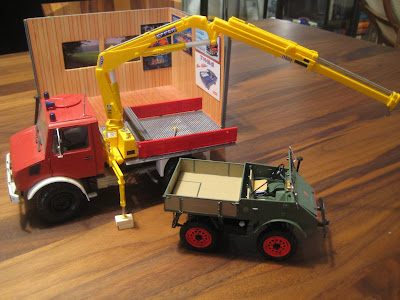
So being a Model Factory Hiro kit, the detail is astounding. I'll let the pictures do the talking from here on.


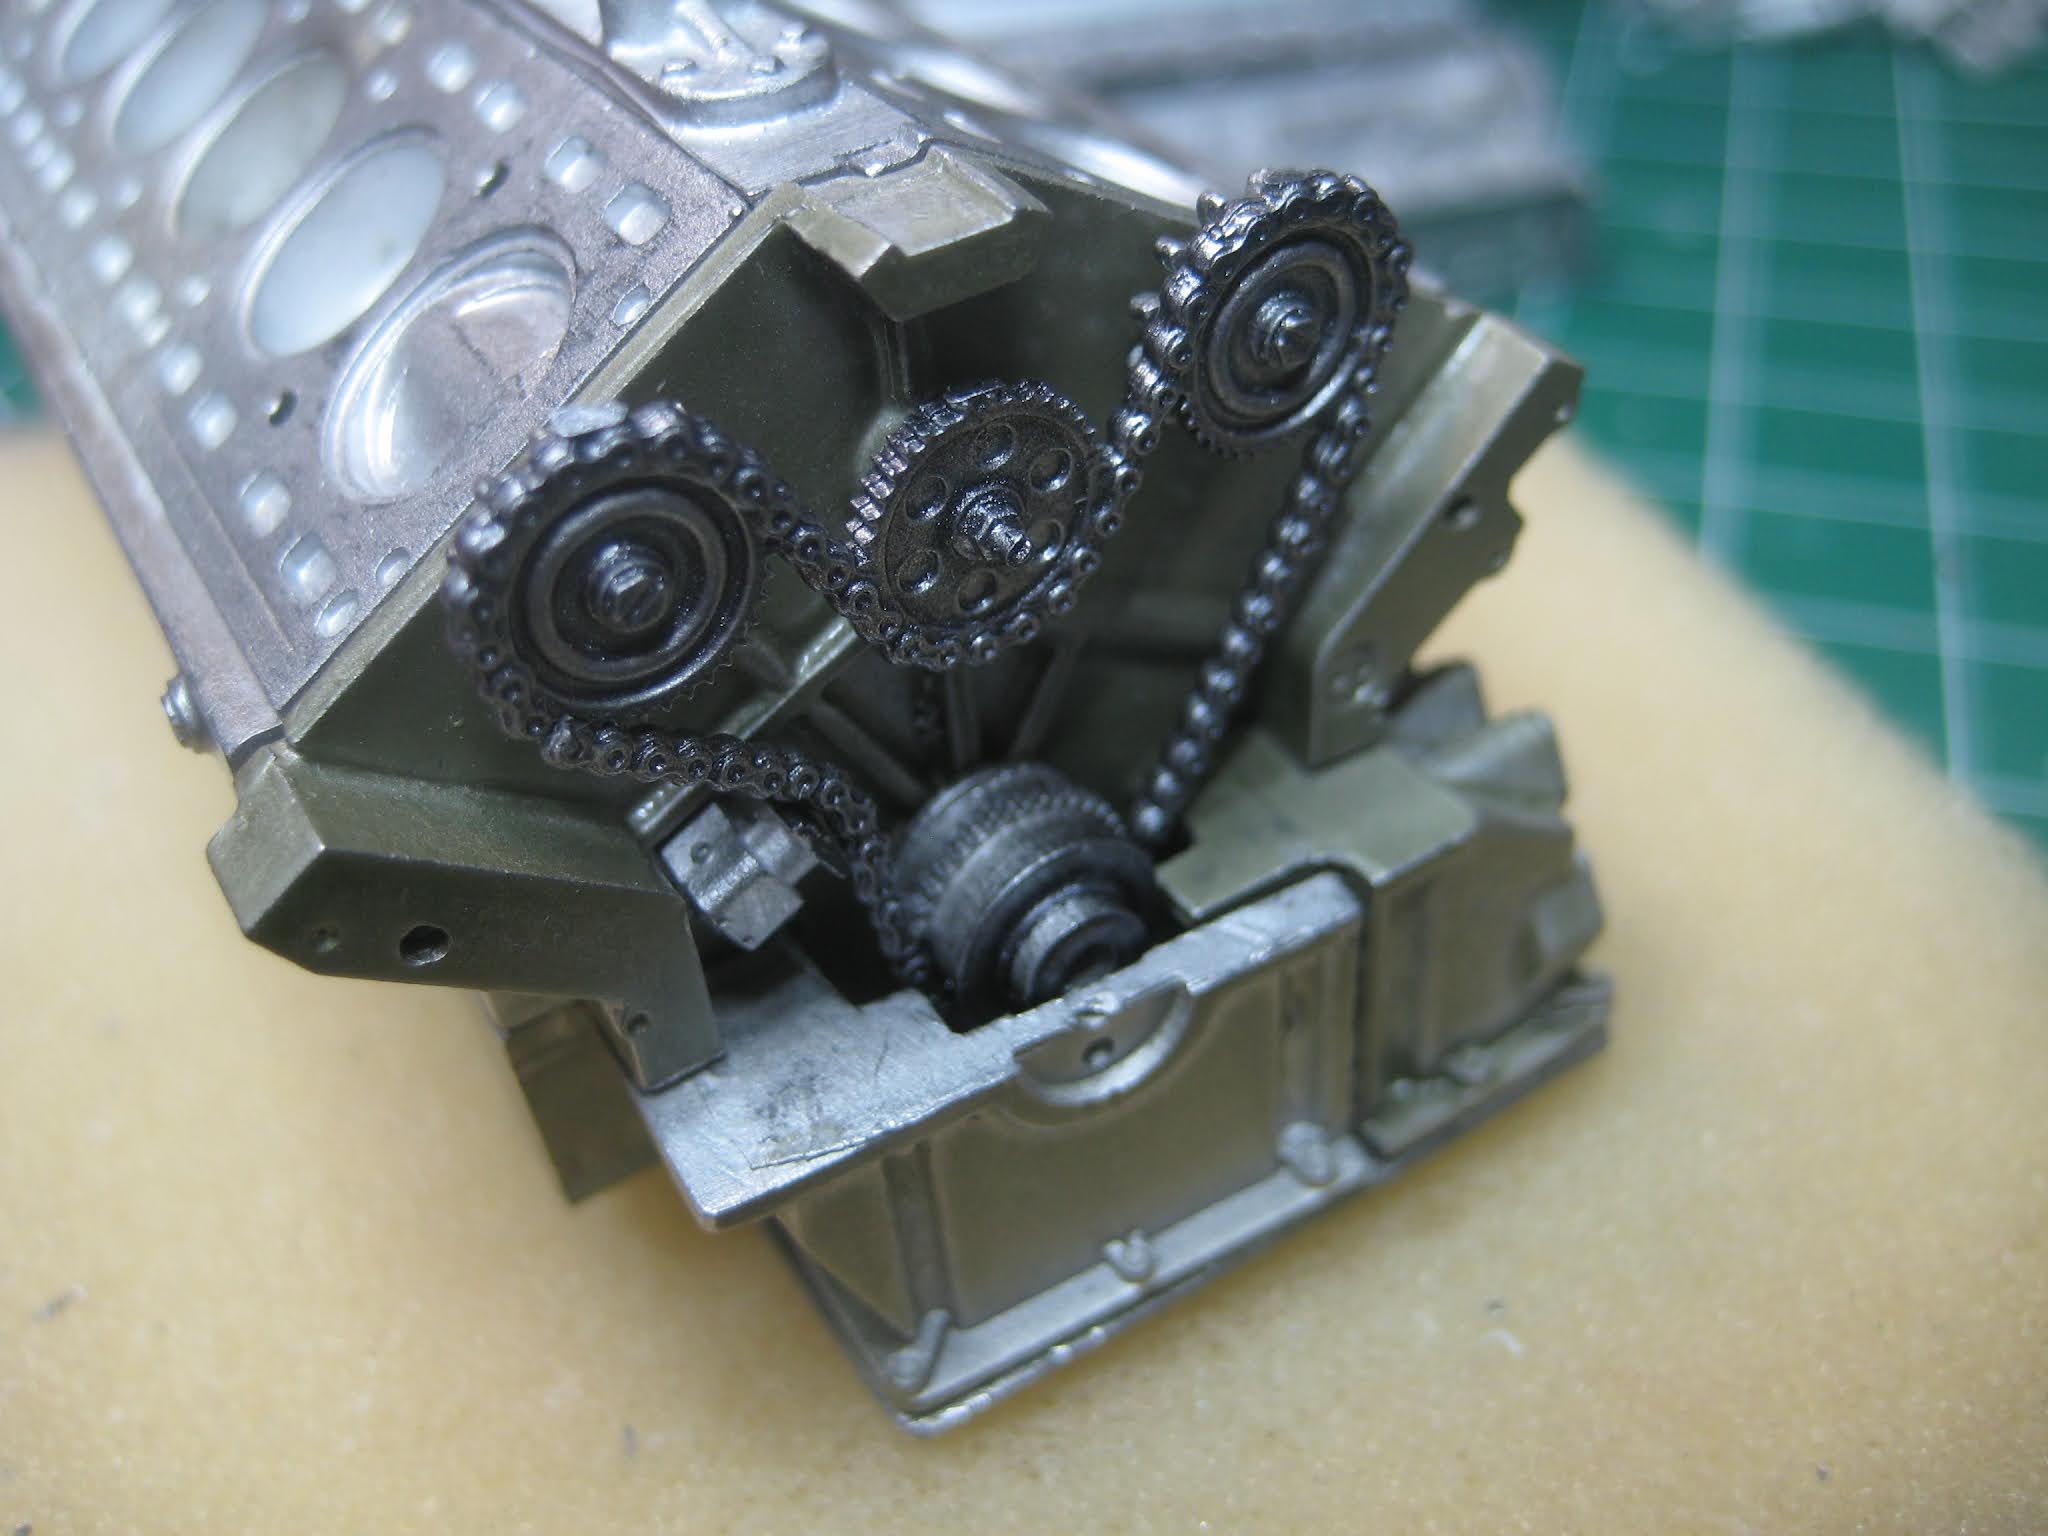
Sadly the detail around camshaft drives is now hidden forever. Such is life. On to ignition and injection systems. Stay tuned!

Things I have learned about building models

Losing stuff

One of the biggest issues modellers face is dropping itsy bitsy teensy weensy widdle parts as we fumble with them in our fat clumsy fingers, only to see them swallowed up by the Carpet Monster; or having them ping out of our tweezers and whizz past our ear as they head into orbit. Here are some tricks and tips I have learned the hard way.

  • You might think stuff would be easier to find on a hardwood floor than in a deep pile carpet. But stuff can bounce more times and hide further away from your chair on hardwood -- it will only bounce once, if that, on carpet. Personally, I ditched the carpet, and don't regret it.
  • Work well away from the edge of your bench, ideally with elbows on the bench and your belly pressed up against the edge. I have seen guys using aprons spread under the model building area, but if you have to get up in a hurry, you risk spilling everything on the floor unless you carefully remove the apron first. 
  • The back of the bench should have a backstop so stuff can't disappear between the bench and the wall. 
  • For really small bits, I work over a low metal tin, like a pie tin. Not the cheap disposable aluminum ones, because the bottoms are not flat, but a decent metal one. Stuff may bounce and roll a bit but it will tend to stay in the tin. Even better: line it with green felt stuck to the inside bottom of the tin with white glue.
  • The tips of tweezers can become bent with time. The tweezers then basically act just like squeezing a wet watermelon seed between your fingers, helping to propel whatever is in them clear across the room or even into Outer Space. Bend them straight, or get better tweezers. (See the photo below for a mangled pair of tweezers).
  • If the tips of your tweezers get contaminated with glue or paint, clean them up. Acetone followed by a quick touch-up with a diamond file and a check for straightness is a good tune-up.
  • Sort through the assorted debris and detritus on your bench (scarf, shavings, bits of sprue, etc.) on a regular basis. Small bits have been known to hide here; I have found lost bits days or weeks after I have cursed and scratch built a substitute for a missing bit. 
  • You can lose bigger stuff, too, by tipping over a whole box left open on the edge of the bench. Put projects in plastic boxes with partitions and keep them closed; use small metal loaf pans to take stuff to the sink for washing or to the garage for painting. Current sub-assemblies can go in the flat tin as above. And keep it all well away from the edge of the bench.
  • Keep completed subassemblies on a shelf or in a box for when you are ready for them, not lying around on the bench. 
  • Washing stuff works better with a fine mesh sieve. You can lose stuff down the drain, especially light plastic or resin parts that float easily. 
These tweezers will fire little bits into orbit.

 Not making a mess

In building models, we work with liquids. Sadly liquids are subject to gravity, and will spread all over your bench (and maybe your pants, too) given the slightest opportunity. Here are some pointers. 

  • Never leave anything uncapped once done with it. For one thing, many liquids (paints and glues) will dry up on you if you don't; but they also spill when knocked over if open. Getting enamel flat black paint all over that lovely engine you've just painstakingly detailed is a major PITA. And thinners and solvents will damage your benchtop (and maybe your hardwood flooring) as well as your project. 
  • Keep open bottles of paint as far away from the edge of the bench (and thus away from your clumsy elbows) as possible. 
  • There are ways of making spill-proof stands for all the common paint bottle sizes, but this, in my view, falls under the heading of making something idiot-proof, which in turn encourages the universe come up with better idiots. 
  • Keep the bench tidy. Regularly put all your tools away into a tool storage system with well-labeled drawers or sections. (You do have a well-organised tool storage system, don't you? If not, see below, and get one now.)
  • When you get paint or glue all over your fingers or tweezers or recently painted parts like the roof of your prized model or whatever, stop to clean up. Maybe it's time to take a break; mistakes happen when you are tired and in a hurry to see some progress.

Staying organised

The concept of "staying organised" scares a lot of people, but it's really just a matter of getting in the habit of putting stuff back where it came from. In turn stuff you use frequently should always be close at hand. I love small hand tools and buy whatever turns up in my Facebook feed; most of them get used very rarely, so keeping the useful stuff close at hand requires some effort. Some pointers and photos follow below.

  • Identify your key tools. If it is commonly on the bench at the end of a modelling session, it is a key tool. Place it in a drawer right in front of you along with similar stuff. 
  • Anything you don't use frequently should be a little further away. 
  • Stuff you almost never use should be far enough away that you have to get up to get it.  
  • Based on frequently used tools and your budget, acquire a storage unit with drawers or compartments of the appropriate size. Don't be a perfectionist or you will never find anything: There Is No Perfect Storage Unit. 
  • When you move on to a new activity, tidy up first. For example, removing parts from sprues, cleaning up mold seams or flash and sanding requires cutters, knives, files and sandpaper, and these activities generate dust, scarf and shavings. Clean up and put everything away before moving to paint. 
  • If something doesn't work (broken X-acto blade, pen out of ink), throw it away. In fact, Throw It Away Right Now. Don't wait. 
  • Cutting mats, lots of light, and (if you're an old f**t like me) a desk magnifier with LED lighting are critical. 
  • If you have multiple projects on the go, put one away in its box before moving back to the next one to avoid mixing up parts. 
 The first picture shows a decent starter tool set. 


Ready for a new project!

There is a fine balance between excessively tidy and excessively messy, and you will want to find your own comfort zone.

That's about it for now; I'll add to this as I think of things.

Friday, July 16, 2021

Unimog 401: Complete (#11 for 2021)

What a cute little thing! Cutest 4X4 ever, I'll wager. 

A forest of shift levers. One for 6 forward speeds, another for two engaging the reverse system (6 reverse gears were also possible); possibly a third for the optional rock-crawler gear set; and two for the forward and rear power takeoffs.

The bed sides are wood; and while the instructions has them painted green, I found an article (in German) in Auto Motor und Sport showcasing a rebuilt one where the wood had been simply varnished.

Canvas tent for a roof... 


Posing with Big Brother Model 406.


Stay tuned! More to come.

Sunday, July 11, 2021

Unimog 401: Engine and chassis

 The Revell Unimog kit is well known and is available in several different versions (fire truck, canvas covered box, etc). This version is relatively civilised, with 130 hp Diesel motor and the ability to keep up with traffic. I built one up as a crane base, using Italeri's truck accessory kit.


But the first Unimog, the 401, was only modeled once, in 2000, by a German or Dutch company called Lassen Project, and was the company's only kit. (Instructions are in German only).


So I found out about this kit only when I saw one for sale on the Interwb, and had to have it as part of my "oddball" collection. I was also interested because when I worked at the Mercedes Benz dealer in 1975-76, we had a Mog for clearing snow and hauling cars in off the lot. (It got replaced by a CJ-5). It was essentially a tractor decked out for the street (if not the highway): 25 hp 1.8 litre Diesel, 6 forward and 2 reverse gears, and so-called portal axles with the drive axle well above the wheel centreline and driving the wheels through reduction gear sets. This provides tremendous ground clearance as the diffs are not on the same centreline as the wheels. 


Power takeoffs were standard front and rear and you can find online pictures of Mogs with haybalers, snowblowers and hedge trimmers mounted to the bumpers. All of this means there are about 5 gearshift levers in the cab... Finally the ground clearance, torque-tube drives and zero overhang meant it could crawl up and over just about anything, as long as you didn't try to exceed 50 km/h. 


The kit is very detailed. I added plumbing for the injector pump, otherwise it's out of box. Sadly most of this will be hidden once the cab is on. 


From the sublime to the ridiculous... all in all this is clearly agricultural. On the to the bodywork, such as it is. Stay tuned!

Wednesday, July 7, 2021

Aston Martin DB 4 GT Zagato: Complete (#10 for 2021)

Finally done! Boy do I hate vacuum formed windows. Otherwise a decent kit and well worth the effort, even if I would prefer the road version without the little fender lips. A muscular shape with lots of muscle under the hood.


Stay tuned!


Sunday, July 4, 2021

Aston Martin DB 4 GT Zagato: chassis complete

The engine is in, the drivetrain complete, the lovely photo-etched wheels are complete, and it all sits nice and square at a proper ride height. 


I was worried the standard tires were going to look lost in the wider rear fenders, but once stretched over the rims, the rubber looks fine. 

 
Next up: interior and body. The hood, which  is white metal, may need to be stripped and puttied to fill some small holes. Stay tuned!