Showing posts with label MFH. Show all posts

Monday, March 30, 2026

Peugeot 905 EVO 1 bis: Opening the box

Well that didn't take long. 


The bench is now filled with the ginormous Peugeot 905 EVO 1 bis, 1992 Le Mans winner driven by Derek Warwick, Yannick Dalmas and Mark Blundell. Model Factory Hiro, 1/12 kit. I actually saw the 1991 version of this car run at Circuit Gilles Villeneuve (the infamous race that was cut short by a loose manhole cover), driven by Keke Rosberg. Pictured here with the poorly detailed and inaccurate 1/24 Airfix kit.


I have started sorting through the various bits and separating out the bits associated with the first couple of steps. I have also learned to test fit major assemblies early on, such as rear chassis to forward chassis, to ensure it is all straight in all three possible axes of misalignment, so some liberties will be taken with the assembly procedure. 


I have also started scouting Amazon for larger acrylic display cases. The 250 LM doesn't fit with the engine lid open, or with a door open; and I suspect the 905 won't fit, period, once that wing is hanging off the back. Stay tuned!


Friday, March 27, 2026

Ferrari 250 LM: Complete, mostly (#2 for 2026)

This Ferrari 250 LM, chassis #5893, was built in late 1964 and sold to Luigi Chinetti at NART, who fitted the more aerodynamically efficient longer nose by Piero Drogo in early 1965. The history of the car is remarkable. 

Driven to a first-place finish by Masten Gregory and Jochen Rindt in the 1965 24 Hours of Le Mans. (This would be the last Ferrari win at Le Mans for some time.) The kit, a 1/12 Model Factory Hiro kit, models the car as it was set up for this race.

Entered in the 1966 24-Hours of Daytona, driven by Bob Bondurant and Jochen Rindt to 9th overall.

Entered in the 1967 24 Hours of Daytona, driven by Masten Gregory and David Piper; DNFed due to an accident.

Entered in the 1968 24 Hours of Le Mans, driven by Masten Gregory and Charlie Kolb; DNFed due to an accident.

Entered the 1969 24 Hours of Le Mans driven by Sam Posey and Teodoro Zeccoli to 8th overall.

Entered in the 1970 24 Hours of Daytona, driven by Luigi ‘Coco’ Chinetti, Jr. and Gregg Young from 44th on the grid to 7th overall. 

So six long distance races in as many years, and still managing to acquit itself well in spite of being a 6-year old race car.  

Sold to Indianapolis Motor Speedway Museum following the Le Mans race of 1970.The museum kept it road-worthy, but did no major restoration work.

With matching-numbers Tipo 211 engine and type-564/940 gearbox/transaxle, indicating that the car is powered by the same drivetrain that won Le Mans in 1965, it fetched €35M ($56M CAD) at Sotheby’s Paris 2025 auction.

See Sotheby's site for more info by clicking here

The kit includes some incredible detail, including engine internals (crank, rods, pistons, camshafts and their drives, and rocker assemblies). I doesn't turn, of course, being made of white metal; in a fit of optimism I tried to turn the crank over once the engine was closed up, and the crank promptly sheared. So much for white metal for crankshaft material... 

The photos show the kit with only the spare rim missing, which still requires 60 more spokes. 


The eagle-eyed will have noticed the engine cover still doesn't close. I don't know how this happened, as it all fit during early mock-up stages; but disassembly did not reveal any major flaws. So I am going to leave it alone and pose it with the lid open (or set to one side). 

What's next, you ask? Hard to tell. But there are some new items in the stash which are attracting my attention... stay tuned! 

Tuesday, March 24, 2026

Ferrari 250 LM: Wheels

Drilling for spokes is complete. 5 wheels, 72 spokes each, 360 x 0.016" (0.4 mm) diameter holes to drill in the hubs. Only broke six #78 drill bits, and only stabbed myself once with a spoke (so far -- three wheels left to assemble). 


Once the last three wheels are complete, I will have assembled 1136 spokes over 19 wheels, with another 8 wheels and 336 spokes to go in three other unstarted kits.

Sunday, March 22, 2026

Ferrari 250 LM: More body updates

Well, the rear clamshell still doesn't fit but at least it has a proper hinge on it now so it can be posed with the clamshell open or removed. That's enough, I'm moving on. 


So the body is back on the chassis and a load of little stuff has been fixed, mostly fixing stuff that fell off or got damaged with all the manhandling. Headlights (10 pieces each, including 4 rivets, 0.5 mm diameter), fog lights (4 pieces each) and the wiper (5 pieces plus an actual strip of rubber) are now installed. 


Doors are complete and the hinges will be glued into the body at the absolute last minute. 


My to-do list is getting increasingly short. Along with gluing in the door hinges, last minute stuff includes the gas caps, exhaust tips and a decal for the clamshell. All easy stuff which leaves me with the need to spoke up the 4 remaining wheels (it has a spare, for which I will have to make a tie-down strap). This requires some Zen time. Stay tuned!


Monday, March 16, 2026

Ferrari 250 LM: Body updates

Finally got back to the Ferrari 250 LM (1965 Le Mans winner at 1/12 scale by Model Factory Hiro). You may recall I quit in disgust when I couldn't get the engine lid to fit -- the first picture illustrates the problem. 


Also the dinky little hinges in the kit didn't like the manhandling and bailed on me. So built a new hinge out of 1 mm wire, 1.5 mm brass tube and a block of 40 mm x 60 mm styrene rectangular section rod. Then added some paint to fix the chips, also due to manhandling. 


Next the body goes back on the chassis and I get back into it, for instance doing up the spokes on the remaining 4 wire wheels (yes, there are five wheels -- there's a spare). These MFH kits are like a love-hate relationship. Beautiful but frustrating.

Monday, November 3, 2025

Porsche 917/30: Complete (first one for 2025!)

Yes, I have completed only one kit in 2025. Life got in the way. 

Posed here with my selection of 908 and 917 kits. The first 908, on the far left, was really a 906 with the new 3 litre flat 8 engine, but the 908/03 shared a chassis with the 917. 


The Can-Am versions of the 917 were unbeatable, especially the 917/30, here in the Sonoco colours as driven by Mark Donohue to the championship in 1973. The classic Can-Am cars, with their 7-litre pushrod motors, were no match for the 5.4 litre flat 12 with the twin turbochargers. 

This kit was provided to me by a colleague who had painted it but didn't feel up to the engine and chassis. I've now boxed it up and shipped it back to him. 

As always with these Model Factory Hiro kits, a lot of stuff doesn't fit or is excessively flimsy. The fit of the engine cowl and its ridiculously weak hinges are just one of the stories. I did get the doors to open and shut, however. 

Sunday, November 2, 2025

Porsche 917/30: Body

The body having been painted by my friend who asked me to finish the kit, I had to get it all to fit before putting on decals. But first I tackled the interior.


This involved some typical MFH fooling around which later required some filing and grinding to get the front clip to fit over it. 


Speaking of filing and grinding, the rear cover sits way too high. A lot of grinding inside the cover, plus some filing of various tubes and pipes, improved things but only partially. 


In the end I gave up, especially as the hinge is extremely flimsy and is likely to rip out after one or two cycles of opening and closing. So it will get posed next to the car, allowing the engine bay to be seen.


Decals went on OK for old ones and only one or two screwups arose, mainly when I put on the clear a little too heavy at first. The front clip fits OK and the doors open and close, with moderate fit issues when closed. With the hinges set in 5-minute epoxy, I hope they will last. 


Upcoming final assembly includes a few details such as mirrors, some rear structure that didn't survive the manhandling and needs to be reinstalled, and the wheels and tires. Sadly this will be one of those "good enough" builds by the time I am done. Stay tuned! 

Saturday, May 31, 2025

Porsche 917/30: Front chassis

Front tubular chassis bits follow the usual excessively complex MFH approach. 

Progress was slow but steady. Making sure every little 0.5 mm socket is drilled out is critical.


The main flaw is the rack, which should have gone in earlier, is bent and the mounting pin i not quite entered into the left side socket. 


Front wheels are test-fitted and it all looks nice and square. 


Rear suspension and brakes also went on in order to get it sitting on all four as quickly as possible. 


The chassis is essentially complete and sits nice and square. The front clip fits nicely but some work will be needed to get the engine lid to sit on it properly. Stay tuned!  


Wednesday, May 7, 2025

Porsche 917/30: Rear chassis

The engine is now installed in the chassis and all the chassis tubing bits are done. This includes the turbocharger piping and a few other bits and bobs. This was all surprisingly easy compared to my recollections of the dreaded 908/03; and maybe this reflects the experience I've acquired in building 25 Model Factory Hiro kits since that 908/03, 17 of them at 1/24 scale. Time to dig out the 1971 version of 908/03 kit out of the stash, perhaps?


Next: front tub details, and rear suspension bits. Stay tuned!

Sunday, May 4, 2025

Porsche 917/30: Engine

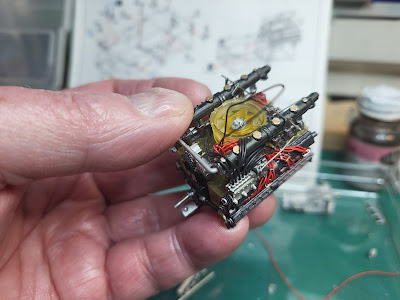
This is my second MFH 917 motor at 1/24, third overall if you include the 908/03 which is quite similar. So I'm getting better at it knowing what to expect -- photo-etched throttle linkages and two plugs per cylinder among other things. The semi-transparent yellow plastic for the fibreglass bits is lovely. Here is the injector wiring going in, with injectors pointing up into the airstream, a first for me:


The engine is clearly wired up as a pair of 6-cylinder inline motors, where the cross-over exhaust piping in the 908 engine shows it was wired up as a pair of flat fours end to end.

First bank of wiring done. I used Detail Master 0.016" red plug wire for this, because the provided black wire is both too flimsy and too hard to see.

This is the hard side to do, with the injection pump in the way.


The other side (right side of the engine) has less stuff in the way of the plug wiring. 


Next: Plunk this all in the chassis where it will never be seen again. Stay tuned!