Saturday, September 9, 2017

1951 Belair: Mating resin and styrene, Part II

I started by cleaning up the resin bits in isopropyl alcohol before putting on some Tamiya primer. No long brown stringy bits of goop surfaced, and the primer stayed on the resin bits, so that all worked out. 

The front end went together reasonably well. The AMT kit offers standard and dropped kingpins, but for some reason the kingpins don't have pins to socket into A-arms at both ends, just at one end. A 1/16" drill and some brass tube fixed that, but this would be a problem for a beginner. Also the tie-rods are glued in place, so while the wheels steer, they won't steer together -- both will have to be posed separately. The photo shows the underside of the front end, with the brass pins visible at the ends of the A-arms.


It's hard to see how low it will be, with the rear at its standard height, because the interior needs to be built up, and I suspect this will lead to lots of filing and resulting changes in the relationship between the body and the axles. 


But two things stand out at the start: the front track is wide enough that the front wheels can't steer (interference with the inside of the fenders); and the rear track is very narrow making the wheels look lost under the fenders. It's a porky little thing seen from the rear. Comparing the AMT and resin bodies, the resin body, measured across the rear fenders at their widest, is 0.150" wider (3.6" at scale) than the AMT styrene body. So lots of room in there for wide tires. At the front the two are the same, meaning the resin body is narrower inside the fenders due to greater wall thickness. 
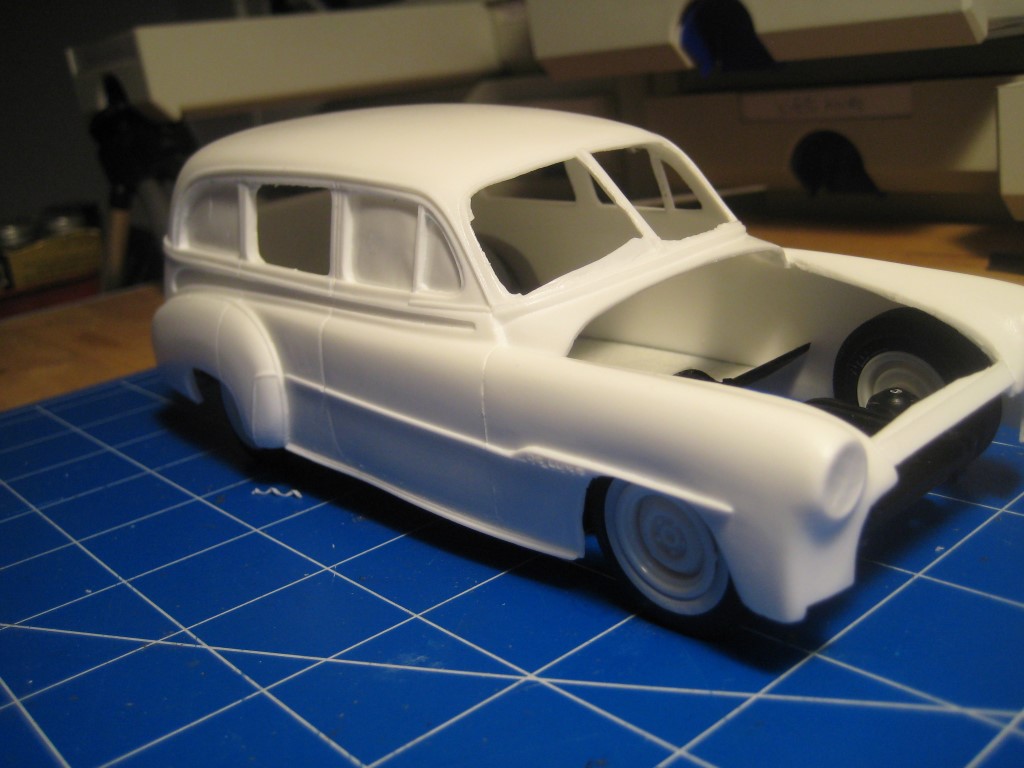

I've also got a choice between two aftermarket sets of whitewall tires: the narrow whitewalls in the photos are the same height and width as the black tires that came in the kit. I've got another set with wider whitewalls which are both taller and wider. The wide ones are also going to raise it all, and in any case don't fit inside the front fenders. Finally I've got some whitewall slicks from the AMT parts packs. More decisions... I will say, though, that engine looks darned good! 


OK, it's not a small block V8, but it looks good, is unusual, and it probably made close to 200 hp with the headers and injection. (Wikipedia says the Blue Flame version of the 235, with hydraulic lifters, the siamesed head and a single carb, as used in cars with the Power Glide trans, made 136 hp, and 150 hp with three carbs as installed in the base C1 Corvette.)


Stay tuned. The interior will be next, with lots of trial fitting into the body. How low the body sits over the interior will impact the choice of tires, and whether I need to do some cutting to sit the rear lower over the leaf springs. 

Friday, September 8, 2017

1951 Belair: Mating the resin body and styrene chassis, Part I

As mentioned in a recent post, the BMCP resin kit is a lot better looking than a typical Jimmy Flintstone unit, which you would expect given the price differential. Apart from the body and hood, the kit comes with a rear floor pan, two inner door trim pieces and an inner tailgate as well as replacement dashboard, firewall and front inner fenders. I am not sure why the replacement parts are included, because they seem to be identical to the styrene parts (on the right in the photo).


There are also replacement bumpers (to save you stripping the chrome off the styrene units, presumably) and both head and tail light assemblies.

Finally there are 3 seats, the middle one narrow to allow access for people (presumably small people) to scramble through to the rear-most seat. Seats for 7 or 8 is possible if luggage is not an issue, speaking of which a luggage rack might be a nice addition.


Some trial fitting shows that the usual resin fit problems are going to arise, perhaps just not as severe as with a Jimmy Flintstone kit. For instance the inner door panels are a good 0.100" taller (2.4" at scale). The issue arises as to where to take the cut since the top of the door sills, which looks like it might actually be meant to be wood, is about 0.090" high. Cutting it out of the bottom on the other hand may require carving out the wheel well opening.


Furthermore the resin body is thicker than the styrene one, as expected, and the chassis doesn't fit. The Dremel will be required to hog out the rear inner fenders, or to cut down the chassis.

Given I want the suspension lowered, I'll have to assemble the chassis and interior and get it all to fit into the body prior to setting up the stance. Plan A is to modify suspension mounting points; the kit does come with two kingpins, one with offset axle; the offset kingpin can be mounted so as to lower or raise the front. I would still have to hack a lowered rear axle. Plan B is to set the entire body and interior higher into the body, essentially a fake channeling. To be determined. So next is to get the suspension and floor pan assembled.

Wednesday, August 30, 2017

1951 Belair: engine complete

According to Wikipedia, the 1951 version of this motor was likely a 216 cubic inch variant with siamesed head (3 intake ports, 4 exhaust), 4-bearing crank, and splash lubrication for the big ends, making 90 horsepower. The bigger 235 unit, with fully pressurised lubrication, was used in trucks and in cars with PowerGlide transmissions; the 3-speed manual cars finally got the 235 in 1954. In a very interesting little tidbit, Wikipedia claims the engine made it into Bedford trucks in Britain, which Austin then copied for its own line of trucks. The Austin copy, with fully pressurised lubrication, eventually wound up in 6-cylinder Healeys! I had no idea. I'll bear this in mind when I build up my EmHar model of the Bedford.

The engine came together well, although I got lazy and used a distributor from the parts people (with two wires cut off). For the distributor mount, I drilled into the front cover at about 45 degrees from vertical on the left side. In theory this would work at 1:1, using a skew gear driven off the crank; in practice getting the right ratio might be challenging, and it would also mean lengthening the timing cover as the distributor drive presently sticks straight through the timing chain. But hey, these are minor details for the 1:1 guys to work out.


The intake trumpets are Detail Master parts, drilled and pinned to the manifold with 1/32" brass rod. I left the brass rod sticking out to the ends of the trumpets to mimic a venturi, although I suspect the Hilborn system didn't have these.


The Fisher labeling on the valve cover came up really well with some dilute black paint. And the header is lovely. I can't imagine the stock distributor surviving underneath the manifold for very long, though.

So overall it's moving along well. The chassis is next which will involve some thought, as the trunk floor now becomes the rear package shelf. There will also be a decision as to opening and hinging the tailgate and rear window. The standard setup is three rows of seats, the second being narrow to allow people (children I am assuming) to crawl through the right side to the back. So seats for 7 or 8 if you don't carry too much luggage.

These cars were known as Tin Woodies, as the wood siding was painted on, unlike the previous generation (up to about 1950) which had actual wood in a decorative if not structural application. There are cars out there that have been converted to real woodies, at great expense, and with excellent results. Rather than dechroming and customising the wagon body, I think I'll build it stock except for the engine, lowered chassis and maybe a surfboard. I'll go for the wood, and maybe even the fender skirts from the AMT kit.

Monday, August 28, 2017

1951 Belair: engine planning

One of the first questions was around where the spark plugs go on the Fisher head, and how many plugs are there -- the hot rod distributor from the AMT kit actually has room for two coil wires and 12 plugs, but has no plugs. A quick Google search brought up a discussion on the Scale Auto site, dated November 2006, which I won't repeat -- click here if you want to see it. (Incidentally, if this conversation had actually appeared in print, and if I had paper copies of Scale Auto going back to 2006, I would never have found this interesting little tidbit. Gotta love the search capabilities of the Interweb.) Click here for more info on the Fisher heads where it seems that fewer than 100 heads were actually cast by Fisher and his predecessor. Seems they are quite pricey today.

Anyway rather than horse around trying to fit wires to the styrene distributor, I plan to go back to the approach used in the DBR1, here, and made a distributor for it. As mentioned in that post, this idea came from someone whose name I forget; it turns out that Tim Kriner posted photos here. Thanks, Tim!

Next is the location of the distributor. The AMT kit has it in the same position as stock, driven off the cam, low down on the right side of the block. This is fine in the case of the stock engine as the distributor is on the right and all the manifolding on the left, but the Fisher head has the exhaust on the right. I would not anticipate that a distributor cap located immediately underneath a header would last very long ... I also found photos online (Jalopy Journal apparently but I can't find the photos outside the Google search results) showing a distributor (or maybe a magneto) driven off the front cover.


It also has plugs on the left side, next to the Hilborn injection, not the right side ... maybe it's another 12-port conversion, not a Fisher, although the two-piece valve cover matches other online descriptions of the Fisher cover. This was apparently designed so you could adjust the tappets with the engine running, without oil spilling down the sides of the block and making a mess, by removing only the upper half. Brilliant! I recall using bits of cardboard that would get soaked in oil in a pathetic attempt to keep oil off the exhaust manifold.


In any case that is one cool looking motor. The plan now is to copy it. Stay tuned!

Friday, August 25, 2017

1951 Belair: planning stages

So I have survived my world travels (for details click here), and while a great time was had by all, it is time to get back to the bench.


I now have two copies of AMT's excellent 1951 Chevy Belair, which I bought because the kit includes a venerable stovebolt 6 which can be built up with a Fisher 12-port cross-flow head, Hilborn injection and a lovely 6-branch exhaust header. The attached, seen in Ticonderoga, NY, in about 2010, shows what is possible with just the basic engine.


I like V8s as much as the next guy, but there comes a point where you've built enough Mopar hemis, Ford 427 cammers and small block Chevys to last a lifetime. Arguably I've reached that point.


I also have two resin bodies designed to fit this kit, namely a chopped, sectioned and channeled unit from Jimmy Flintstone, and a station wagon from Best Model Car Parts (which I will call BMCP from here on).


The Jimmy Flintstone body is typical: relatively poor quality, a molded-in hood, and no parts beyond the body. The $20 price tag shows clearly that you get what you pay for. It would be a shame to waste a decent AMT kit on this, when tinted glass and a chassis made of a slab of balsa would be more than adequate.


The BMCP kit, however, has lots of interior bits, decals for the gauges, and a removable hood. The resin is thinner and the body seems to fit the chassis from the AMT kit well, although for some reason the hoods are not interchangeable. So the plan is going to be a moderately hot-rodded wagon, with the hotter engine, lowered suspension and period-correct steel wheels to be decided. Wide white walls may be involved. The second '51 stays on the shelf for now.

First will be to build up the engine and chassis. Stay tuned!

Friday, August 18, 2017

Chrysler 300: Final touches

It's still summer and there are still plenty of things to keep me away from the bench, including some paying customers who want me to do work for them. The income will be useful if only because later in the fall, there may be a large home renovation project that will likely require I pack everything up and move out for a month or so. This will further delay model building progress, but should lead to a better work space. I have already packed up about half the unbuilt stash of kits. Perhaps I'll document the new space as it arises.

But meanwhile I thought I'd post the latest on the 300, namely the addition of a couple of aluminum air cleaners from Parts by Parks (part #3007). They're a bit tall, and I had to trim down the carbs as well as carve out a couple of dish-shaped recesses in the hood to get it all to fit, but the result is better than the naked and poorly detailed 4 barrel units. If it was a gas guzzler on one carb, two should be a real fun setup.


Still a lovely big brute.


Next I should probably detail under the hood a little better, a challenge given it is too late to wire up the distributor... anyway I am counting on all of you to keep on modeling, and I will get back to this as soon as possible.

Monday, July 31, 2017

Chrysler 300: Steel wheels rule

I've been away from the bench and this blog since late June, and I'll be away again in early August for over a week, so there hasn't been a lot of progress, and there might not be much further progress for another few weeks. (It's summer here in Canada and we're all out running around out in the fresh air, getting over the cabin fever. Isn't there a TV show where they keep saying 'Winter is coming' ...)


Anyway I thought I should clean up a few items that are almost done, starting with the Chrysler 300, and reassure my legions of faithful readers that I am still active. The main question was rims.


In the end I went for steel rims, painted red in contrast to the gunmetal grey of the body. (Thanks to Frank of the Model Car List for the suggestion around contrasting colour). The tires are the excellent Goodyear L60-15 Polyglas from the new AMT parts pack. These are a bit lower and a lot wider than the unlabeled tires on the kit, and as a result look a lot better.


So this was a box-stock build except for the ride height and the tires. Overall, what a lovely big brute. And I gather from Hemmings News that 1:1 versions can be had pretty cheap, too! Not that I want to have to buy gas for one.