MFH kits are well-known for extremely detailed spun-cast white metal bits, especially the engines. The Lusso is no exception.
The first step is a bath in acetone (a.k.a. nail polish remover). Tip: get the unscented one. The 'dirty' acetone can be poured back in the container for your next project. Note nitrile gloves are eaten away by acetone, which is a pretty strong solvent; use tweezers and eye protection and a way of ensuring your bits don't go down the drain. Also note that acetone dissolves CA glue (superglue), so don't use it if you've already started building.
Second is to identify all the little gubbinses and where they go. Unlike a styrene kit, most bits are not on a sprue, and are not identified in any way. The instruction sheet in this particular case is a little slim, with some bits not well illustrated, and identified only by a code number. For example, M18 mounts to the lower timing chain cover on the left side, and is, I think, a fuel pump; the picture is not clear and I still haven't found anything in the kit that looks like it might go there. It is really important not to assume that some little gubbins is the fuel pump and glue it in, only to discover later it was, in fact, the brake master cylinder. And watch for duplicates that may or may not be mirror images; the two magnetos on this car are mirror images, but not exact mirrors (one has the tachometer drive - can you spot it in the photo? It's obvious once pointed out.) Photos of 1:1 cars from the InterWeb, especially period photos, can be valuable.
Third is to clean up the flash which is very fine but which will show up once painted if you don't scrape it off. Some bits are long and thin, and can easily be bent, so this requires patience and care.
Fourth is test fitting everything. Dowels will not be clean but will have shoulders that need to be filed down so the part can seat firmly; the matching socket is probably just a dimple which will need to be drilled out, and the flange with the socket may well be slightly domed. Drill sizes will be metric, with 0.4 mm (#78), 0.5 mm (#76) and 1.0 mm (#61 or #60) common. Plug wires supplied are very fine at about 0.011" (0.3 mm); while this is smaller than a #80 bit, the risk of breaking the #80 bit off in the hole is significant, so I went for 0.016" (#78).
Then and only then do you go for primer. Here I assembled everything that was to be painted aluminum prior to painting to avoid having to scrape paint off glue surfaces.
So far so good. Stay tuned!
Oh, and the difference between the magnetos? In the photo below, the one at upper right (right side of the car) has a longer shaft pointing towards the bell housing than the one at lower left.
PS note the flywheel which will be completely hidden from view once assembled. Other MFH kits have actually included clutch disc, pressure plate and throwout bearing. in 1/43 scale. Now that's detail.
A blog devoted to sharing my adventures building 1/24 (and 1/25) scale model cars, whether styrene or resin. Enjoy!
Thursday, September 28, 2017
Wednesday, September 27, 2017
1951 Belair: Completed
All done, and the result is a bit sloppy but acceptable, I guess.
The windshield, taken from the AMT kit, is a bit small, and would benefit from a sun visor to hide the gap at the top. And at the last minute, the fumes from the CA glue used to attach body to chassis fogged up all the windows :) Of course I worked on the fit, and surface area of the join between body and chassis is quite large and therefore quite impossible to take apart. Bah.
Some of the bare metal foil and silver paint is a little sloppy as well.
And the outside finish, as always, took a beating as I was struggling with the acetate windows. This just reinforces the old rule, especially with resin, that you should trial fit absolutely everything before paint goes on, and I bent that rule fairly significantly this time.
As far as resin kits go, this one was middle of the pack in terms of challenges. At one extreme are crude $20 castings needing lots of cleanup and work on fit; at the other extreme are the $400+ kits from Model Factory Hiro which are absolute masterpieces. In terms of both price and quality, Profil 24 is in the middle, and so is Best Model Car Parts who made this wagon body. You pays your money and you takes your chances. That being said, resin is (so far) the only way to get interesting models that aren't provided by the major styrene companies.
As for the AMT donor kit, I was surprised at the poor instructions and vague fit of things like the splash pans behind the bumpers. A nice kit but needs some finessing to get it right. That being said, the Stovebolt 6 and associated speed components are very nice and worth the price of the kit, you just need to ignore the 12-lead distributor located immediately under the exhaust manifold.
Time to go surfin'!
Monday, September 25, 2017
1951 Belair: A few details left
So after a bit of panic around primer not sticking to resin (see the last couple of posts), I decided to simply trim back the rough edges and press on with the wood-coloured panels. The pale colour is Metal Master #1735, Wood; the dark one is Testor's #1185, Flat Rust. This was done with a brush and turned out fine for brush work; taping would obviously have improved it. I also did some of the chrome trim with a brush.
The door panel gaps look worse in photos than in the plastic and I will likely leave them alone. I should have cleaned them out before painting, but it is too late now, especially given how the paint wants to chip off and lift in chunks and sheets.
The body has now gotten two coats of clear and looks OK. (The cutout in the passenger side rocker panel is to clear the exhaust).
Bare Metal Foil application on the rest of the chrome trim was the usual tense standoff, made worse by the fact my sheet seems to have developed a network of fine cracks in spite of being stored in the stiff envelope it came in. So getting a single long piece to cover the trim on the side or (worse) over the top of the rear fender was a challenge.
The interior shot reveals a large black blob on top of the dash. Good thing the glass is not in yet!
What's left? Lights, wipers (from the parts bin), bumpers (from the resin kit), grille (from the AMT kit), and glass (cutouts from a sheet of clear plastic). Close up, it's all a bit sloppy, but it will look fine in a display case.
So the overall analysis? Two conclusions. First, resin is trickier than styrene (but we all knew this). This one had its challenges around fit, but was not too bad for an advanced modeler with some patience and a willingness to carve things up. (The hood still doesn't fit). I have never finished a Jimmy Flintstone body, but I suspect this one was easier, reflecting the higher price. Second, cleanup is critical (again we all know this). The right kind and the right amount of cleanup remains to be established. I'll post separately as I uncover more.
And what about 3D printing? This is coming, as I've said before. I've ordered some bits from Ron Olsen (here) and will report on the whole experience once I get my order. It will be interesting to contrast with resin. If I were casting bits for the aftermarket, I think I'd be worried. Stay tuned!
Sunday, September 24, 2017
Ferrari 250 GT Lusso: Intro
After the chunky and homely 1951 Chevrolet Bel Air Styleline De Luxe station wagon, aka 'Tin Woodie' because the 'wood' on the outside was painted on, it's now time to move on to something more attractive.
Ladies and gents, may I present the Ferrari 250 GT Berlinetta Lusso. I am not the only one to put this in my list of top 10 sexiest automobiles, ever. Discovering the added beauty of the classic 3-litre V12 under the hood is like finding out that Sophia Loren also has a PhD in astrophysics.
This was designed primarily as a road car, with fully trimmed interior and a somewhat detuned V12. This version of the 3-litre has three 2-bbl downdraft carbs where the racers, such as the GTO or SWB, would have had six.
The kit, which is also a stunningly beautiful effort from Model Factory Hiro, has exactly three resin pieces: body shell, floor pan, and dashboard. The resin bits are up to the usual standard with styrene-like finish and very little in the way of flash, pores, sinkholes or other flaws. Most of the rest is spun-cast white metal, with huge amounts of detail.
And unlike my nemesis, the Porsche 908/03 (also from MFH), this has no space frame components made from easily bent spun-cast white metal, so it should go together relatively well. Stay tuned! But first I need to complete the Bel Air.
Ladies and gents, may I present the Ferrari 250 GT Berlinetta Lusso. I am not the only one to put this in my list of top 10 sexiest automobiles, ever. Discovering the added beauty of the classic 3-litre V12 under the hood is like finding out that Sophia Loren also has a PhD in astrophysics.
This was designed primarily as a road car, with fully trimmed interior and a somewhat detuned V12. This version of the 3-litre has three 2-bbl downdraft carbs where the racers, such as the GTO or SWB, would have had six.
The kit, which is also a stunningly beautiful effort from Model Factory Hiro, has exactly three resin pieces: body shell, floor pan, and dashboard. The resin bits are up to the usual standard with styrene-like finish and very little in the way of flash, pores, sinkholes or other flaws. Most of the rest is spun-cast white metal, with huge amounts of detail.
And unlike my nemesis, the Porsche 908/03 (also from MFH), this has no space frame components made from easily bent spun-cast white metal, so it should go together relatively well. Stay tuned! But first I need to complete the Bel Air.
Labels:
1:24,
MFH,
Resin & Multi-media kits,
Stock builds
Thursday, September 21, 2017
Getting primer to stick to resin: a primer on mold release agents
In hunting around, I found a number of companies that offer mold release agents. I also found a model hobbyist who makes resins and posted on release agents here. (Let me know if the link stops working, I have saved the file).
This fellow uses a commercial agent called Mann Ease Release 200 (spray) or 205 (liquid). He also makes his own, made up of petroleum jelly thinned with mineral spirits which he then applies with an airbrush ... anyway the MSDS (here) states it includes dimethyl ether and 1,1-difluoroethane. I figured the fluorine component is likely the part that makes it nice and slippery, but an actual chemist informs me that this is the propellant, and that the actual release agent is not listed.
Mann also lists Mold Cleaner 2508 for removing traces of prior mold release agents. The MSDS for a competing product (here) lists xylene, toluene and our old friend, MEK (methyl ethyl ketone). So whatever the release agent might be (Vaseline?), these are likely the solvents needed.
The next question is what is the impact of MEK on resin parts. Trials with a scrap piece may be in order. As I don't have any MEK on hand, I will report back.
Labels:
Tools & tips
Lancia D50: opening the box
This turned up today as I was putting the clearcoat on Belair, wondering what I would tackle next.
It's the Lancia D50 Grand Prix car driven by Ascari to a win in Monte Carlo in 1955. The kit up to the usual Model Factory Hiro standards in terms of quality. The one disappointment is that it is 1/20 scale; the posting was unclear and I guess I assumed it was 1/24. I'll hang on to it for now but won't start it just yet.
Stay tuned.
Labels:
1:20,
MFH,
Resin & Multi-media kits
Wednesday, September 20, 2017
Getting primer to stick to resin
A while back I described problems I ran into as a result of not knowing about mold-release agents used in resins (here). Atthat time, a bit of research led to the conclusion that a good cleaning in 99% isopropyl alcohol (propanol or rubbing alcohol) followed by dish soap in hot water would do the trick, and indeed I haven't had any problems since, especially when the alcohol bath includes a vigorous scrubbing with a sacrificial toothbrush.
With the current '51 Belair wagon resin body, I ran into some problems with the paint.
The problems arose when I started scribing around where the wood-colored paint will go, and was surprised to see the entire paint structure, right down to the primer, lifting off in sheets like multiple layers of old wallpaper. Clearly the primer didn't really stick to the resin.
So what am I missing? The primer was on for over a week, the top coats for several days, and there has been plenty of time for it all to set.
Several members of the Facebook group "Model How To's" recommended soaking new resin parts in Wesley's White Wall Cleaner or Black Magic Bleche-Wite tire cleaner. These contain a mixture of an alkaline chemical and alcohol, so presumably they are a more aggressive version of the propanol I have been using. For now I've repaired the flaking bits by carefully trimming with a fresh X-Acto blade dragged along a crease in the body where the step change in paint thickness won't show.
With the current '51 Belair wagon resin body, I ran into some problems with the paint.
I cleaned the body up with isopropyl alcohol as I have done in the past. Then I applied a couple of coats of DupliColor primer/sealer, with no issues around bubbling or any of the other problems associated with applying primer to a resin body which is coated in mold release agent. Finally I put on a couple of coats of Krylon top coat as detailed in recent posts, again with no problems attributable to release agents (although the problems related to using a rattle can were on hand as always).
The problems arose when I started scribing around where the wood-colored paint will go, and was surprised to see the entire paint structure, right down to the primer, lifting off in sheets like multiple layers of old wallpaper. Clearly the primer didn't really stick to the resin.
So what am I missing? The primer was on for over a week, the top coats for several days, and there has been plenty of time for it all to set.
Several members of the Facebook group "Model How To's" recommended soaking new resin parts in Wesley's White Wall Cleaner or Black Magic Bleche-Wite tire cleaner. These contain a mixture of an alkaline chemical and alcohol, so presumably they are a more aggressive version of the propanol I have been using. For now I've repaired the flaking bits by carefully trimming with a fresh X-Acto blade dragged along a crease in the body where the step change in paint thickness won't show.
Labels:
Tools & tips
Sunday, September 17, 2017
1951 Belair: Mating styrene and resin, Part IV
After a fair bit of trimming, I got the firewall and inner fenders to fit, and the chassis is essentially complete with a few minor exceptions such as the radiator. It's all pretty tight and needed a fair bit of carving, which I suppose is better than having to shim up loose bits.
There is a bit of paint to fix under the hood. As I don't have an airbrush, I'd have to do a lot of taping to use the rattle can. Instead, I added some white to Testor's gloss light blue to get pretty close with the brush (not shown in the picture). Also the long air ducts from the radiator bulkhead to the firewall don't fit, because of the injection intake horns on the left and the 6V (!) battery on the right.
The reason for all the replacement parts (firewall, inner fenders, dash) in the resin kit is slight differences between the resin and styrene underhood areas, mainly associated with the body. Same goes for the hood. I assume the resin molds need to be thicker than styrene, for good filling and stiffness if nothing else. So there are a lot of spare styrene bits, not just the body.
The stance is fine, and the body colour on the steel wheels is also fine. I had toyed with black, possibly matched by black bumpers (to come), but I think this works. (The resin kit comes with unchromed bumpers.)
The front wheels are the stock steelies from the AMT kit, while the rears are the chrome rears from the drag version, dechromed and painted. Tires are also big in the fender wells, and the body cleanup will be my last chance to hog them out a bit. After final assembly, the body will sit a bit lower on the left side than in the photo, improving the stance. I'm still of two minds around the baby moons.
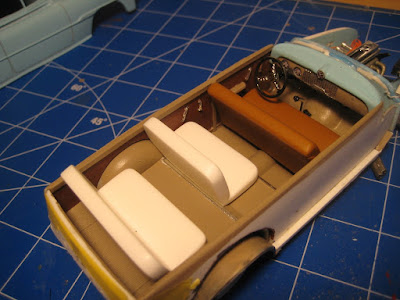
The interior is also complete. I'm going to stick with just the front bench; the resin kit comes with three seats (as shown) which doesn't leave much room for luggage. A luggage rack perhaps? The tan is OK but in retrospect I might have gone for something a bit darker than the Model Master Flat Fabric Tan. And the dash is a bit sloppy but it will do.
Next is the long boring part: all the sanding, filling and painting to get the exterior up to snuff. A lot of sanding is needed first to smooth it all out, then I'll need to paint on the external wood. This will consist of two shades; the darker will probably be Testor's 1185 Flat Rust applied with a brush. The lighter one will probably be Model Master 1735 Wood, again with a brush, which is a bit darker than the Flat Fabric Tan I used inside. There are some gorgeous restoration jobs on the Interweb, but I am not sure how to make the wood grain look realistic.Finally this will get taped and some more of the baby blue shade will get sprayed on. Still to decide: Bare Metal Foil or chrome silver paint for the trim. Probably the rear fender kick panels will get painted because of the risk of wrinkling the BMF over the large-surface, compound curve, but probably the rest will be BMF.
Stay tuned!
Wednesday, September 13, 2017
1951 Belair: Mating resin and styrene, Part III
The interior panels have been glued together, and sit nicely in the body with the tops of the door panels just slightly below the window edges. All the interior chrome was done with Bare Metal Foil. The door panels were painted according to instructions from the supplier, Best Model Car Parts, and the light tan (Model Master Flat Fabric Tan) is really not entirely right -- it is all meant to look like a wood panel. The darker brown (Testor's Flat Rust) looks pretty good. Next will be to complete and install the dashboard and firewall, and finish off the rolling components.
I've given the body a first coat of the final colour, Krylon Blue Ocean Breeze. It's a nice '50's pastel colour and it all looks good. I'll probably do the steel wheels in the same colour, and add baby Moon hubcaps.
It'll sit for a few days as I have other projects that will take me away from the bench, so the paint will have time to get nice and hard. I still need to scribe the door gaps which look pretty ratty, then I'll paint on the wood. You can find photos of what these looked like by Googling 'Chevy Tin Woodies'; I'll see what I can find in the way of paints that look reasonable, especially for the light wood colour.
All that's missing is a windshield visor, a roof rack and a surfboard. Stay tuned!
Sunday, September 10, 2017
1951 Belair: getting the stance right
So I got brave and took 2 mm out of the lower edge of the inner door panels. These are resin parts and presumably hard to replace if I screw up. However it all worked out and the chassis now sits where it should, with the tops of the door panels roughly level with the door tops.
The stance as shown here is with the dropped kingpins, the rear axle in its standard position, and with two types of whitewalls from the parts bin. The fronts are from one of the aftermarket companies supplied through Model Roundup (I forget which one), and are the same size as the black walls that come with the AMT kit. Note they are very large inside the fenders and would not steer at 1:1 without fouling the fenders. The rears are from AMT's MH Racemaster slicks parts pack and are both taller and wider. While they raise the rear, the stance is actually quite nice, and furthermore they now fill out the fender wells a lot better. I suppose another approach will be to go for the down in the weeds look by lowering the rear. To be decided.
It also appears that the chassis needs to move rearwards slightly relative to the body (the wheels look to me to be a bit forward in their fenders), which will allow the body to drop a bit more over the chassis (it's hanging up on the top of the dashboard, and just inside the rear bumper). Too much and I'll have to cut clearance for the headers peeking out from under the right side rocker panel.
Incidentally I had problems getting the color coat, a Krylon automotive paint, to sit on the inner fenders, even on top of Tamiya primer. This is interesting because the Tamiya rattle cans and Testor's bottled paint all took fine. This could be because the solvent used in these auto paints is a lot more aggressive ('hot') than Testor's or Tamiya. Anyway I stripped it all off with paint thinner, then cleaned it up some more with isopropyl alcohol and put on a couple of coats of DupliColor primer-sealer. That seemed to do the trick. I've given the body some added scrubbing with alcohol just to be safe.
So progress is being made! As this is my first transkit, as opposed to the multi-media resin items from Profil 24 or Model Factory Hiro, I am pleased with the state of it at this point. So far (says I, knocking loudly on wood), the trimming and adjusting needed has not been horrendous. Stay tuned!
Saturday, September 9, 2017
1951 Belair: Mating resin and styrene, Part II
I started by cleaning up the resin bits in isopropyl alcohol before putting on some Tamiya primer. No long brown stringy bits of goop surfaced, and the primer stayed on the resin bits, so that all worked out.
The front end went together reasonably well. The AMT kit offers standard and dropped kingpins, but for some reason the kingpins don't have pins to socket into A-arms at both ends, just at one end. A 1/16" drill and some brass tube fixed that, but this would be a problem for a beginner. Also the tie-rods are glued in place, so while the wheels steer, they won't steer together -- both will have to be posed separately. The photo shows the underside of the front end, with the brass pins visible at the ends of the A-arms.
It's hard to see how low it will be, with the rear at its standard height, because the interior needs to be built up, and I suspect this will lead to lots of filing and resulting changes in the relationship between the body and the axles.
But two things stand out at the start: the front track is wide enough that the front wheels can't steer (interference with the inside of the fenders); and the rear track is very narrow making the wheels look lost under the fenders. It's a porky little thing seen from the rear. Comparing the AMT and resin bodies, the resin body, measured across the rear fenders at their widest, is 0.150" wider (3.6" at scale) than the AMT styrene body. So lots of room in there for wide tires. At the front the two are the same, meaning the resin body is narrower inside the fenders due to greater wall thickness.
I've also got a choice between two aftermarket sets of whitewall tires: the narrow whitewalls in the photos are the same height and width as the black tires that came in the kit. I've got another set with wider whitewalls which are both taller and wider. The wide ones are also going to raise it all, and in any case don't fit inside the front fenders. Finally I've got some whitewall slicks from the AMT parts packs. More decisions... I will say, though, that engine looks darned good!
OK, it's not a small block V8, but it looks good, is unusual, and it probably made close to 200 hp with the headers and injection. (Wikipedia says the Blue Flame version of the 235, with hydraulic lifters, the siamesed head and a single carb, as used in cars with the Power Glide trans, made 136 hp, and 150 hp with three carbs as installed in the base C1 Corvette.)
Stay tuned. The interior will be next, with lots of trial fitting into the body. How low the body sits over the interior will impact the choice of tires, and whether I need to do some cutting to sit the rear lower over the leaf springs.
Friday, September 8, 2017
1951 Belair: Mating the resin body and styrene chassis, Part I
As mentioned in a recent post, the BMCP resin kit is a lot better looking than a typical Jimmy Flintstone unit, which you would expect given the price differential. Apart from the body and hood, the kit comes with a rear floor pan, two inner door trim pieces and an inner tailgate as well as replacement dashboard, firewall and front inner fenders. I am not sure why the replacement parts are included, because they seem to be identical to the styrene parts (on the right in the photo).
There are also replacement bumpers (to save you stripping the chrome off the styrene units, presumably) and both head and tail light assemblies.
Finally there are 3 seats, the middle one narrow to allow access for people (presumably small people) to scramble through to the rear-most seat. Seats for 7 or 8 is possible if luggage is not an issue, speaking of which a luggage rack might be a nice addition.
Some trial fitting shows that the usual resin fit problems are going to arise, perhaps just not as severe as with a Jimmy Flintstone kit. For instance the inner door panels are a good 0.100" taller (2.4" at scale). The issue arises as to where to take the cut since the top of the door sills, which looks like it might actually be meant to be wood, is about 0.090" high. Cutting it out of the bottom on the other hand may require carving out the wheel well opening.
Furthermore the resin body is thicker than the styrene one, as expected, and the chassis doesn't fit. The Dremel will be required to hog out the rear inner fenders, or to cut down the chassis.
Given I want the suspension lowered, I'll have to assemble the chassis and interior and get it all to fit into the body prior to setting up the stance. Plan A is to modify suspension mounting points; the kit does come with two kingpins, one with offset axle; the offset kingpin can be mounted so as to lower or raise the front. I would still have to hack a lowered rear axle. Plan B is to set the entire body and interior higher into the body, essentially a fake channeling. To be determined. So next is to get the suspension and floor pan assembled.
Subscribe to:
Posts (Atom)