A blog devoted to sharing my adventures building 1/24 (and 1/25) scale model cars, whether styrene or resin. Enjoy!
Monday, December 31, 2018
MFH kits: a history of my builds
My modeling skills have improved since 2013, partly through building several dozen increasingly detailed styrene and resin kits, and partly through determination to get the MFH kits to the level of finish they deserve. It has been, and continues to be a learning experience, and I would like to share the results of that learning next.
After starting the 908/03 and shelving it in frustration the first time, the first MFH kit I finished was the Abarth OT 1300 Periscopio, one of the so-called Proportion Kit series that have less detail than the Full Detail series. It worked out well, in large part because it was a lot simpler. Probably the biggest worry was cutting the vacuum-formed glass too fine. I have not seen this kit in the MFH catalog or on eBay for some time; the Proportion kits available seem to be largely Ferrari 488 GTE's and Aston Martin DBR9's.
In an act of bravery or foolhardiness, the second MFH kit I tackled was the 1/43 BRM H16. A fascinating little car with an oddball engine (a pair of flat 8s, stacked one above the other and geared together), it went together well given that everything was assembled under my 4X desktop magnifying glass. I would not recommend starting here, however ... the drawing of the engine in the instruction sheet is actually bigger than the actual 1/43 engine. And I wore out my 0.020" (0.5mm) drill. Finally I had a scare when I thought I had lost the steering wheel; my first reaction was not to worry as I have lots of spare steering wheels in the parts bins, but then I recalled they are all 1/24 or 1/25! Fortunately it resurfaced.
The Ferrari 250 GT Lusso went together very well as the chassis is a solid slab of white metal. Other Ferraris of this vintage, as well as the Cobra Daytona, are similar. Here the detail level is entirely due to my own decisions as to what is 'good enough'. The little jig for the grille was critical, and the wheels, while finicky, are gorgeous.
Most recently I finished up the Alfa Romeo TZ1. The major issue here was that I cut down the vacuum-formed windshield a little too far ... in any case I am quite happy with this one, and the frame here is a space frame which went together a lot better than the 908/03. Experience or kit design? A little of both, I suspect.
So there you have it -- a beginners guide to MFH. Don't panic, they are wonderful kits, but be realistic about your skill level before tackling one. Little, flexible struts made of spun-cast white metal do not lend themselves easily to dimensional stability.
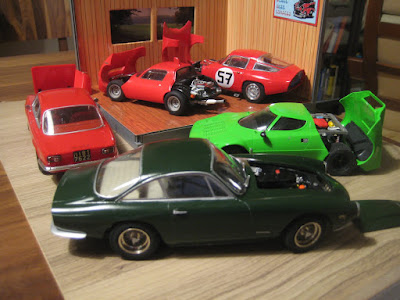
So: you should DEFINITELY tackle an MFH kit, but you MUST start with an honest assessment of your skill level and willingness to be patient. Accept that perfection comes with practice. I intend to build more, and I intend for each build to be better than the last. Stay tuned!
Friday, December 28, 2018
MFH's 908: Final fitting Part 1
The first issue is that the rear subframe went together slightly wide, and slightly tall, compared to what it is supposed to be. Blame this on all the little dowel and socket joints that can't really be drilled out very far. The result is that a range of bits are preventing the rear deck from sitting right down on the sills.
In turn the sills needed to be fitted a little higher, which I did, but I am still not sure they are straight. This has reduced the problem from a 5 mm gap to a 2.5 mm gap.
Some judicious filing, of the deck as well as various mechanical bits under the deck, has further reduced the problem to about 1.5 mm. Small, but still too big -- that's close to 1.5 inches at scale.
Next problem is the stance which appears off, due either to the chassis being high in the front, or the sill panels being low in the back. I am hoping it is the latter as it will be easier to fix, and should help sort out the gap with the rear deck. I really don't want to take apart the suspension ... It could also be that the join between the rear subframe and tub is not completely flat; I can recall old E-Types sagging in the middle caused by rust in the tub. That would not be an easy fix, to put it mildly.
On the plus side, the hinges for the 'doors' worked out well. The hinges for the rear deck don't look so forgiving.
That's it for now, I need a break. While gorgeous, this kit is a constant battle. Maybe I'll go build a Tamiya Le Mans car for a break.
Thursday, December 27, 2018
MFH's 908: detailing the rear chassis
This includes overflow tanks, dry sump reservoirs, oodles of little pumps, filters and other gubbinses, and the potential to plumb it all together.
The issue is that the instructions offer pointers on where to put fittings, and suggest using the small diameter flexible tube provided in the kit, but don't identify the gubbinses or where they should be plumbed to ... the instructions say "refer to your own reference material". I've found some pictures online but this is hardly "reference material".
I drilled all the fitting points to 0.021" and inserted 0.5 mm brass rod into each with a drop of CA glue. Once it all sets I'll run some tubing which will simply disappear into the chassis somewhere. It won't be accurate but it will look good.
I assumed that the larger of the two tanks on the left is the dry sump system, so I connected the two braided lines, which run from the forward oil cooler under the passenger seat to the rear, to this tank. I have no idea what the smaller reservoir, against the bulkhead, might be.
I then assumed the large tank on the right is connected to the fuel tanks in the sills. I will have to carve out the reservoir to make room for my #0-80 bolt (photo above) securing the rear subframe to the tub. The photo below shows the reservoir sitting next to where it needs to go.
So the end is nigh! Of course it is highly likely that body panels won't fit right due to the poor dimensional accuracy to date, and if fit isn't a problem some other screwup will arise. Nonetheless I will press on regardless! Stay tuned!
Wednesday, December 26, 2018
MFH's 908: on to the suspension
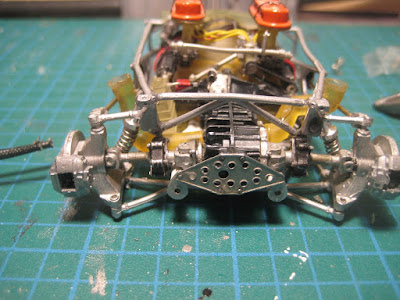
A mere 4 hours got the front end assembled.
Lots of little unidentified wee little gubbinses. Interestingly the tie-rods (centre right, next to a pair of A-arms and still attached to a 'sprue') are marked L and R on the sprue.
The machined shock absorbers and wire springs are lovely but a pain to install without something getting fired off into the ether.
Sadly, like most MFH kits, it doesn't steer, and there was no easy way of making it do so.
I am very fond of the slightly transparent yellow plastic, which mimics unpainted fibreglass very nicely.
On to the rear suspension. My overriding fear, of course, is that once the engine is mated to the tub. the car won't sit square on its four wheels. Given the amount of horsing around to assemble the rear end, I decided to do the suspension next, even though the instructions say I should mate engine and tub first and then assemble the rear suspension.
First observation is that the U-joints in the rear axle are not in the same plane but 90 degrees out. Seems to me this is a recipe for driveshaft vibration. See my sketch.
Next the ducting for the transmission interferes with the exhaust and the upper radius arm locating the left rear wheel. A lot of cutting and filing ensued. Getting the hubs on straight required a lot of cursing. Finally I drilled through for #0-80 screws and nuts to hold it all together. What a proper little go-kart! And bonus! it all seems to sit square.
Next up: a bunch of subframes supporting various overflow tanks;Stay tuned!
Previous post 2017-04-11. Next posts through to 2019-01-01.
Monday, December 24, 2018
Volvo 240 Turbo: Complete (#18 for 2018)
Some of the instructions have got part numbers wrong, for instance; the right and left side windows were reversed as an example. The tires are from a drift kit of some sort and are not at all suitable for a circuit racer; a set of Bridgestones from the parts bin served, although the car is sponsored by Pirelli.
Some of the photo-etched bits were just too small to deal with. The drip rails are molded into the side windows, which go in from outside; fortunately there is a ridge all around the windows which means a painting mask can be cut relatively easily using Tamiya tape.
Peeling off the excess tape around the mask prior to painting (above) and the painted result (below).
Nonetheless it looks good keeping the 850 company on the shelf.
There aren't a lot of kits of Volvos out there; Tamiya had the 850 in sedan and wagon form, with the wagon available in road or race form; I can't think of any others.
What's next, you ask? Hard to say. Stay tuned!
Sunday, December 23, 2018
Volvo 240 Turbo: Chassis, paint, interior
As a Volvo owner, I couldn't resist. A racing Volvo! I worked on 140 and 240 series cars back in my previous life as a mechanic, and they were fairly truck-like compared to the Saab 99s and BMW 2002s which we also serviced. Who'd'a thunk they'd make a good racer.
I have never heard of the Volvo Tubro ... gotta love these Japanese tranlation jobs.
A very detailed chassis, especially with the detail-up bits for the Tubro (which seem to fit the Turbo just fine). Sadly there is no engine, and no one that I know of makes an engine kit for a 240 Turbo.
Well located rear axle: trailing arms, torque rods, Panhard rod, coils and telescopic shocks. I am guessing one of the silver gubbinses either side of the diff is a fuel filter and pump, while the other is a pump circulating differential fluid to the rear-mounted oil cooler. If I were a real keener, I might run some piping.
Rack and pinion steering along with cross-drilled discs up front, with big flexible cooling hoses.
Spartan interior.
Lots of time spent on the seatbelts! The yellow paint specified for the seat is meant, I assume, to mimic an unpainted fibreglass shell. A very business-like cockpit.
Now to the problem: conical tires! No matter which way they go on the rims, they are conical. I have never seen this before; the other Beemax kit in my stash (a Toyota Corolla rallye car) shows no such problem. I see no easy fix.
Fortunately there was a set of Bridgestone Potenzas, of the appropriate size, in the parts bin. They are not slicks, but could be considered a decent set of rain tires.
Final assembly looms large. Stay tuned!