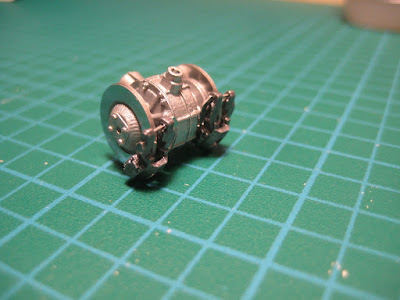
The rear axle, with inboard discs, is very detailed. Discs consist of a couple of photo-etched discs, and the little levers for the handbrake are also made of PE sheet.

Painted, it all looks very nice. I am hoping I won't damage the paint too badly as I force fit all the other bits that will attach to it...

Many other bits are also quite complex. The radiator consists of a hollow white metal shell, two PE grilles, and two little brackets made by folding small PE pieces.

The engine went together well. I decided not to put in the head gasket (!), although the flywheel and starter ring are installed and permanently hidden.

The head includes 10 little rivets with domed heads, mimicking the acorn nuts used to tie the head to the crankcase, sandwiching the wet liners. All went in and none got lost -- I am making progress! Of course clearance holes of 0.020" had to be drilled to accept the rivets.
Most references state that the TZs all came with the twin-plug head. However, there are pictures on the Interweb of TZs with the single plug head; while these all appear to be modern post-restoration pictures which may have used this engine as a substitute for unavailable twin-plug engines, it is possible, reading between the lines on the Zagato site, that at least one TZ was delivered with a single plug head. The Zagato site, which one would expect to be fairly authoritative, states that car number 750 011, which won the GT 1600 class in 1964 as car 57, was delivered with the twin-plug head. Nonetheless the kit comes with a single plug head and 4-plug distributor, so this is how I have built it.

The PE Alfa Romeo script on the valve cover is held on with some Tamiya clear paint, X-22. This is far cleaner than trying to get it in place with CA glue. I am quite pleased with the result, even though I need to sort out some of the plug wires which detached from the distributor as I was handling the engine. The wire loom guides came from the parts bin (Model Car Garage or equivalent).

Separately I put on multiple coats of Tamiya TS-8, Italian Red, starting with light mists and moving to wet coats. An entire can of TS-8 and then some was used. This went on over several coats of Tamiya's fine white primer. There are no runs and minimal orange peel; it should polish up well. As I will be unable to fiddle with it for at least a week, this is a good thing.

Overall a very detailed kit, and a welcome step up from the 250 GT Lusso I just finished. Clearly the MFH folks have at least two levels of detail, and this is important to understand given the horrendous prices these things trade for on eBay. The PE sheets are a case in point; two of the three are backed by a sticky clear red sheet, so the parts have no little 'sprue' connections to the sheet. Peel the piece out with a blade, and voilà! Very nice.

There are twelve other contestants in the contest run by the online Model Factory Hiro Builders Facebook group, building mostly F1 kits in scales ranging from 1/43 up to 1/12. My chances of winning anything are poor given the cosmic level at which some of these guys are working, but as there is nothing like a challenge to get one going, I intend it to be the best I can possibly make it. And there are three prizes (actual MFH kits), so 3/13 = 23%. So stay tuned!
No comments:
Post a Comment