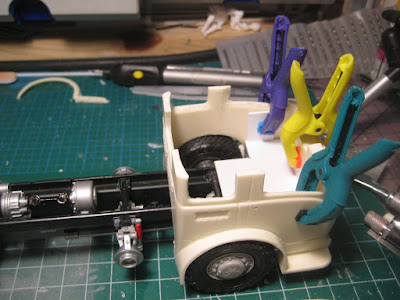
Next the Jimmy Flintstone cab is perched on the chassis, lined up with the forward axle. It's tilted because of interference with the chassis at the front.

Finally here is what it would look like OOB.

By putting my camera on a mini tripod, and not moving either the camera or the chassis between shots, I know the photos can all be overlaid to compare without worrying about scale or perspective changing.
There are a range of different software approaches to playing 'cut and paste' on the computer; I use Power Point to move pictures around, trim and rotate them, and play with transparency. Here's a screenshot. Pictures were rotated slightly to line up the wheels with a horizontal red line. Other red lines show where things will line up, left to right or top to bottom, and where to cut. For example, the vertical red line on the far right shows the forward extent of the engine (bottom photo), relative to the White cab (top photo). The scale marker is obtained from the distance between the two axles, which is just about 50 mm on the model; when printed on 8 1/2 X 11 paper, the distance is actually 27 mm.

The next picture, an enlargement of the one in the upper left corner above, shows the White cab, cut in two and split to bridge both wheels, with the MAZ engine cover inserted. The cab is also level and lower on the chassis than in the earlier pictures, in an effort to get a good feel for the stance.

It looks like it will all just about fit, so out comes the saw. First was to cut a slot in the bumper and grille to allow the MAZ chassis to poke through, and let the cab settle lower over the axles. Then I took 6 mm off the fender lips to better fit the wheels, and also because the White was 12 mm wider across the fenders than the MAZ width across the wheels.

Then I took off the roof, because I intend to chop it, and because it will be easier to reach through the open roof and put in a floor that supports the cab at the right height. I started off with a very fine 54 tpi saw blade but this is not really necessary with this level of resin; most of the cuts were done with a 40 tpi blade. Some straight cuts were started with the back of a #11 blade, then the excess snapped off.

After getting the floor, which is cut from 0.060" styrene, well underway, I cut off the back of the cab and glued it to a shortened forward cab section. One interesting learning here is that it is a lot easier to cut up a thick resin casting than a delicate thinwall styrene molding, which would likely tend to flap around and break with this extreme level of hacking. The cab, consisting of doors and forward grille, is pretty sturdy and inflexible which makes measuring and marking a lot easier.

The engine just clears the new, shorter cab. Radiator and intercooler will sit facing the sides of the engine cover as in the MAZ chassis. I doubt this device will ever get going fast enough to generate any reasonable airflow through a front-mounted radiator so this should be OK! Lots of fans will be needed. Maybe I'll hang an oil cooler under the floor in the front.

The remaining piece of the White cab will serve to build up the rear fenders. I may have enough leftover material to fill the gap in the engine cover above the turbo, or I may need to scratch build that; to be verified.

Lots of fitting, filing and gluing to go; there will be a catwalk joining the two fender halves, and the roof needs to be shortened to fit. But the general shape of the cab and engine cover is getting there, and so far it all seems to fit. I am hoping to do all this without modifying any of the parts from the MAZ kit, so that it could, theoretically, go back to an OOB build; we'll see how far I can get on that score. Stay tuned!
No comments:
Post a Comment