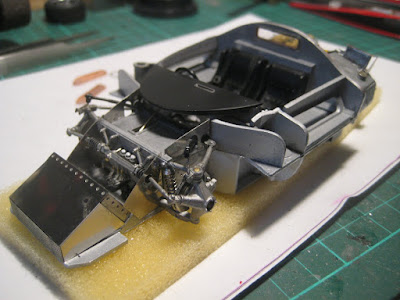
What a gorgeous little car! Based on the 33/2 race car, only 18 road-going ('Stradale') chassis were built, of which five were converted into show cars by Pininfarina or Bertone; about ten still exist and they rarely come out in public. One turned up at the Villa d'Este concours some number of years ago and the video (click here) is a very good overview of the later version with one large headlamp each side and the chrome strip along the sill.
The Model Factory Hiro kit is on a par with the Ford P68 just completed, but it is such a beautiful car, and the kit is so rare, that I feel intense pressure to get it right.
So starting with the 'easy' bits: The engine is now complete. The 2-litre V8 had four cams, 16 spark plugs and two distributors, each supplying one plug per cylinder; with SPICA fuel injection, the Interweb states 230 hp at 8,800 RPM for the road version, and up to 250 for the race version. Not a barnburner by today's standards, but enough for a large number of period class wins as well as an outright win at the Targa Florio where small and nimble is a big advantage.
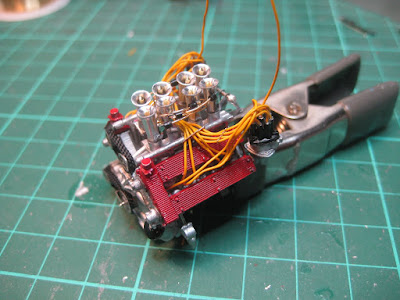
Plug wires are Detail Master 0.016", or just over 3/8" at scale, so a bit large but easier to handle than the 0.013" supplied with the kit. They also stand out more.
Fuel injection pipes are 0.013", 28 GA craft wire, with short bits of black tube to
join them to the photo-etched injectors. This is better than the clear,
relatively inflexible tube supplied, because it is easier to handle, but
not as realistic as a clear pipe.
Belts are made from microtape supplied in the kit. The throttle slides have bellcranks and a photoetched crank to pull on the fuel feed in the pump located between the banks of the V.
Overall I am quite happy so far. But I've usually found engines to be usually pretty easy; the challenge as always with these kits will be getting the chassis straight and snug enough to fit under the resin body. But I am deploying my new secret weapon, a new LED desk lamp with large 3X magnifier built in. So stay tuned!
A blog devoted to sharing my adventures building 1/24 (and 1/25) scale model cars, whether styrene or resin. Enjoy!
Monday, May 25, 2020
Wednesday, May 20, 2020
Ford P68: Complete (#12 for 2020)
Well, like a lot of MFH kits, this had some last minute surprises, for instance the enormous rear tires not fitting under the rear deck. At 30.5 mm, they correspond to 28.8" diameter at full scale which may be OK for a 15" rim, but the 17.3 mm width (16.5" at full scale) would appear to be wide.
Other body panels were also tight. The thickness of the resin allowed for some grinding, with improved things to a certain degree. The rear cover, however, is a lost cause. The photo below shows the best case.
There doesn't seem to be a lot of room to move the hubs inboard, although I suppose if I had been aware of this, I might have been able to shorten driveshafts and move things around by some fraction of a millimetre. Lessons learned:
1. MFH kits are always tricky
2. Trial fitting right through to the end is critical.
A bit disappointing, but that's life. Time to move on.
Labels:
1:24,
MFH,
Resin & Multi-media kits,
Stock builds
Monday, May 18, 2020
Ford P68: Front suspension, interior and trial fitting
Front suspension went together OK. I didn't bother piping the master cylinders and their respective bottles as it is all very fiddly, and won't be visible. If the bottles had been immediately above the masters, I might have attempted it, but they are on the chassis centreline with a significant offset relative to the pedals in order to allow for the steering column.
The little black screws provided for the uprights were replaced with #00-80 brass screws; heads were snipped off once I was happy with the location..
The radiator is well located by a couple of big dowels, but the photo-etched shroud is not quite right. A certain amount of dithering got it to this point.
The interior is pretty simple. A couple of toggle switches attached to the right side inner fender well forward of the gearshift lever were forgotten, and there was a structure under the dash that needed to go in about two steps before the instructions showed it going in. But as it doesn't show, the fact I cut it in half to get it in doesn't matter. Nonetheless this illustrates the key with these MFH kits: trial fitting is critical.
Speaking of trial fitting, the body components are all very snug fits over the chassis, and could use some carving out with an end-mill in the Dremel. The right side rocker doesn't quite fit over the battery; the forward body section doesn't quite fit over the radiator shroud; and the engine cover doesn't fit over the oil cooler or the rear tires which are probably way out of scale. The central cockpit seems to fit OK, however. Fortunately the panels are fairly thick resin and there is some room to carve away.
A very low, sexy little beast, and it took a miracle of packaging to get it all into the volume allotted. The fact the thicknesses of the resin parts are way out of scale is for the builder to solve.
So some more Dremeling is needed; then the red paint needs sanding and a couple more coats before decals and gloss coat can go on. Then onto final assembly: lights, glass, wiper.
Elsewhere the missing injector trumpet mesh guard will have to be sorted out, and the exhaust will need to be completed. I've scuffed the paint on the undercarriage with all the handling. The spare tire likely won't fit under the rear cover. And the big wingnuts holding on the wheels are too long, or I didn't push the driveshafts far enough into the transaxle. Just another MFH build... But a very neat kit. To Be Continued.
Labels:
1:24,
MFH,
Resin & Multi-media kits,
Stock builds
Monday, May 11, 2020
Ford P68: Engine and rear suspension
I have given up and decided to use the 4X desk magnifier, because it's just impossible to build these kits properly otherwise. Pride be damned, the eyes just aren't up to it anymore.
The engine has gone together nicely but is a very tight squeeze between the two rocker box extensions associated with the monocoque. Shortly after this car was designed, the concept of the stressed engine block became common, which freed up a lot of space for things like exhaust manifolds, which in the P68 follow a tortuous path around cylinder heads and driveshafts.
(The lost wire mesh cap over one of the intake stacks is visible, where I tried to make one out of a sheet of mesh I had lying around, but obviously other approaches will be needed.)
Next were the discs, each made up of six photoetched sheets and a cast hub.
The work is worth it but sadly the discs won't be that visible once complete.
Finally the bulkhead, with oil cooler and tank on the left side and battery on the right. Both involved piping and wiring. The braided piping supplied in the kit in particular was too big and inflexible. I decided to keep the piping but fixed the inflexibility issue by bending 1 mm brass rod to fit, then sliding the pipe over it.
Discs tended to be inboard of the hubs in a lot of the sports cars from that period.
The battery terminals consist of a terminal and a hexagonal bit of photo-etched sheet meant to reproduce a nut. I also discovered my #11 blade is mangled and needs to be replaced.
A bit of touch-up paint is needed on the battery, but other than that and the lost mesh intake cover, the rear is complete. So it's moving along, slowly but surely. Next: Front suspension.
Labels:
1:24,
MFH,
Resin & Multi-media kits,
Stock builds
Saturday, May 9, 2020
Porsche 904 GTS Carrera: Complete (#11 for 2020)
I built this kit a long time ago and I guess I foolishly thought it would be easy to build a better one, now that I have the benefit of much more experience. Sadly this didn't quite work out -- I got over-confident and a bit sloppy, and the old one (in red) is at least as nice as the new one.
The engine is better in the new car: wiring and detailing in particular, and the fact the original car would not have had quite so much chrome.
Paint and fit are better in the old car. The devilishly complex hinge for the rear engine cover doesn't close properly in the new car, and will have to be posed closed or open, but won't be movable. Perhaps I'll pose it with the lid removed. And I managed to damage a decal with too much clear coat, too fast. Of course both cars suffer from excessively large tires, which are a tight fit inside the inner fenders.
Car #86 won the Targa Florio in 1964, driven by Colin Davis and Antonio Pucci.
Well, on to other projects, with excessive faith in my own skills dampened. Perhaps a better build next time ...
Labels:
1:24,
Stock builds
Subscribe to:
Posts (Atom)