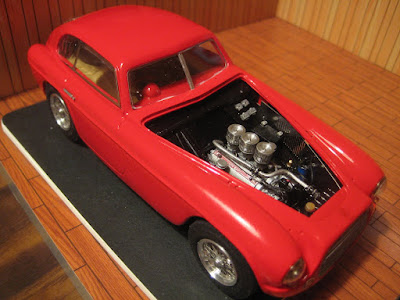
Squeezed another one in! and with 33 hours to go until midnight on the 31st, who knows what else I might achieve!
I started this one in April 2015, including a plan to cut open the door. The hinge was finalised in November 2016 and I got back to it in late December 2019. So I figured I needed to get moving as it's been on and off the Shelf of Doom for going on 5 years now.
Building the hinge, out of 0.5 mm rod inserted in a 1.0 mm tube, also required building a door jamb.
The challenge continued to be the amount of scratch building necessary, given the poor quality of the smaller resin bits. Some are misshapen lumps, others have hidden air bubbles that lead to failure as you are trying to assemble. And to top it off, I dropped the PE Renault badge for the grille and it has disappeared ... and I don't even have a carpet! The floor is hardwood. Bah.
The rear section is almost entirely gasoline tank, with the filler under a trap door in the roof. This shot also shows the lever shocks.
Yes, the steering wheel is meant to be crooked as the column apparently goes around the radiator, which is mounted between the engine and cockpit. (The wheel should be higher, though.) This just contributes to the cramped cockpit and the general lack of comfort due to the big stiff chassis, lack of front shocks, etc.
So while the kit was a challenge and the build is not one of my best, it is a unique kit of a very interesting automobile. I have flagged the contrast with the Miller before.
Overall it's a big brute and will lurk in the back of the display cabinet where the build flaws won't be so visible... the paint is meant to mimic aluminum sheet (glossy hood and undertray) and doped fabric pulled over a wooden structure (cabin).
Stay tuned! There's lots to come in 2020.
A blog devoted to sharing my adventures building 1/24 (and 1/25) scale model cars, whether styrene or resin. Enjoy!
Monday, December 30, 2019
Sunday, December 29, 2019
Renault 40 Record: Chassis
What a painful kit! nothing is doweled or pinned, nothing lines up, and the instructions are crude to the point of being useless. As well, some of the long thin resin bits have bubbles in them due to casting flaws, and break in half the minute you try to push them into a hole. So I gritted my teeth and got the suspension done.
The rear has friction shocks and quarter elliptics at an angle to the chassis centreline. The brake rods are a nice touch but required lot of fabrication with various bits of brass rod to make it work.
In front the tie-rod and its associated arms had to be pinned to each other and to the knuckles. It's a simple dropped axle, again on quarter elliptics, with no apparent shock absorbers and certainly no brakes. Twenty-four hours at an average 140+ km/h must have been hellish.
So anyway it's sitting on its wheels. (The piece of wire next to the left-side windshield post is excess hinge material for the door which will be cut off at the end). Next is the body and final assembly. One adventure to come is scratch building the structure for mounting the steering wheel to the dash, as there is no obvious approach using the bits in the box. Stay tuned!
Labels:
1:24,
Profil 24,
Resin & Multi-media kits,
Stock builds
Saturday, December 28, 2019
Renault 40 Record: Paint and interior
The hardest part about picking up a WIP, especially an oddball resin kit like this one, is figuring out, again, where stuff goes.
The paint is the original Tamiya AS-19 Medium Blue applied back in 2015 when I started this project. The hood and belly pan, which were sheet metal in 1926, have been polished and clear-coated; the cockpit body, which was fabric stretched over a wooden frame and doped, has been scuffed at 45 degrees to the centreline (matching the rough surface pattern molded into the resin) and cleared with flat clear. So the paint is essentially done, a good thing as I don't have anymore AS-19 Medium Blue lying around.
The floor pan and seat are assembled and ready to be installed. The dashboard is ready, with the exception of some unidentified gubbinses that may or may not surface eventually. I have found no period photos of the dash, and only one modern picture shows the interior through a side window.
Chassis bits will be scary. But the wheels are gorgeous.
This will look good next to the Miller 91, which was contemporaneous but light years ahead in understanding the importance of valve timing, specifically overlap, to engine power. The Renault was a 9.1 litre 6, making 130 hp at 1800 RPM; the Miller a 1.5 litre 8 making 250 at 8000 RPM. Double the power from a sixth of the displacement... granted the Miller had a blower, but the gain is still impressive even if power was equal.
Stay tuned!
Dino 206S: Final assembly (#15 for 2019, barely)
Well, this is some kind of record -- a resin kit complete in only 4 days! The fact the kit has no chassis or engine detail helped focus efforts on the dash and interior, and on the exterior finish. So while I would have loved to build up the lovely little V6, I am happy with this icon of Ferrari history on my shelf with the other Italian racers. And I even got the fiddly little PE wiper together!
Lovely curves!
Shades of the 3-litre V12 cars in the rear view.
Details of final assembly follow.
Seat belts are courtesy Scale Productions. These PE parts are a challenge as they are harder to cut than others, either because the sprue is the same thickness as the part, or because the metal is harder. Not my favourite PE supplier. I also used small pins and MasterClub MC435047 1.0 mm hex bolt heads to hold down the belts where it shows.
Decals are on and awaiting clear before moving on to the vacuum formed windows. Ugh. This is my least favourite part of multi-media kits. You can take a really nice build and ruin it in the last 2 minutes.
Decals are interesting in that you need to trim them close to the colour; they are not deposited but printed, probably with an ALPS printer or equivalent as you can see the track the printer head left in the white roundels.
The biggest issue, as always, was cutting the vacu-formed windows to exactly the right size. I am getting better at this but the white glue does tend to get all over everything.
Stay tuned! Who knows what's next. I should probably take this opportunity to finish up a couple from the Shelf of Doom. I may even manage a 16th between now and the 31st...
Labels:
1:24,
DDP,
Resin & Multi-media kits,
Stock builds
Thursday, December 26, 2019
Dino 206S: Interior
The dash is very well detailed, beginning with a photo-etched dashboard, continuing with a printed set of dials that goes in behind and shows through the holes in the PE piece, and finishing with a series of little toggle switches. It's amazing how the camera picks up little flaws ... the excess paint on the tach bezel has been removed since the picture was taken.
This photo without the steering wheel shows the rest of the cockpit, including the classic Ferrari shift gate. Again the photo makes it look pretty sad it looks fine without the blowup.
The steering wheel does not come with a Ferrari emblem, so I will root around in the parts bin to see what I might have.
Last step before wrapping this up will be seat belts.
Stay tuned! This is moving much faster than I might have hoped.
Labels:
1:24,
DDP,
Resin & Multi-media kits,
Stock builds
Wednesday, December 25, 2019
Dino 206S: Background and paint
This gorgeous little car placed second at the 1966 Targa Florio, driven by Jean Guichet and Giancarlo Baghetti, sandwiched between a pair of 2-litre 906s. It's the Berlinetta version; the regular 206S had what we would call today (ironically courtesy of Porsche) a Targa top, with just the roof section missing.
The kit is a resin curbside kit from Pierpaolo Pintarelli, who you can find on Facebook under DDP Models. I have a couple other kits of his (a Lola GT Mark 6 with the Cortina tail lights, and a 908/02 Spyder); this is the first one I've tackled. His selection of '60s and '70s road racers is extensive, eclectic and well researched; while he doesn't provide an instruction manual, the kits are relatively simple, the parts are well made and fit well, and his photo albums on Facebook document assembly well. Most recent was a Matra MS 660 from 1970.
Resin quality is very nice with only one or two pinholes, and essentially no flash, although the mold in this particular instance is a bit thin in places, so I will have to be careful not to break through. The three main resin bits all fit together nicely. Vacuum formed bits are a decent thickness unlike some resin kits where it's barely thicker than food wrap, and thus very easily damaged.
First step as always was a bath in isopropyl alcohol followed by a warm wash in Dawn soap.
The Duplicolor primer-sealer went on well but is a bit dark, and a couple of coats of Tamiya TS-8 Italian Red over it came up a little darker than I would like, so next was a light wet sanding (1000 and 2000 grit) to cut this back and also to smooth out the resin.
Tamiya white primer went on next. A run in the roof will need to be sanded out once it all dries hard in a couple of days, so that's it for now.
There are two distinct sets of period pictures of this car online; some show the car as here, others (including the link given above) show little scoops built into the doors and roof presumably to improve cockpit ventilation. I am guessing the former are shots taken in practice while the scoops were added for the race at the driver's request. DDP provides little scoops amongst the vacuum-formed bits, but I think I'll leave them off. The kit also includes additional nose tabs and a spoiler joining the two rear tabs, but the photographic record implies these were only used later in the season, at Nurburgring and other tracks.
Stay tuned! Could be #1 for 2020!
Labels:
1:24,
DDP,
Resin & Multi-media kits,
Stock builds
Monday, December 23, 2019
2019 in review: Completed builds
So here's a review of what I achieved in 2019... only a baker's dozen +1, but all were good builds.
1. Porsche 908/03
This was a long standing occupant of the Shelf of Doom. I started it in late 2013 and finished it in January 2019. This is not an easy first Model Factory Hiro kit. The body doesn't quite fit due to all the little white metal bits not quite lining up, but still I am pleased with this devilishly complex little beast. A highlight of the year. I have a 1971 version of the same car in the stash and hope to do better the second time around.
2. Chevy Ambulance
This build for a friend, a retired paramedic, was a lot of fun.
3. Ferrari 166 MM Berlinetta
What a gorgeous little car! And this MFH kit, while hard to find these days, is not a difficult build compared to the 908/03. The equally gorgeous Barchetta is in the stash.
4. Cheetah
This is an excellent kit from Historic Racing Miniatures, sadly no longer available. What a brutal little monster it was, compared to the delicate 166 MM. Nobody ever really mastered the vicious handling on the track, and its history includes a string of DNFs. Still, it's a visually stunning car and historically interesting as a "what-if" story. So this makes four kits completed in January alone.
5. 1955 Corvette Speedster
This is a mild custom inspired by Briggs Cunningham's Le Mans cars, even though Briggs' cars were '58s. Various bits from the parts bin, such as the steel NASCAR wheels and Webers, round out the carefully trimmed windshield.
6. 1964 Rover 2000 TC in Monte Carlo trim
Having owned two Rover 2000 TCs (of which one actually ran!), I felt I needed a kit, and this 1/43 white metal kit from K&R is probably the only one out there. The vacuum formed windows were a beast... Here is the entire fleet of 1/43 builds.
7. Honda S800 rat rod
I had a lot of fun building up the body from sheet styrene. The rat rod ethos means it doesn't all have to fit all that well. And the hypothetical straight 8 of 1.6 litres is a neat idea. The chassis is the Honda S600 with two independently sprung chain drive cases to the rear hubs.
8. Ford Fairlane
This was meant as a tutorial on decent paint jobs with rattle cans. It came out pretty nice if I do say so myself, with only a few dust specks to mar the finish.
9. Lincoln Futura, aka proto-Batmobile
This was a quick build as there is very little detail in this oldie but goldie. I lowered it and swapped the wheels for something a little meatier, otherwise it was out of box (including the pastel blue paint job).
10. Subaru BRZ
This Tamiya kit was a gift, so I built it up out of box. It has enough engine detail to avoid the dreaded curbside tag, but detail is poor. A good starter kit.
11. Honda N360
I got my hands on a 1.6 litre VTEC motor from Hobby Design, and spent a lot of happy hours with the shoehorn. (The original motor, poorly detailed, is an air-cooled 360 cc twin from the motorcycle parts bin.) And this is where things stood in May...
12. BMW 320i
... until I completed this build in September. The kit, which has relatively poor underhood detail for a Tamiya kit, came with photo-etched details and a set of decals for the car driven by Gilles Villeneuve at Mosport; European cars were sponsored by Jagermeister but this was not allowed under Canadian alcohol advertising rules. Unilock makes paving bricks for driveways and patios.
13: Lotus Seven/Eleven
This Profil 24 resin body for slot car use fits the Tamiya Lotus 7 chassis relatively well, but the result is not historically accurate as the Eleven never had the double A-arm front end or the Cortina 1340 cc motor, and the Seven does not have the de Dion rear end with inboard discs. So I chose not to use the 1957 Le Mans decals provided by Profil 24; hopefully Jean-Philippe will see fit to make a version with the Coventry Climax motor...
14: 1964 Ford Falcon Sprint in Monte Carlo livery
A fun build of an interesting historical footnote. The Trumpeter kit of the Falcon Sprint is quite nice and the V8 is a close approximation of the Holman and Moody 289.
Additions include an oil cooler from Scale Production, and racing mirrors from the parts bin.
Wiring includes voltage regulator and battery, both firsts for me.
Stay tuned! There is more to come. Meanwhile best wishes for the holiday season and a happy, healthy, safe and prosperous 2020 to you all.
Additions include an oil cooler from Scale Production, and racing mirrors from the parts bin.
Wiring includes voltage regulator and battery, both firsts for me.
Stay tuned! There is more to come. Meanwhile best wishes for the holiday season and a happy, healthy, safe and prosperous 2020 to you all.
Subscribe to:
Posts (Atom)