Wednesday, February 27, 2019

S800 Rat Rod: Body

There are two options for the body: One is to cut up the S2000 body, using either the nose or the entire body, but the other is to build a proper old school roadster body from sheet stock.


So the roadster started off with the S600 dashboard supported by a bit of brass tube.


Next was the cowl from the S600 and some sheet stock.


Strategic trimming uncovered the electrical relays and hydraulic cylinders on the firewall. Whether this is good or bad remains to be decided.


Quarter round stock contributed to the curved body panels. Single compound curves are actually relatively easy; it's the compound curves that are challenging.


Next will be some putty and sanding, followed by primer. Stealing the headrests from the S2000 was an easy decision.


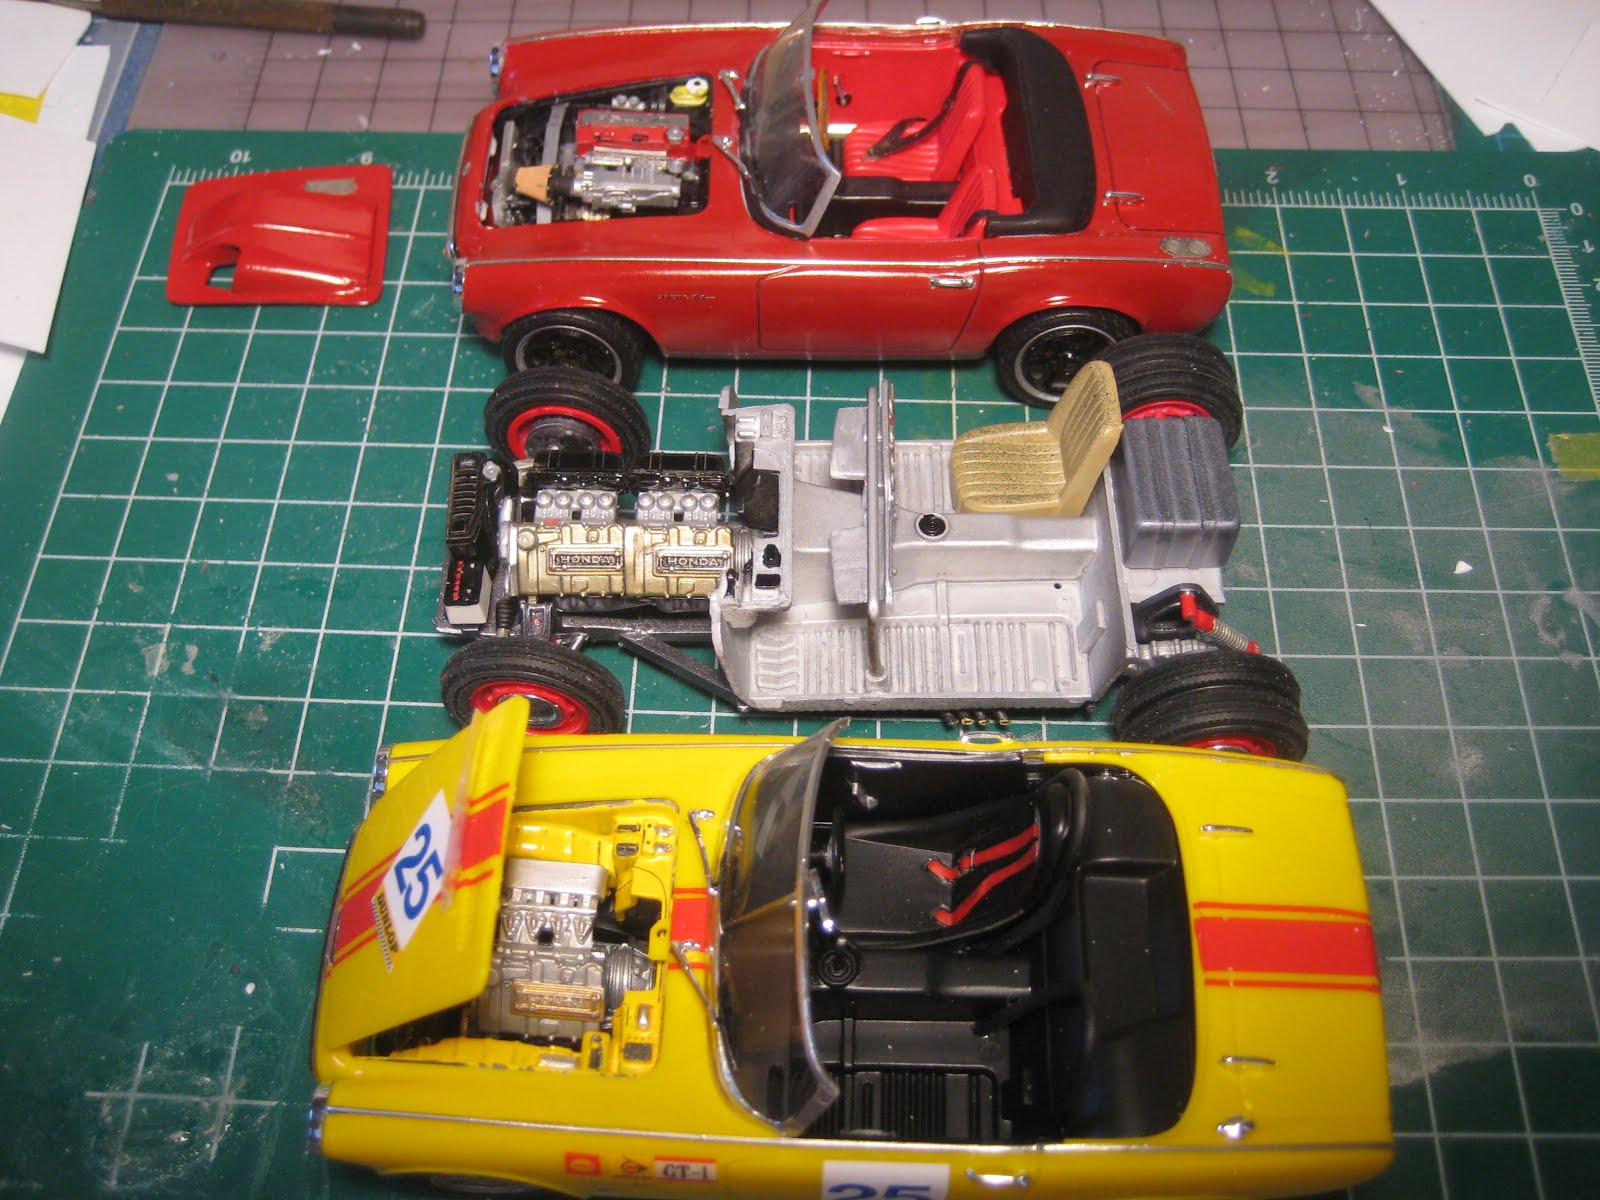
The issue of identifying a decent nose cone remains to be dealt with. With the radiator to one side and the battery on the other, something asymmetric makes sense. Stay tuned! 

Thursday, February 21, 2019

S800 Rat Rod: Chassis complete

A decent stance, not as low as some rat rods, but realistic given the exhaust pipes under the transmission tunnel.


The oddball rear suspension, consisting of two chain cases acting as trailing arms hanging off a chassis-mounted final drive unit, is visible in this photo. The floor pan at the rear may get cut away, to make room for a small Moon-type fuel tank, which will leave the suspension visible.


Dual rear wheels will cope with the extra torque of the 1.6 litre straight eight compared to the 800 cc four.


The wheels and rims are sourced from the Hasegawa VW van, and represent 25.5" diameter tires versus 22.5" for the tires in the S800 kit. This required lowering the suspension substantially, in order to not only keep the body at the original height but to lower it further. This was done by moving the brake drum backing plates upwards on the corresponding uprights or chain cases. While technically not quite feasible, the approach works in styrene. A modified upright at the front, and a different coil-over in the rear, would do this at 1:1.


Hubcaps came from an unknown donor to the parts bin.


The other two Honda roadsters: S800 in competition trim, and S600 modified to take the S2000 drivetrain. The rat rod is the same length, with longer wheelbase offset by reduced rear overhang.


Next: body work. Stay tuned!

Wednesday, February 20, 2019

S800 Rat Rod: Chassis and scratch-built exhaust

The engine is assembled and installed in the chassis. The added length corresponds to the length of the short block, only 15" at 1:1. 


The exhaust consists of two manifolds and collectors from the S800 kits, joined to brass side pipes. 


K&S brass thinwall tubing is lovely: the 0.5 mm rod is a snug fit inside the 1.0 mm tube, which in turn is a snug fit inside the 1.5 mm tube, and so on. 


So the collectors were drilled out 0.020" for a 0.5 mm pin; this was inserted into 1.5 mm tube with a short bit of 1.0 mm tube inserted to space it out.


Tube bending is made easy with the spring-type tube bender, which I have managed to bend permanently.


Stay tuned! More to come. 

Rover 2000 TC: Paint, decals, stance

After some minor problems with tape, the red went on OK.


The orange peel, which is quite evident in the photo below, was mostly wet sanded out with grits ranging from 3200 to 12,000, followed by LMG and Tamiya polishing compounds.


The stance looks good, although the interior door panels are too high and show above the door sills. (The colours in all photos are the same, just the lighting conditions have changed). 


Upper edges of the door panels, visible in the photo above as a white line just above the window sill, will need to be cut back. Time to get out the Dremel.


Decals are on as well, and the stainless steel trim has been painted with an enamel pen from Testor's. Once dry, a couple of coats of clear will go on over it all.


There are a couple of aspects of the build that are not quite correct. First, the interior of the kit is LHD where 4 KUE was RHD.


Another problem is the size of the numbers on the doors.


Period pictures, including Rover advertisements, show the numbers to be the size of the doors and extending slightly into the front fenders. The kit's decals are much too small.


All in all a relatively easy build so far, even given the small scale, with the majority of the problems being due, as is frequently the case, to my own impatience or sloppiness. The kit has its flaws but it is worth it to have a model of my own sadly deceased TC.


Next up: Final assembly, including lights, bumpers and glass. Stay tuned!

Monday, February 18, 2019

S800 Rat Rod: initial planning

Rummaging through the parts bin, I discovered I had two complete Honda S800 motors, and an S600 chassis. Brain Wave: What could be better than a 1.6 litre straight 8 in a stretched rat rod chassis? Out came the saw, and 0.600" of 3/32" square rod was quickly inserted into the chassis between the firewall and the forward engine mounts.


Next was gluing the two blocks end to end.


The stock air filters will get replaced with 8 intake trumpets. Rear suspension from the S600 is a pair of chain drives and while a nice IRS would be an interesting fit, the chain drives are suitably funky and may be retained. Ride height, wheel style, body, all this is still up in the air.


Stay tuned, this could get silly. The objective is to consume some of the boxes of spares and not open anything up that hasn't previously been cannibalised.

Sunday, February 17, 2019

Subaru BRZ: Birthday gift

In spite of my instructions that I wanted no presents, a good friend bought me Tamiya's BRZ, which of course I couldn't refuse.


It's molded in blue, and the colour seems to be distributed evenly enough in the styrene that the body could probably be polished rather than painted. The engine consists of a couple of big moldings, so either I detail this one to the extent possible, and go for the Out Of Box rules, or I'll hunt down one of the aftermarket engine and chassis kits. I'll probably go the OOB route, but I'll check to see what is available first.

So while I don't feel I need lots of presents at this point in my life, I'll never turn down a kit! Stay tuned!

Saturday, February 16, 2019

Rover 2000 TC: More paint, and interior

The lower body has now been painted a dark red, namely Milano Red from DupliColor. There will be a few blemishes to fix once it all sets; some of the problem areas will actually be covered by the stainless steel trim used by Rover instead of chrome.


This is pretty close to the colour used for the Corgi toy, which sadly is the only decent reference online. Period photos are largely black and white.


The interior is pretty accurate, from my recollection of the one I owned; this 1965 car was the prototype twin-carb model, and the production version had a nicer aluminum and wood-rimmed steering wheel.


The instrument panel, with its wood veneer trim, looks right but the gauge cluster does not, and I assume this is a rally-specific dashboard. Again the lack of photos online is a problem, and the kit appears to be missing a part called an 'instrument fascia'.


As always the camera is brutal in its honesty. At 1/43, the model itself looks a lot better than the photo implies.


The little window winders, door handles and door pulls are very fiddly, and several of the door pulls broke. Lots of fast setting CA glue inevitably found its way onto my fingers, but fortunately no further. My car had a proper armrest instead of a chromed door pull, but again this may be a pre-production version.


So next is to let the paint harden for a few days, then break out the polishing kit. Stay tuned!

Sunday, February 10, 2019

Rover 2000 TC: Paint

I have only been able to unearth one period colour photo of this car at the '65 Monte Carlo, showing a white roof and dark red body. (All body panels, including the roof, were bolted on, and I recall ads saying you could have a whole other set of body panels in your garage for, say, summer versus winter. But I digress). Sadly most colour photos online turn out to be of this kit, or of the Corgi version of it with the wrong hubcaps. Apparently the car is at the British Heritage Museum in Graydon, which I visited in 2001; if they had it on display at the time, I didn't take any pictures of it.


The photo illustrates the soft suspension leading to lots of squat on acceleration. Not particularly fast, but very comfy, and the leather seats were the most comfortable seats I have sat in up until the Volkswagen GTI came along. There are also some hilarious B&W pics online of it cornering, with so much understeer that it is trying to roll the inside front tyre off the rim.


Getting paint to stay on it was the usual problem, and after three or four trips to the acetone bath to strip it down and start over, I went back to the old favourite for metal, namely Duplicolor Primer Sealer. This fills in minor pits and scratches very nicely, and takes Tamiya rattle can paints well. I do not recommend it on styrene or resin, however, as I have seen problems with it; I would suggest sticking to the Tamiya stuff or primers that explicitly say they are for plastics.


So at this point I have the roof done with two or three coats of TS-7, Racing White; keeping my filthy big mitts off it for a few days while it hardens will be made easier by the fact I am heading out of town for a few days. Then I will tape up the roof and shoot the red, which will probably be Duplicolor Milano Red, a slightly dark shade of fire truck red. Stay tuned!

Saturday, February 9, 2019

Rover 2000 TC: Intro

And now for something completely different. 

My first car was a 1967 Rover 2000 TC. A while back I discovered that K&R Replicas in England makes a 1/43 white metal kit of the 1965 prototype that ran in the Monte Carlo, winning the two-litre Touring class and finishing 6th overall. So of course I had to have it. 


And while it is small, it is curbside so shouldn't be too difficult. (That last sentence has already come back to haunt me as I am currently on my third attempt to get primer to stick properly). Once done, it will sit on the 1/43 shelf next to my BRM H16 and a diecast 1939 Delage D8-120 Laundalette by Solido given to me as a gift some number of decades ago.


The car that ran in the Monte Carlo in 1965 was the prototype twin-carb (TC) model, with a pair of enormous SU's replacing the single unit on the regular car (which soon became known informally as the SC). This also required a new cylinder head, as the inlet manifold on the SC engine was cast into the head with only one inlet port. And as the head is just a flat milled surface, with the hemispherical combustion chamber cast into the tops of the pistons, the 10:1 compression ratio was obtained with new shallower pistons. In turn the 10:1 ratio required 100 octane fuel, which is not to my knowledge available anywhere anymore, except possibly at airports servicing piston aero-engines. I recall Sunoco used to offer it at some stations at exorbitant prices.  


What was it like to own? Well, with a de Dion rear axle and 4 disc brakes (inboard at the back), the handling and braking were superb for its day. Suspension was at the cushy, Jaguar end of the spectrum, rather than the ultra-stiff German approach, but without being a wallowing pig like my '78 Dodge Monaco. Lean in corners was substantial but it cornered well, the significant levels of understeer being due to the lack of sufficient power to break the rear end loose. Inside it was all leather seats, wool carpets and wood trim, with a lovely big wood-rimmed steering wheel on two aluminum spokes. The vent windows, one in each door, were opened and closed by gorgeous little stainless steel 4-bar linkages, the doors closed with a solid, gentle 'thunk', and all the switch gear felt like it was machined from billets of titanium. As befits the popular moniker of 'the poor man's Jag', however, the wood was veneer, not solid; and the 120 horsepower on tap was not really all that much given the substantial avoirdupoids. Certainly 3.8 Jag sedans were a lot faster. The close-ratio four-speed box and 4.11:1 final drive ratio, while providing some useful oomph in getting away from a stop, conspired with the peaky torque curve to require 4500 RPM for cruising at 120 km/h, right in the primary vibration zone of this highly stressed little four cylinder. And the less said about the Lucas generator and voltage regulator, the better. The later 3500 S, with the Buick-Olds-Pontiac 215 cubic inch aluminum V8, was far more civilised, even though it retained the Lucas electrical system and swapped the conventional American carb for a pair of SUs. The last 3500 model, which featured a different body with a hatchback, was fast but represented a step backwards with the return of a solid axle and a bunch of new British Leyland quality control issues on top of the usual Lucas worries. 

So the kit, which is mainly white metal, is being prepped and primered. Stay tuned! 

Friday, February 8, 2019

'55 Vette Speedster: Complete (#5 for 2019)

Well, I've done better. Realistically I should have stripped the paint off and started over, but I decided to cut my losses and finish it up. The kit has its challenges, and building it OOB would be a challenge, so while it is not up to my recent standards of finish, it is better than the kit.


The full rack of Webers is pleasing and well suited to the 283; Weber never made carbs for really big engines which is why Ford went to Le Mans with Holleys on the 427, but they did make carbs for Ford's 289.


The sidepipes are almost too subtle, after the struggles I had getting the headers in between the block and chassis. Another 1/8th of an inch in length would probably have been smart.


I do like the simplicity of the shape, when side trim and bumperettes have been deleted. There is a bit of the Buck Rogers design ethos here.


The front and rear views are particularly simple. Kudos to Chevrolet for the glass headlight covers, which the NHTSA outlawed some time later, about the time that the E-type Series II was coming to the US.


The little cut-down screen, slightly higher in front of the driver, mirrors a generation of Italian barchettas and English roadsters, not least the D Type. And the continuation of the rear deck into the cockpit, along with the stripes continuing from the hood onto the dash top, emphasise the fact that this car is not meant to have a top, of any sort, at any time. If there was any doubt, the absence of windshield wipers will settle the matter: When it rains, you should just go faster, so the drops go over your head. Vroom!


What's next, you say? Hard to tell, stay tuned!