Thursday, November 29, 2018

Subaru Sambar: Chassis

As a break from the two American trucks on the bench, I decided to tackle Aoshima's Subaru Sambar. The kit comes with a flyer for the 2011 Sambar recognising 50 years of production. Prices are listed as well, ranging from 899,000 Yen for a basic 2WD truck to 1,408,950 Yen for the fully loaded 4WD version of the van. The kit models the 4WD truck which (if I interpret the flyer properly) went for just over 1 million Yen for the 5-speed version.


What a detailed little kit! Some Aoshima kits are pretty basic but this one involves plenty of teensy weensie little bits. A certain amount of fiddling arises due to the very small dowel and socket joints.


The present version has a 658 cc inline 4 making 48 hp. It's mounted transversly and tipped over on its side, behind the rear wheels. The cam cover and spark plugs face rearwards. 


The 4WD system is well modeled. The chassis includes a large number of coolant and other pipes from front to rear.


The inevitable comparison with the Suburban shows the huge difference in size, which is actually worse in real life because the Suburban is 1/25 while the Sambar is 1/24.


The chassis is essentially done. Stay tuned!

1955 Suburban: Paint

Constant readers (if any) will know I've had my share of problems with paint on resin in the past. Typically half the problems (at least) have been self-inflicted ... anyway this time it all seems to be working out, and I am letting it all sit for a few days before touching it again.


I am debating painting the remaining metal bits (fender flares from the Toyota; visor, bumpers and grille from the Cameo) in contrasting white, or in red to match the window surround. To be continued.


Tuesday, November 27, 2018

1955 Suburban: Interior

The interior is a hybrid of bits from the Toyota Hilux 4-door, the Chevy Cameo 2-door, and some scratchbuilding for the rear section in what was the Toyota pickup body.


The truck will be Tamiya Blue TS19, with a section around the windows in Tamiya TS8 Italian Red. The red has been shot in the picture above; I'm letting it dry before taping and moving on to the blue. A bit heavy, perhaps, but this (along with white) maps the Icelandic flag. There will be a visor and fender lips that I may paint white to contrast.


The interior is Testor's Flat Sea Blue, with Gloss Light Blue as an accent. Most of it is from the Toyota, but the dash and steering wheel are the classic 1955 Chevy items. The third rear-facing bench seat came from the parts bin. 


A lot got done today, more than appears from the pictures. The next big item is getting the paint onto the resin body. No problems so far, but I've never really gotten a decent result in the first pass, so stay tuned.

Monday, November 26, 2018

Chevy Ambulance: Cab and chassis

The drivetrain and two sections of the chassis are now complete, except for details like shock absorbers. (The chassis had to be cut in half, because the wheelbase of the ambulance box + cab is a bit longer than that of the Chevy Rescue Van. Once complete, a piece of styrene square section rod will be fitted.) The heavy duty truck wheels have been mounted on the rear axle, and the rear section of frame has been spaced up to allow it all to sit nicely in the wheel well openings.


At the front, the floor pan went in along with the engine cover.


Without an opening hood, the engine is now pretty well invisible. Even with an opening hood, there wouldn't be a lot to see.


I scratch built a track rod so it would steer. The bolts are #0-80.


From a height perspective, the new truck tires don't fit under the forward inner fenders.


In order to fix this, the floor pan got lifted off the frame by 3/16" (about 4.5" at scale). It's at a point where I can verify the stance (good) and the relationship between the cab and the ambulance body. Before gluing it all down, I may look at adding another 1/16" to the stack of styrene under the cab, as the front wheel is quite snug in the wheel arch.


With the cab and chassis essentially done, next will be to do some more cutting of the box. The curbside door will get opened, along with a large hole in the roof so I can reach inside with my big mitts and put stuff in there. This will get covered with a sheet of clear once done. I'll also open up an internal door between the cab and box.


I am debating installing internal mini LED lamps, with the battery pack glued to the underside of the chassis, to highlight the interior. Decals remain a challenge which I have not addressed yet. Stay tuned!

Wednesday, November 21, 2018

Chevy Ambulance: Chassis and engine

A lot of things up in the air here, as I get started on this project for a close friend, a recently retired paramedic.


Height of the ambulance box relative to the chassis: The box has to be high enough off the chassis to allow the dual rear wheels to sit nicely inside the wheel wells. It looks like a 0.060" spacer made up of sheet glued to the bottom of the flimsy box floor, followed by I-beam and flat stock totalling 0.375", will do nicely. The rear floor section from the Chevy can then be deleted, except for the gas tank and (perhaps) the inner fenders.


Amount of the floor to remove from the rear of the cab, and height of the cutout between cab and box: this is going to require that I build up the engine and interior. In turn this required stripping chrome off a bunch of bits that would not have been chrome on the ambulance, such as air cleaner and valve covers. So things are snowballing ... while waiting for the Easy-Off to remove the chrome, I got brave and sliced up the cab.


Chopping stuff up is exhilarating. Progress can be quick, but the risks are high if you cut too much off ... I seem to have got this one straight, at least.


Fit of the 8-lug wheels and associated tires (from Scenes Unlimited) in the Chevy wheel well also needs to be verified. They are nice big tires and clearance may need to be reviewed. Stay tuned!

Tuesday, November 20, 2018

1955 Suburban: cleaning up yet another resin body

I've documented my unpleasant encounters with resin in the past so I am under no illusions that this will be painless. This is my first Jimmy Flintstone body, and while I have seen people on Facebook claim they are great, I would dispute that.

After a lot of scraping and filing to remove flash, lumps, excreta and other flaws, I washed it carefully in isopropyl alcohol, followed by an extended bath in warm water and dish soap (the kind that has no hand cream in it).


We interrupt this blog post for an Occupational Health & Safety Note: if you are going to use your Dremel on resin, you will be well advised to wear a breathing mask, and to wipe down your entire workspace with a damp rag afterwards. This is also true, although perhaps less so, if you are manually dry sanding or filing -- anything that generates dust needs to be managed carefully. Once done, you'll also want to wash hands and face, and get your clothes into the washing machine. The dust is NOT good for you.

And now, back to our regularly scheduled programming. There were no obvious large brown boogers floating in the alcohol, so either they are still embedded in the body, or there weren't any to start with... The body is porous but at least there are no obvious sinkholes. There is a crack in one of the front fenders that will need filling. A test fit shows that the rear fender opening on the right side sits marginally forward compared to the left side, meaning a shorter wheelbase on that side. I'm not sure the photos show it, but it is pretty obvious.


I am aiming for a more level stance, so I am hoping that sitting the body high enough will mean the wheelbase discrepancy won't be too obvious when completed.


It is of course possible that my build of the chassis is off, but careful measurement shows that this is not likely to be the case. It is hard to build one of these Japanese kits so poorly that he wheelbase would be off by a scale inch.


Next will be some Duplicolor primer sealer, but that will require waiting for the snow to stop. The adventures in resin are only beginning; paint has always been a challenge. Stay tuned!

Thursday, November 15, 2018

1955 Suburban: engine and chassis

The engine from Revell's Pontiac 421 went together as well as can be expected. These are not the cleanest of molds, and the triple carb manifold in particular is pretty poor. I rummaged through the parts bin and found a Ford manifold with room for two Holleys, which are still pretty poor but better than the tri-carb setup. Of course this means the distributor is in the front ...


The Toyota chassis went together well, and mating the 421 to the bell housing for the Toyota gearbox worked well. (In real life I expect the Toyota drive train would not stand up to the 421 for long, but this is styrene at 1/24, so no problem).


The Aoshima kit comes with some spares, such as shorter shocks, lower profile rear springs and shorter uprights, all obviously for a less aggressive version.


As expected the wheelbase is just about right! The tricky bit will be mating the resin body to the chassis and interior.


The Toyota wheels are nice but I may be looking for a proper set of steel 4X4 wheels.


The resin body will be the usual challenge, starting with the crack in the left front fender. Stay tuned!

Tuesday, November 13, 2018

1955 Suburban Off-roader

Back in early 2017 I described seeing serious off-road vehicles while on a trip to Iceland (click here). This built on observations during an earlier trip, this time in 2015 (click here), which convinced me to build something similar. The key challenge was going to be the tires, which are big but not as big as a Monster Truck tire.

My first thought was it would be really cool to build up a copy of ICE 3, which I rode up into a glacier. This brute is based on a surplus NATO missile launcher and appears to be essentially unstoppable, but sadly there are no 1/24 kits of NATO missile launchers out there. There appear to be several in 1/35, at fairly steep prices; I may one day buy one and pretend it is 1/24 by changing up engine and cockpit, as with my snowplow, but that is a tale for another day.


Controlling tire pressures from the cab is critical to making regular progress. See how soft the front tires are in the picture below.


The 5-axle Mercedes Class 8 was also cool but a lot of time would have been spent on making seats.


Attention then turned to the more common approach of modifying a road vehicle. There were lots of examples on the roads in Iceland, from Mercedes busses to Land Rovers, Japanese 4X4s and full-size American SUVs. The Ford Expedition seemed to be a favourite.


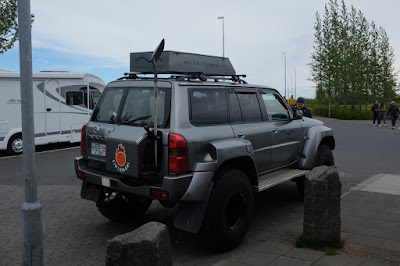
I witnessed this Nissan being flogged up hill through deep wet snow and was impressed by the vehicle and the driver. A good thing too, as he was carrying our food and sleeping gear!


Crawl speed, with tires deflated as much as possible without breaking the bead. Watching wheels begin to slip, only to be brought into line by a set of three very limited slip differentials, was very entertaining. 


Clear of the snow, for now, and the tires re-inflated to gravel road levels. Dinner was waiting for us when we got to the mountain hut. But I digress.


Coincidentally I had Jimmy Flintstone's resin 1955 Suburban in the stash, so I ordered the AMT 1957 Cameo to serve as a donor. I started looking around for big tires, and eventually came across Aoshima's jacked-up Toyota Hilux 4X4, which saved me the trouble of kitbashing the Cameo suspension. And there things stopped for a while, probably in late 2017.


So the plan is now to build up the Toyota chassis and interior, fit the Suburban to it along with a decent motor (the Toyota is curbside), and scavenge a few bits from the Cameo (firewall, hood, windshield, grille, lights, maybe bumpers).


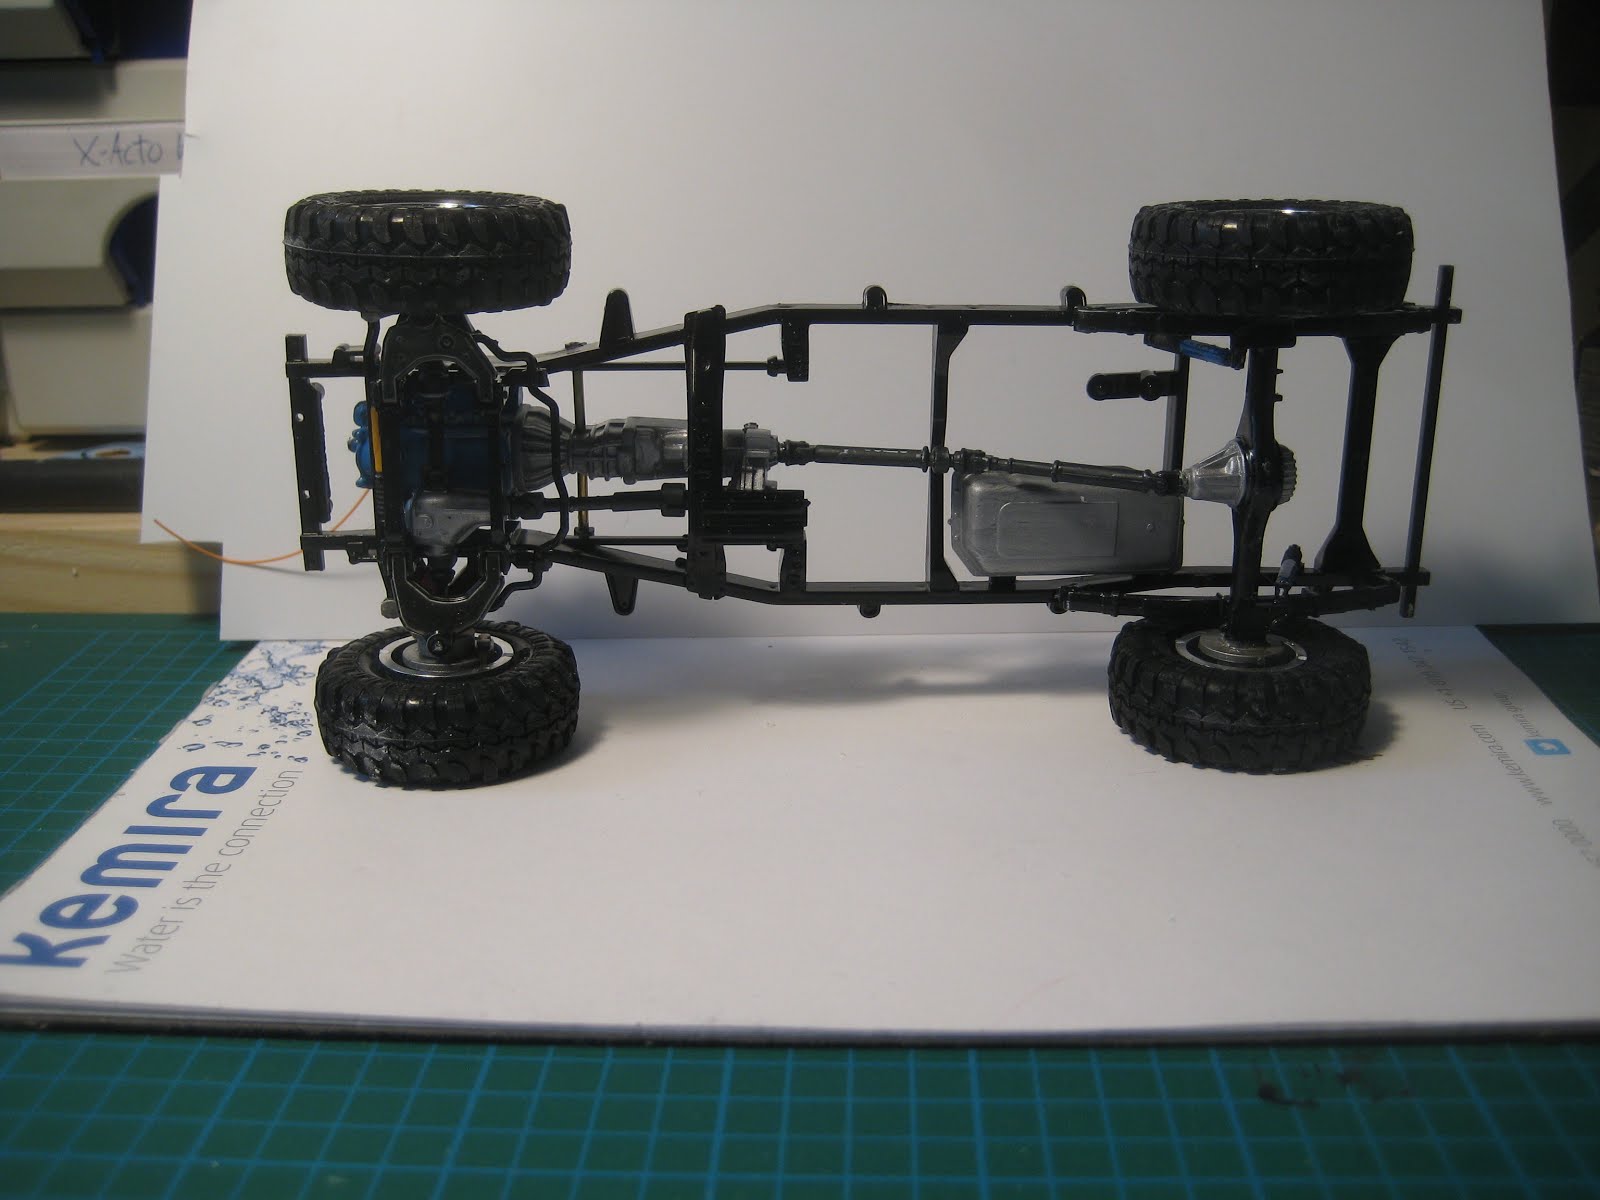
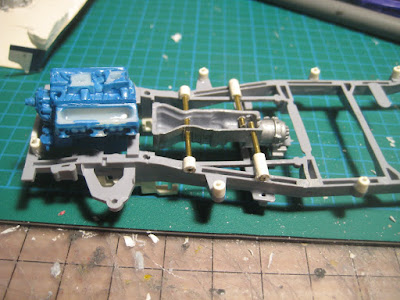
First step was a bath in oven cleaner to strip the chrome off the Toyota chassis bits and the Pontiac 421, which I intend to build up on carbs. (A blower would be overkill in this situation). The old Revell Parts Packs are of relatively poor quality once the chrome is off, and I rummaged around in the bin for a better manifold than the lumpy tri-carb unit provided. The one I found was from a Ford, with a pair of double-pumpers and with the distributor in the front, but that's OK, it'll do. Look, they're all big block V8s, so who cares?


Second step was to fix the transmission relative to the chassis, because once the oil pan is cut out to make room for the 421, there would be no way of determining where the transmission goes in terms of height or longitudinal position. I did this with pieces of 1/16" brass tube inserted into 1/8" styrene tube, which was in turn glued to the top of the frame. The rod can stay once it all goes together, or not; the floor pan is raised off the chassis on a series of little spacers, so there will be plenty of room for my improvised transmission mounts.


Still undecided on using the clutch housing from the 421 or the Toyota. The Toyota will likely be less work.


I'll look around for other '55-'57 Chevy pickups as well, as the Cameo is a nice kit and it would be a shame to cannibalise it for only a few bits; AMT had a 1955 Stepside which seems to be relatively available. Stay tuned!

Monday, November 12, 2018

Alfa Romeo TZ1: Complete (#15 for 2018)

Well, it's done, but I'll be the first to admit it's not perfect. Problems, as is frequently the case, arose with the vacuum-formed clear plastic and the photo-etched window and headlamp surrounds that go with it.


I suppose it isn't as bad as I feel it is; it certainly passes the 3-foot test, and is a decent build all told.


The hinged front hood works particularly well and is a major step up from the little nubs the hinge was supposed to hang on.


The engine looks good from both sides, and the fact it isn't tipped over quite as far as it should doesn't really show.


This was meant to be an entry into a Model Factory Hiro contest build, run by a Facebook Group dedicated to MFH kits, but it is clearly not a winner. I'm reconsidering entering this or starting another MFH kit; but with a December 31 deadline, there will be some urgency and I know from experience that urgency is the enemy of quality.


In any case it is a nice addition to the little (and no-so-little) Italian screamer category, in both road and race categories.


So what's next you ask? Good question. Stay tuned!