Wednesday, November 30, 2016

Renault 40 Record: door hinge

The last time I mentioned the Renault 40 Record was April 26, 2015, over 18 months ago. How time flies when you are having fun... The kit, a curbside resin item from Profil 24, comes with both doors molded in, but includes a left-side door for keeners wanting to open it up for display, saving you having to preserve the old door for re-use. So I got brave and cut out the old door, then set it aside as life intruded.

Fresh from successful fabrication of door hinges on the Citroen H van, I decided to have a crack at hinges for the 40. Rather than individual barn door hinges, which are fragile and need to be lined up, I went for the admittedly inauthentic approach of a piano hinge, made from 1 mm brass tubing (0.225 mm wall thickness) with a 0.5 mm brass rod as the hinge.


Long story short: it took about three tries to get it right. In the end I cut two short pieces of tube, glued to the top and bottom of the door, and one longer piece in the middle glued to the jamb. Butting the round stock against a relatively flat surface is not exactly the best way to make a strong joint, and I attached small strips of flat styrene stock to each hinge section to increase the gluing surface area. The hinge rod in the pictures has not been trimmed, so the door can still be taken off for doing the interior and other things; I'll trim it flush only once it is all done.


With the door sorted out, I can now get this oddball LSR car back on track. It will sit next to a handful of other prewar racers of historic interest: Alfa Romeo 2900, Miller 91, Blower Bentley, Auto-Union Type C. Yes, a Type C!


The Auto-Union is from a resin kit maker I had never heard of before: Fernando Pinto is a Spaniard who makes obscure F1 and early '50's road cars. The Porsche-designed supercharged 6-litre V-16, in a mid-engine chassis, was way ahead of its time on paper, although the handling was reputed to be challenging. Lesser drivers were unable to handle the combination of power and oversteer; the cars were driven to wins by greats like Nuvolari and Rosemeyer. I am looking forward to seeing the kit and parking it next to HRM's Miller 91, with its 1.5 litre supercharged 8.

The kit includes some very nice wire wheels, and a couple of metal items (steering column, pushrod tubes) are molded directly into the resin. Otherwise it is the typical resin kit, with lots of flash to be removed.


Wednesday, November 23, 2016

Citroen H van: door hinges

While looking for ways to avoid tackling the stack of resin again, I poked around the stash and came across the Citroen H van, a post-war commercial delivery vehicle based on the Citroen 11. Ugly as can be in its crude, corrugated sheet metal livery made largely of flat pieces, it is technologically very advanced with FWD and a rear twist beam axle that allows a very low, wide load floor. Spare tire and gas tank cleverly fit ahead of the rear wheels against the inner wall (gas on the right, spare on the left), contributing to the massive amount of useful space for the size. Issigonis may, rightly, have bragged about the volume to footprint ratio of the Mini in 1959, but the French had been playing the same game for some time already. Of course the Mini was fun to drive.


The kit, from Ebbro, is a curbside which means it can be built pretty quick. I decided to hinge the suicide doors, which, as delivered, can be posed open or shut but not operated. This involved brass rod of 0.5 mm diameter sleeved inside brass tube of 1.0 mm OD and just under 0.25 mm wall thickness -- the rod is a nice snug fit inside the tube. It also involved a little too much crazy glue, but that can be fixed.


This approach to door hinges will come in handy on Profil 24's 1926 Renault NM record car, where I previously tried the Scale Auto Magazine trick of short bits of brass rod wrapped in thin brass sheet, with little success. At this point I have made the mistakes on the H van where they can be fixed, and hopefully it will all work better on the Renault.

Next will be getting the sliding side door to slide, and hinging the three-piece rear doors (upper hinged tailgate, and two small doors hinged left and right). Paint will probably be grey primer with a clear coat, or at most with a pale grey semi-gloss top coat -- you could have these in any colour as long as it was pale grey.

The van is short but quite a bit wider than I would have imagined for something meant to navigate narrow Paris streets. It's on a par with my AMT Ford Skyliner, which admittedly is a bit smaller at 1:25. Of course everything is big next to the Mini...


Tuesday, November 22, 2016

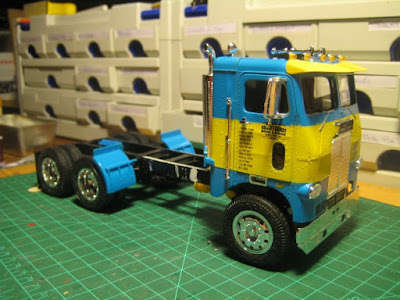
Freightliner complete

The Freightliner is now complete with the boom from Italeri mounted behind the cab.


The Italeri kit includes a great set of add-ons for any serious modeler of Class 8 trucks. Apart from the boom, there are deck plates, exhaust systems and step plates galore. The boom is the only component requiring assembly, and it goes together well, with one caveat: each component sockets into the next, so the order of assembly is critical and is not reflected in the sheet, which is simply an exploded drawing. Start with the hook at the end of the boom and work your way back to the mounting structure and hydraulic tank, and there should be no problem. Pay particular attention to the lovely 4-bar mechanism before gluing any bits together here.


The photo below shows the Freightliner and the Unimog, both with Italeri booms; this is where the difference between 1/24 and 1/25 becomes obvious as the Freightliner (in 1/25) seems small next to the Unimog (in 1/24). In both cases the boom is quite large compared to the cab, and I have a feeling the true 1:1 unit is a better fit between the mirrors.


So this finishes off a series of relatively quick builds required to complete stuff I had started over the last couple of years prior to retirement.

One of my better builds, you ask? Not really, as I was in a hurry to clear some of the opened boxes, and the arrival of the SD chassis, with its short day cab, allowed me to build the utility vehicle you see here. So close examination will reveal some sloppy paint and glue lines. Also the Tamiya yellow is pretty pale next to the bright yellow of the Italeri components.

What's next, you ask? A difficult decision. The list of started but incomplete stuff includes mainstream styrene racers (Tamiya 956, Revell BRE 240Z), custom builds requiring further planning (Freightliner Allison hot rod, 956 pickup truck), and resin (MFH 908/03, and DBR1, Renault NM Record and Audi S1 from Profil 24). There are also a number of items that are stalled, and probably for good reason. Certainly the 956 and 240Z should be relatively quick, but quite frankly I have been avoiding the resin and perhaps I need to get back to this before clearing kits becomes a chore. With one complete resin/multimedia kit under my belt (the Abarth), I can see that they are not impossible, just different; a different mindset is needed.

Meanwhile I need to rearrange the display cabinet, as the Freightliner and Mog are taking up an entire shelf all by themselves. This is called playing with my toys ...

Saturday, November 19, 2016

Freightliner update

The Freightliner is essentially complete, except for gas tanks and battery boxes that need to be installed after the Italeri boom goes in -- the stabilising legs for the boom will interfere with the standard gas tank locations.


This is an amalgam of the two recently re-released AMT kits: the dual-drive tractor with the sleeper cab, and the single-drive tractor with the day cab. I've put the day cab on the long, dual-drive chassis so as to make room for the boom immediately behind the cab.

The kit is disappointing for an AMT kit. It's all pretty sloppy: there are no part numbers on the sprues, and the sprue is typically very thick where it meets the part. This is a particularly big problem on chrome parts where simply removing the part from the sprue leaves a big white scar, frequently in a visible spot. As well, a lot of parts are not doweled and it is easy to assemble things in the wrong location. Finally the tilt cab hangs up on the gearshift lever, which stays with the chassis; this is not major but you do need to be careful to line it all up properly. Altogether this is not a problem for an experienced builder (I built this one as a kid in the late 1960's), but it is clearly not beginner material.


As the boom controls are on the left side of the truck, I've left off the left-side exhaust. I also shortened the exhaust pipe, adding a bend from the Italeri kit, because I figure no one wants to tangle the boom up in an excessively long pipe. (European trucks all have exhausts at curb level, under the chassis). I'll post again once the boom is complete and tanks have been installed.


I've always liked the look of these big cab-over trucks, especially with the visor pulled down low -- they almost look chopped, and flat black or a dark grey would look neat. I chose some less menacing colours here. The remaining bits from the second kit will serve for the Allison-powered rat rod, where the flat grey paint will come in handy. Stay tuned.

Thursday, November 17, 2016

And now for someting completely different: 1949 Chris Craft 19' Racer

This one turned up from Micro-Mark today. I ordered it for a couple of reasons: it looks cool, it's the right scale (1/24), and I have never worked with wood before. I presume it should be easy to open up the deck and shoehorn a flathead in there -- I've got one with Ardun OHV heads that's just looking for the right spot, although this one has some sort of flat-head 6 in it. We'll see how it goes ...


The manufacturer's website, www.dumasproducts.com, lists three other Chris Craft kits in 1/24 scale, all added to the catalog in 2006. I am not sure how many they might still have in stock, although the bits are pretty simple -- three thin laser cut sheets, a bunch of thin planking, and a small handful of urethane resin deck fittings -- no complex and expensive tooling for injection molding in styrene. I can't imagine it would be too difficult to make more. Most of the website is devoted to boats and planes, in 1/8 as well as a range of oddball scales, all suitable for RC projects.

Tuesday, November 15, 2016

Skylines: Three down, one to go

The Prince Skyline 2000 GT (model S54B, for the pedants) is complete. The kit involved some chrome bits which attach to the tree through a visible part of the bit -- not a major issue except the chrome is over black plastic, so the little scar where you cut it off is quite visible and requires fixing, either with silver paint or bare metal foil. Apart from that it all went together well, and the lack of an engine is the only major disappointment.

KPGC10 and (incomplete) S54B.

S54B and KPGC110.


Clockwise from left: KPGC10, S54B, KPGC110, R32.
The missing one is the third in the series, model KPGC110. This is a full kit of the ugliest one of the lot, looking like a Datsun 610 steroids (which is what it probably was, to be honest). The second one (KPGC10) and the most recent one (R32 through R34) are quite attractive. Keep an eye out and you will see right-hand drive R32-R34s on the streets in Canada; I have never seen a KPGC10 which was apparently built in small numbers and which therefore fetches a bundle today.

Friday, November 11, 2016

Freightliners: planning stage

It's amazing how many stalled kits I can get completed now that I am retired! So after the 300 SL, on to something bigger. I have two Freightliner kits: a single-drive (SD) chassis with a short cab, and a dual drive (DD) with a sleeper cab.


The SD chassis has been modified to take an Allison V12 aero engine, but the whole thing sits way too high to be a proper rat rod. More cutting is on the horizon. Also the body ought to be something more or less aero, for instance the general shape of a Spitfire, not the barn door shape of a Freightliner ... so this will require some planning.


Meanwhile the long-wheelbase DD chassis is essentially complete and with the arrival of the SD, I now have the choice of cabs. I am going to put the short cab on the long wheelbase, and maybe I will build some form of platform instead of the fifth wheel. This could also involve lengthening the chassis.


In particular I have another copy of Italeri's truck accessory kit, the one with the boom that I already mounted on the Unimog, so whatever develops is likely to have a boom on it. Stay tuned ... I have an entire shelf set aside for trucks, and there is really only the Mog in there now. Other unopened boxes include Krupp and Büssing models from Revell Germany, a Bedford from Emhar, Italeri's well-regarded Volvo F12, Ford C600 stake truck and LN8000 race car carrier, and the Dodge A600 with the Little Red Wagon on a trailer.  There is even a Jimmy Flintstone White COE cab that needs a chassis. Lots to keep me busy. So enough blogging and back to the bench.


Thursday, November 10, 2016

MB 300 SL completed!


I resisted the temptation to build a 300 SL Tourer, as illustrated here, because the fabrication would be complex. Not only does the existing roofline slope steeply towards the deck, but it also curves inward over the trunk lid immediately to the rear of the doors. An entire new kit would probably be needed to provide a donor roof to the Tourer. I did some fooling around with digital photography to see what it might look like, and decided it is a neat idea but for another day.


So after much dithering, I went for the silver paint (Tamiya Gloss Aluminum). Black would have been pretty mean-looking but non-standard; as it is I am leaving off the bumpers and have put on black Rudge knock-offs from Historic Racing Miniatures.


The metal transfers went on well, as did the decals, and I decided to paint the black door and hood surrounds rather than struggle with Bare Metal Foil. Some days the BMF goes on nice and easy, other times it turns into a series of little wadded up balls of frustration. This time getting the right amount of paint on the tip of a small brush and flowing it into the groove worked really well.


The rest of the window surrounds are meant to be chrome silver, but with a Gloss Aluminum paint, I decided not to bother. The only exception was the quarter windows where the silver window surround needs to be put on the glass. Tamiya helpfully provides a mask, which is a relatively poor fit, but given the portion needing paint is raised, I held my breath and free-handed it. The trick as always is getting the right amount of paint on the brush, and letting it find its own way due to the conflict between viscosity and surface tension. I use Testor's bottles and I have gotten used to the way different colours work in this respect.


Speaking of Testor's paint, a major panic was averted when my thumb full of Testor's paint got on the driver's door ... the solvent for Testor's is paint thinner while the silver paint is Tamiya, for which the solvent is alcohol. So crisis averted. However, I do need to stop putting my thumb full of paint on recently completed bodies.


All in all a very enjoyable kit that will reward a talented builder without frustrating a beginner.

1964 Prince (Nissan) Skyline 2000 GT

While waiting for the paint to dry on the 300 SL, I dug out the Fujimi curb-side kit of the original Skyline, designed and put into production by Prince just as Prince was being acquired by Nissan. This unassuming 4-door is completely nondescript except for the twin-cam six which is unfortunately not modeled.


At some future date I will get around to the later 2-door GT-R, also by Fujimi, which has a well modeled six but a molded-in hood! I am not sure what they were thinking. And the plastic is very thick, so cutting out the hood will be a major challenge.


Anyway progress on the 2000 GT was quick since there isn't much to do underneath. A solid rear axle on leaf springs and front discs complement the six. The off-white paint (Tamiya TS-7 Racing White) is on; once dry I'll tape it and paint the roof burgundy. Interestingly I had no problems with this, unlike my repeated challenges with Tamiya yellow.


Unlike the chassis and interior, final assembly will take time as there are four chrome strips and two chrome door handles per side, as well as lots of lights, mirrors, etc. It even has a chrome windshield washer nozzle smack in the middle of the hood. First, however, will be the awesome (I do not use that word lightly) 300 SL.

Tuesday, November 8, 2016

MB 300 SL chassis, drivetrain and interior

What a lovely kit! Tamiya at its best: Parts are very detailed but not excessively fragile, and fit is perfect even for very detailed items, such as the chassis strut that joins the firewall to the right front suspension mounting, passing below the intake manifold and through the exhaust manifold. (This is not visible in the picture below as the motor needs to go in first). Parts are well formed with minimal sinkholes or part lines, and the connection from the part to the sprue is often through a mounting point, which you will normally be filing smooth anyway, rather than a visible area of the part where you'll have to touch it up once you cut it off the sprue.


The Gullwing doors, of course, were dictated by the wide sills, which were in turn dictated by the classic three-dimensional space frame made up of lots of little tubes. At its most complex, this type of chassis design led to extremes like the Maserati Birdcages from the late '50s and early '60s. At its simplest, it offered an entire generation of British back-yard builders, like Lotus, TVR or Ginetta. the opportunity to build a decent chassis in reasonable quantities using 4130 chrome-moly tubing and a home welding setup. The Tamiya kit provides a very detailed replica of the chassis and it will be a shame to hide this under the body work.


I spent about 18 months working for the local Mercedes-Benz dealership as an apprentice mechanic back in the mid-70s and recall these lovely cars still turning up occasionally, including a blue-grey roadster belonging to one P.E. Trudeau. The stock hubcaps, painted to match the body, were very classy and understated, but I ordered the Rudge wheels, made by Historic Racing Miniatures, from Strada Sports. Painted black, these will provide a nice contrast to a classic silver body. An alternative is to paint the body a non-standard black; there is a very nice picture online of a 300SL roadster, in black with black Rudge wheels, that is very striking. Decisions, decisions. Either way the dark red interior will be a nice contrast.


The 300 SL was a study in contrasts. The engine is an overhead cam straight 6 with fuel injection and an aluminum head; on the other hand the Tamiya model implies the exhaust ports in the middle cylinders (2 and 3; 4 and 5) are siamesed, something I don't recall from the 300 sedans of the same period. Rear suspension is by swing-arms, and does not incorporate all the camber compensation bits that appeared on the subsequent 230/250/280 SL, as well as the mighty and legendary 6.3. Brakes are drums all around. So a mix of state of the art for the late '50s, and some legacy bits that really should have been ditched a lot sooner. My time as an apprentice corresponded with the introduction of the 450 SL and SE/SEL, the first with fully independent rear suspension, and the 280 sedan, with IRS and a proper twin-cam six; MB at the time was never one to leap out in front of a 'fad'.


In any case, this is a superb kit, and while very rewarding for a skilled builder, will probably not be as tricky as the Revell BRE 510 for a beginner.

Saturday, November 5, 2016

Push to completion: 787B, OT 1300, BRE 510

I am just back from a few weeks away, and the Audi S1 is moving slowly. Meanwhile I have completed a few items over the last few months, where the roadblock has been mental more than anything else, and haven't really posted the results. Case in point: the Mazda 787B.


This ground to a halt when I screwed up the paint required on the windows. Recent experience with the S800 tells me Bare Metal Foil would probably be a better choice, but too late for that now. So I trimmed the excess paint as best I could, glued the right side upper ball joint back together, and finished it off. Again not a winner in the area of quality of finish, but it adds an essential item to the Le Mans collection and highlights the oddball power plant, the 4-chamber rotary motor.


The Abarth OT 1300 required some paint where I put a thumb full of glue into the right side door during a prior attempt at final assembly. Lots of taping was needed to keep fresh paint off the windows and chrome. Meanwhile I gritted my teeth and cut the headlight covers out of the vacuum formed sheet. This worked out quite well, surprisingly, given the fragility of clear material made with this technique.


The long 'stinger' exhaust is a bit silly and prevents the rear engine cover being posed open; it has to be removed to exhibit the engine compartment. This is probably an important part of the claimed 145 hp from 1300 cc, probably all arising at something like 7000 RPM.

Getting the body to stick to the chassis took some doing. This was necessary in order to position the hinges for the front compartment. The major challenge was figuring out where the body and chassis meet up, and thus where the glue belongs.


What an oddball little car! Carlo Abarth was another character, like Colin Chapman or Ettore Bugatti, who was completely uncompromising about doing things his own way. The lime green Lancia Stratos lurking in the background of the photos, while radical for its time in terms of styling, is a paragon of modernity by comparison, with a transverse, mid-engine V6. And the Model Factory Hiro kit was a challenge even if it isn't one of their super-detailed kits. As my first successfully-completed multi-media kit, I am pleased, although as usual there are details I could have done better.

Finally I tackled final assembly of the BRE Datsun 510. This is a very detailed and challenging kit that will reward an experienced modeler, but will frustrate a beginner. Lots of fiddly little work was required to get the front and rear body panels to fit properly. The oddball approach to joining chassis to body, via the inner shock towers under the hood, required some fiddling and filing, and the opening hood, which gets trapped between the chassis and body, doesn't open very far, and doesn't quite close fully. A final gripe is the Minilites which are poorly done. Still it's a good looking little sedan. I am moderately pleased with the effort which is a bit sloppy in the details, the photos being carefully chosen to minimise the flaws ;-).


The matching 240Z, which is only at the paint and decal stage, will likely sit for a while until I can knock off a few more that are further ahead, such as the 300 SL. At first glance, however, the level of detail here is substantially less than the 510. Meanwhile the Japanese contingent is growing.


So this takes the completion ratio to a whopping 33%. And all of this coincided with the arrival in the mail of EBBRO's Citroen H van, a real ugly duckling commercial vehicle. A curbside model, it lacks detail of the FWD Traction Avant chassis which allowed for a very low load floor. It was a utilitarian vehicle which you could get in any colour you wanted as long as it was grey, and which served French commerce quite well in the post-war years. The addition of the Citroen brings the completion ratio back to 32.8%... time to get going.