Wednesday, October 31, 2018

Dodge Ambulance: Introduction

A close friend is recently retired as a paramedic and has asked me to build a replica of the ambulance she drove for all those years.


So I've sourced a Dodge van from MPC, and an ambulance body from BCS Trading Post (via eBay). The photos I've found show Chevy vans, but unless I come across a Chevy van soon, this will do, especially since all the kits listed on Scalemates are of the older style with the flat nose.


The ambulance body is made from sheet styrene and looks good. I'll cut open the doors and scratch-build an interior; lights, sirens and truck wheels (including dual rears) will need to be sourced.


Stay tuned!

Sunday, October 14, 2018

Miller 91: Front suspension and drive

The FWD system goes together well once HRM's typically cryptic instructions are deciphered. The parts are all very well made. The friction shocks are period items but the inboard brakes (drums, of course) and the De Dion axle, which snaps cleanly into place on pins at the end of the quarter elliptic springs, were used well into the '60s by companies like Maserati, Aston Martin and Rover. In fact the Rover 3500S, which was the V8-powered big brother to the Rover 2000 TC I ran for a few summers back in the early '80s, still had a De Dion axle as late as 1977.


Knuckles are missing because they need paint. The big brass radiator sits cleanly on top of the transmission, but won't get glued in until the body and hood are in place in order to avoid embarrassing gaps.


Part of me was afraid of this kit but so far all is well. The major issue is the obfuscatory instruction sheet which assumes you have access to lots of photos of the car in the Smithsonian, or better yet, Borgeson's book on Miller.


The kit includes a large number of bolts, nuts and rivets with diameter 0.020", so there may be plenty of occasions for swearing later.

I'll be away from the bench for the next little while. Stay tuned!

Thursday, October 11, 2018

Miller 91 by HRM: outline

Historic Racing Miniatures has a well-earned reputation for detailed resin kits and additions, and I can vouch for this having built their 917K motor upgrade for the Fujimi kit. I have a few more of their engines, specifically the 330 P4 for the Fujimi kit and a Ford GT40. Recently I decided to tackle HRM's Miller 91 while waiting for the paint to harden on the Alfa TZ1.

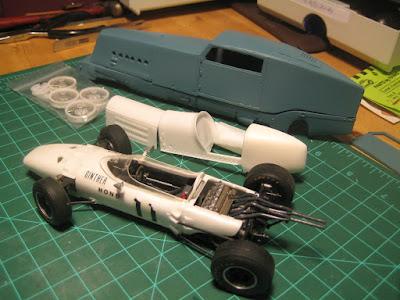
This Indy car from the late 1920's was revolutionary in many ways. With a supercharged DOHC straight-8 of only 1.5 litres, it made substantially more power (200 hp, by some accounts) than the Edwardian Renault 40 Record with a 9-litre six (130 hp). It also had front wheel drive, the main reason being aerodynamics: it allowed the driver to crouch low behind the cowl and not have to sit up high, straddling a driveshaft. It also showed in 1927 that FWD was possible and easy. The picture shows the delicate little Miller with the slab-sided Renault 40, from Profil 24, and the Honda F1 with transverse 1.5 litre V12.


The major issue with this kit, as with most HRM kits, is the instruction sheet, which is terse to say the least. It consists of a page and a half of typed instructions which reads a bit as a stream-of-consciousness text; a parts list indexed to baggies numbered 1 to 9; and a couple of crude sketches for some of the less obvious parts. You are expected to find lots of detailed pictures online or in your personal library. Given I sold off all my books and magazines about 30 years ago, this all becomes part of the fun.


I chose the purple and yellow paint scheme of the #18 car driven by Leon Duray. The actual colours are of some debate, given the absence of period colour photos; the car presently resides in the Smithsonian and HRM's Harold Bradford feels the shade of purple used in the restoration should be lighter. So my use of Tamiya TS-24 is probably no less accurate than the Smithsonian's work.


The scheme certainly pops. Bradford says the frames were metal colour, but that the Smithsonian restoration crew painted the frame yellow.


Location of various bits is a matter of trial and error. Eventually I concluded that the front cross member is not actually a cross member but a sacrificial bit of resin intended to keep the chassis straight prior to building; cutting this out was the only way the transmission would fit between the frame rails.


The wheels are lovely with metal spokes that, according to the Smithsonian restoration, are painted yellow.

Some added details can be found in a lovely web site featuring thousands of line drawings (click here). Low resolution pictures are free but registration is required; highly recommended for scratch-building of obscure stuff. Real keeners will search out Griff Borgeson's definitive history of the Miller marque.


Tuesday, October 9, 2018

Alfa Romeo TZ1: Chassis and interior

A self-inflicted problem with paint means the body is going to have to sit some more while paint hardens, again. Meanwhile I got the chassis and interior complete.


The interior is pretty plain, but the photo etched circular vents on the dash top are a nice touch. The decals all went in well, aided by my habit of putting a drop of white glue inside the gauge bezel before dropping in the decal.


The exhaust pipe is cute but sticks out too far. I may look at rearranging this.


With the body on, the lovely Zagato shape is becoming evident.


Lots of piping here, exemplified by the engine breather catch tank and radiator overflow pipe. I tried but failed to run the oil cooler pipes from the engine to the cooler, because I couldn't thread them through the very narrow passageways between various mechanical bits and the chassis struts.


The exhaust pipe is, as mentioned above, somewhat prominent.


Hopefully this is the view the competition got of it. Car 57 took first place in the 1.6 litre GT class, and 13th overall, at Le Mans in 1964. Next was an Iso Grifo running a Corvette 327 engine, followed by the second TZ1 (Car 41). Behind were a Ferrari 250 LM and a Cobra roadster, along with all the smaller stuff; ahead were five 904/4s running in the 2.0 litre GT class, six Ferraris and a Cobra Daytona Coupe. So good company, and it makes up for 1963 when none of the Alfa SZs were classified as finishers.


The hood fits better now that I've adjusted things a bit. It'is still a bit high in the front due to the engine not clearing, this in turn because the engine isn't quite tilted over as far as it should, but I think I've ground away enough material from the inside of the little hood bulge, mainly because I don't want to accidentally grind right through.


A very pretty little car indeed.


I'm going to leave this for a couple of weeks for the paint to set properly before getting out the polishing kit. Stay tuned!

Sunday, October 7, 2018

'53 Stude: Complete (#13 for 2018)

Some last minute screwups. The white paint on the roof went on well and sat for a few days to harden before taping, but obviously not long enough as the tape left an imprint in the paint, and in a couple of cases ripped slabs of paint off. This is in spite of detacking the tape by sticking it on my cutting mat first; the 3M blue tape was significantly more aggressive than the Tamiya.


So rather than strip it, I settled for some fixes involving a brush and some decanted paint (to fill the holes) and a thorough sanding and polishing regime. It's not show quality but it will do.


Stance is odd in this kit. Using the lowest position for the axles on kingpins yields a stance that looks, well, stock. And there is a lot of chassis showing below the bumper. Nonetheless it all seems to work.


Overall I went for a mild custom look. The hood scoop, from the parts bin, clears the 4 bbl carbs (from the parts bin) and venturis (from the aftermarket storehouse). In retrospect the scoop distracts from the clean lines, but not excessively so.


A classic dash, livened up with some careful brushwork. There were no decals for gauges in the kit.


A clean '50s car.


The custom bumpers front and rear are particularly understated.


It looks good as it joins the other American iron.


So now back to the Alfa TZ1!

Tuesday, October 2, 2018

'53 Stude: Chassis

There is a tremendous amount of flash in this kit, to the point where some smaller bits actually disappear into the flash. If I thought it would be an easy break from the TZ1, I was mistaken; the scraping and filing has been substantial.


More importantly, there is a mistake in the instructions regarding the idler arm (part 37). It does not go through the hole in the lower A-frames (part 16), but through the cross member molded into the chassis. So don't glue it in, or mushroom the head on the little pin, going solely by the instruction sheet! Note if you follow the sequence, of installing the A-frames in step 4 and the idler in step 5, you'll be OK.


With that out of the way, I dry-fitted the chassis to the body, to look at fit and stance. The front kingpins have three settings and this is the lowered setting, which looks good but prevents the wheels from steering very far. The rear is stock and I think I'll leave it alone. The stock hubcaps are decent and while a Bonneville dish would look better, I think I'll stick with these. The tires are the whitewalls out of the kit; I need to flesh out my stash of whitewalls as a wider whitewall might have been nice. But the objective is a (very) mild custom, so this is all fine.


I never met an engine, especially a V8, that didn't benefit from a pair of four-barrel carbs (from the Ford Starliner kit) and ram tubes (from the aftermarket).


However, due to clearance issues, this requires a small scoop, which came from an unknown donor to the spare parts bin. This works OK because it means the white paint on the roof will have another few days to harden before I tape it up for the body colour.


So the car will essentially be factory stock, with lowered front end, a pair of 4-bbl carbs and a discreet hood scoop. Shredded rear tires can be expected.


Oh, and the backdrop? This is the Fujimi garage diorama that I picked up at the show last weekend. It's pretty bare, I agree, but I'll be adding stuff as time allows. And the scene visible through the window is a photo I took in Holland a couple of years ago.


Stay tuned!