Friday, July 31, 2020

Alfa Romeo Giulietta SZ: Driver's door hinge

This Profil 24 kit comes with doors molded into the body and with inner door panels. It also comes with a pair of doors, however.


So I got carried away and cut out the driver's door, using the tools in the picture.


The hinge was fabricated from 1 mm brass rod and narrow-wall 2 mm brass tube.


The bent 1 mm rod is inserted into the door panel into holes drilled for that purpose. (The broken fragment of door panel at the lower forward edge will be glued back in prior to paint).


The tube will be epoxied to the body when the time comes (after paint and so on).


A fair amount of bending and fiddling was required. 


Here is the situation after paint, but before the hinge got glued in.


View through the right side door at the hinge, still with no epoxy to hold the hinge in. Next will be to source some 5-minute epoxy. Stay tuned!

UPDATE: I got brave and mixed up some epoxy, being careful to keep it off the hinge pin or the door. I also shimmed up the tube with some 0.030" styrene to get it all to fit. You can see where the resin of the door had to be carved away to allow it to clear the fender.


The door might not open as wide as I might have liked but it will do.


The only real flaw is that I glued the window and frame in just a little too far forward. The glue being CA, I don't want to use acetone to dislodge it as that will damage the paint as well.


All in all I am not unhappy with this. Next will be the interior door panel trim. Stay tuned!

BMW 2002 tii Estate: Decals

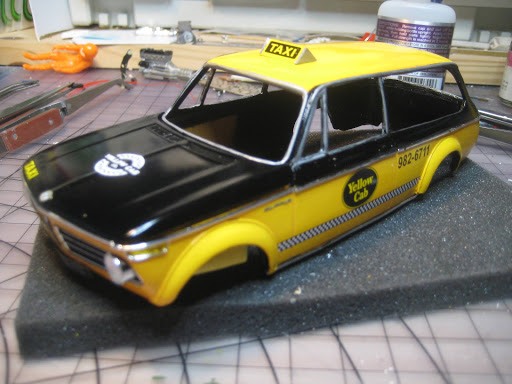
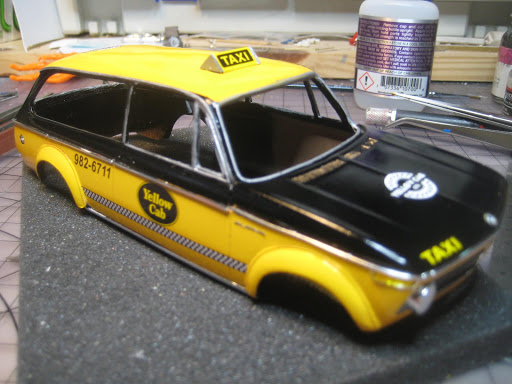
With the yellow and black paint making it look like a taxi, I decided to get taxi decals from Gofer Decals. The roof piece was fabricated from square styrene tube cut in half lengthwise.

"Yes, monsieur, you need to be at the Gare du Nord? Oui, we can do that. Ahh but your train leaves in 12 minutes? But monsieur, I have the perfect taxi for you. You will even have time for un petit blanc at the bistro de la Gare. Taxi!"


Yes, yes, it's a New York cab with French plates. Bear with me, will you? Next is windows which will need to be cut to fit, then final assembly. Stay tuned!


Man I hate this new Blogger editing interface.

Alfa Romeo Giulietta SZ: Resin issues

I've had ongoing issues with resin and paint in the past. The Abarth just finished, which was an MFH kit, had some issues with the entire paint layer peeling off, fortunately in a spot where it didn't show; the cleanup and paint sequence was:
  1. Soak 20 minutes in isopropanol (99%), scrubbing intermittently with a toothbrush;
  2. Thorough rinse in warm water
  3. Wash in Dawn and warm water
  4. Air dry and carefully pick up droplets of water using Bounty paper towels
  5. Two coats of Duplicolor Primer Sealer
  6. Two coats of Tamiya Fine White Primer
  7. Three or four coats of the final colour coat (Tamiya rattle can)

Where it peels, it all comes right up in a single layer including the Duplicolor Primer Sealer. I have had this problem in the past, with resin bodies from various providers, so I am assuming it is an incompatibility between the primer and the resin. So this time went straight to the Tamiya primer to see if there is an improvement.

I have also seen recommendations to use an acetone wipe but you have to watch this, because acetone will eventually dissolve resin, and you can't let it soak. So the question is if the exposure is long enough to do some good, is it also short enough to prevent softening up the resin.


Separately the first coats of primer on the Alfa revealed a crack running lengthwise in the roof, so to keep it from opening it up, I have glued a strip of styrene into the inside of the roof using Bob Smith IC-2000 Extra Strength CA Glue (20-45 second drying time).


The outside got some Tamiya filler, before sanding and more primer. After this, I had a reaction between primer and something on one of the fenders; so I sanded it off then cleaned it up with alcohol on a swab. New primer just on the affected area now sticks.


I am hoping I didn't create the crack when cutting open the door, which was done carefully. (The story of hinging the door will be told in a separate post).


Anyway all's well that ends well. The body is looking good, with primer, Tamiya TS26 Pure White, decals and clear. (and yes the engine compartment is also done). Next I'll tell the story of the hinge, but first I need to source some 5-minute epoxy.

Stay tuned!

Monday, July 27, 2020

Alfa Romeo Giulietta SZ: Overview

Sticking with the wee little Italians, I figure it's time to start this resin kit from Profil 24. This predecessor to the TZ did poorly at Le Mans in 1963, with two DNFs and a DSQ (for a premature oil change). I'll build up car #34, which lasted 155 laps (16 hours) before the gearbox failed.


The engine is the lovely 1570 cc twincam, not yet tilted over as it was in the TZ.


Interestingly the kit has inner door panels but also doors, which would require careful cutting of the body to open up; ideally hinges would have to be made as well. I am tempted.


Stay tuned as I get a new blade in my Xacto knife. What's the worst that could happen!

Fiat Abarth 750 Record Monza: Complete (#18 for 2020)

This is a simple build, given the total lack of chassis or engine detail. Decals were very nice and went on very well.


Getting the number to lie down over the rear deck took some doing; minor cracking was fixed with a very fine brush and some black paint.


The interior is basic but includes door handles and pulls as well as window winders.


As always, my least favourite part of these builds is the vacuum formed glass.


The body has a dimple in the door for a mirror, but there was no mirror in the kit. I'll be keeping my eyes open for a suitable bullet-style mirror.


Presumably this is the view Dan Gurney and Phil Hill would have had from their Ferrari 250 TR as they overtook the little Fiat Abarths. Three were entered by Team Roosevelt for the 1959 Sebring 12 hours, finishing 28th, 29th and 30th and thus taking the first three places in the GT 750 class. This one models the first of the three to finish.


The Abarth fleet at rest, both Lightweight kits from MFH. The OT 1300 kit did have a motor, however.


So what's next? Not sure but I am getting used to the new Blogger interface and not liking it much so far.


Monday, July 20, 2020

Fiat Abarth 750 Record Monza: overview

Looking for a quick build while waiting for the mail on some other builds, I dug the simplest MFH kit ever offered out of my stash: the Fiat Abarth 750 Record Monza. Kit LK001 has decals for cars finishing 1st, 2nd and 3rd (28th through 30th overall) in the GT 750 class at Sebring 12 hours in 1959, and has grand total of 61 pieces, including the decal sheet (63 if you include the instruction sheet and the box).


One thing is for sure: venturing out on a race track for 12 hours in a 750 cc Fiat Abarth, when the leaders are all hammering along in Testa Rossas, takes a serious amount of cojones, even if it has a slippery Zagato body. 

This will get built up as car #64, painted white, which finished first in class, 28th overall. Stay tuned!

For the record: 
Resin pieces: 8
PE pieces: 9 (one sheet)
Axles: 2
Screws: 3
Metal pieces: 21 (4 sprues)
White metal pieces: 4 wheels, one handbrake lever
Rubber pieces: 4 tires
Decal sheets: 1
Vacuum formed pieces: 8 (one sheet)
Headlights: 2 pieces

CORRECTION: 63 pieces plus instructions and box as I had missed the two headlight lenses. 

Sunday, July 19, 2020

BMW 2002 tii Estate: Chassis and body

Lots of progress here and I've been slow to update the blog.


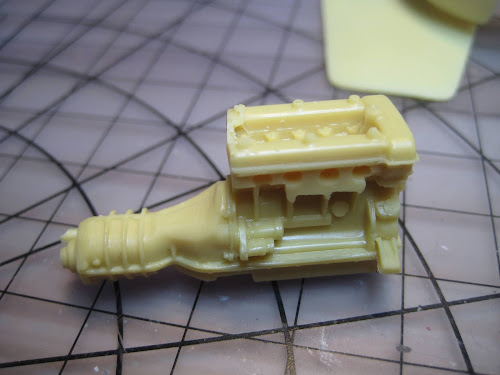
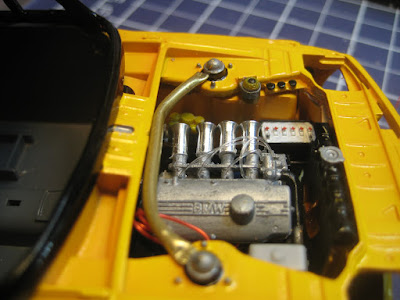
The USCP resin engine kit is excellent, and is the engine Hasegawa should have included in the styrene kit. I cut off the ram tubes and plenum chamber and replaced it all with venturi stacks from Model Car Garage. The fuel injection tubes are made from 0.014"clear fishing line, an idea I wish I had thought of sooner! I would have used it a lot more in the past.


The 4-cylinder distributor comes from Morgan Automotive Detail and replaces the excellent USCP unit. I was just too lazy to drill out the distributor for individual wires.


The engine kit includes the inner fenders and the panel above the radiator, as well as battery, brake master, clutch fluid bottle and a few other underhood bits.The clear fuse panel cover is an interesting touch (not installed yet in the pictures).


One issue I should mention with the USCP kit: You need to leave the radiator and bulkhead out until after you have put in the 3-piece grille, because this goes in from behind the body panel, and you'll never get the grille in otherwise.

The tube linking the shock towers is a piece of 2 mm brass tube, bent and with the ends crushed.


The stance looks good with Minilites from Scale Production, with wider tires in back. It is possible I could have lowered it a bit but I think it will look fine as is; the tires fill the fenders quite nicely and lowering it would turn it into a bit of a caricature. 


The Hasegawa kit is very detailed. The chrome strip around the body, which most of us would normally do with Bare Metal Foil or a Molotow pen, is made up of 10 chrome bits where trimming the bit off the sprue leads to a bit of black plastic that can show if you're not very careful.


The tail lights are made up of 4 pieces each, two of them quite small.


The resin estate body from ARM is excellent in that the bits from the Hasegawa kit all fit well.


There are a total of 8 flat black grille inserts that are individually glued in place. 


Final assembly looms large! Just some fabrication of side windows, and the interior still to build. Stay tuned!

Thursday, July 16, 2020

BMW 2002 tii Estate: Paint

I saw this orange/yellow and black livery on a 1602 club racer resin body supposedly in preparation by Scale Production, and liked it. In the absence of the lovely blistered fenders in the 1602, I used the Scale Productions fender lips for the 2002.


The slightly orange tint was obtained by using Tamiya pink primer under several coats of Tamiya TS 16 Yellow. I'm quite happy with how it turned out, even though a couple of touchups will be needed.


The black is the usual Tamiya TS-14 rattle can, applied in three light coats followed by a flood coat.


On to the engine. Stay tuned!

Tuesday, July 14, 2020

BMW 2002 tii Estate: Overview

The Hasegawa kit of the 2002 and variants is superb, except it is a curbside. So I bought the Hasegawa kit when I saw the USCP engine bay kit. Along the way I added the Scale Productions fender flares and air dam, Renaissance photo-etched sheet and  Alpina wheels (which may get replaced with something a little bigger), and the estate body by Damien Lision of ARM (Anjou RĂ©sine Modeling). ARM also offers a Touring body, but the phantom wagon is neat and unique.


First step was to carefully cut the hood off the body, using a fine saw blade and the back of a new #11 blade. After some cleanup of the relatively small amount of flash, it all went into an isopropanol bath followed by a warm wash in Dawn soap.


The ARM resin is decent if not of the same quality as Model Factory Hiro: minimal flash, no large pinholes, and a relatively smooth surface.


As for the USCP bits, they are excellent.


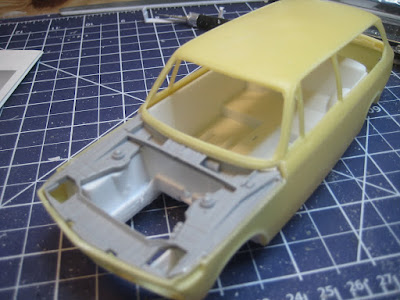
With the body washed, the underhood panel has been glued in with 5 minute epoxy. Cuts to the Hasegawa floor pan and firewall have been made as requested by the USCP instructions (click here to see these instructions).


Test fitting required a bit more filing; perhaps the USCP panel should have sat a little higher in the resin body, but nothing that requires any serious correction.


Stay tuned!