Wednesday, November 29, 2017

Update

My home has been taken over by a wrecking crew, which will hopefully be replaced by a construction crew in the not too distant future ... so no modeling for the foreseeable future if only because of the dust.


Meanwhile I am vicariously modeling by means of a number of FaceBook groups which provide lots of interesting tips. The New Modelers Club is run by a great admin named Randall 'Krazee Wheelz' Wheeler; the Model Car How-To's and Model Car Aftermarket are run by an equally great admin named John Papp. And for fans of airplane models, there is a Finnish group called Oldie & Goldie Scale Models. Posts are sometimes in Finnish, and FB's translation app is horrible, but the membership appears to be worldwide. All highly recommended.

Thursday, November 16, 2017

3D printed LS3 V12 motor Part 3

Here are two more pictures comparing the roughness of two 3D printed parts, 10 years apart. The blue wrench looks like 0.5 mm between passes with the printer head (two furrows per millimetre) while the valve cover from Shapeways is more like 0.12 to 0.20 mm between passes (5 to 8 furrows per millimetre).


Painting with Testor's enamels and a brush leaves a relatively thick paint layer that obscures the ridges, especially when a light sanding has taken off the high points as identified by a coat of primer.


I completed the engine with starter motor, oil filter and a water pump from the parts bin. One important point: drilling out a hole, even carefully with a pin vise, will be challenging because the material is quite brittle and will split and crack if you are not careful. In the photos you can see where I was trying to hog out the hole for the crank in order to fit a pulley and belt assembly from the parts bin.


I filled in the hole around the crank pulley once it was all glued up, but the rigid, brittle nature of the material is worth keeping in mind. Of course it is possible to select different materials in the ordering process; I picked the Frosted Ultra Detail option, but the White Nylon option may be more forgiving as well as cheaper.


Overall, a mean looking engine. Now I just need a mid-engine chassis suitable for a 9-litre V12 ...


(PS it has been pointed out to me that the Chevy logo on the valve cover is backwards ... I have flagged this for the people making the parts, and presumably this is a minor software edit. I hadn't actually noticed, given that most of my past work is on imports ...)

So are we there yet? Not for bodies, unfortunately, until the resolution can be improved significantly beyond the current level of about 0.15 mm (about 0.006"). That being said, the possible level of detail is also 0.006", or about an eighth of an inch at 1:24 or 1:25 scale. This is minuscule -- bolt heads on a water pump are going to be 3/8" or 9/16", for example. Just be careful what material you select because this can have an impact on what you can do with it. To summarise:
  
Property
Styrene
Resin
3D
Selection of subjects
Mainly high-volume, high demand markets
Mainly specialised markets for low-demand niche products
Potentially very extensive once the necessary computer files exist
Finish
Excellent, smooth surface
Variable
Poor today, visible ridges due to tracking of printer head
Detail
Depends on molds
Variable
Potentially very high level of detail at the scale of the printer head resolution
Porosity
Low
Variable
Low
Work-
ability
Good
Variable, can be brittle
Depends on material selected – can be brittle
Prep needed
Dish soap, dry, primer
Alcohol or acetone to remove mold release agents. Putty for pinholes and bubbles. Heavier filler-primer needed for more porous castings. 
Dish soap, dry, primer

Wednesday, November 15, 2017

3D printed LS3 V12 motor Part 2

I wrote about this back in early October (click here). I have since received the correct intake manifold, so it is time to move forward. 

The parts are semi-transparent as received; this will vary with the type of material you specify. 


Giving them a coat of Tamiya primer shows the detail available, which is otherwise hard to pick out on the translucent surface as received. 


The grainy texture of a cast block is reproduced nicely, but in the right light, you can see the regular step-wise grooves that arise when the printer head scans back and forth, as in the oil pan or valve cover. 


Fixing this could involve light sanding, or one could assume that paint will fill it. I'll try sanding parts where it will show (oil pain, valve covers), and simply apply paint where it won't (bell housing) in order to evaluate the importance of the roughness. 


The level of the roughness is noticeably less than in the adjustable wrench made using a $250,000 prototype machine in a university mechanical engineering lab about 10 years ago, but is still visible on close examination. 


I am guessing that a 3D printed body will not be as smooth as styrene or a good resin body. The advantage over resin is low porosity, high dimensional accuracy and no mold release agents. Styrene remains the best quality if you can get the specific parts you want. 


The area of improvement is now at the level of building ever finer printer jets, and stepper motor drives with smaller step sizes to bring tracks closer together. I suspect this will proceed rapidly; take a magnifying glass to output from a good inkjet printer on decent paper and compare to the late, unlamented 8-pin dot matrix printer. As well I am assuming Shapeways is using commercial-grade printers, i.e. better than the $1500 home hobby unit from Micro-Mark, but substantially cheaper than that $250,000 university prototype of 10 years ago.  

So we are getting closer.

I'll paint and build up the motor and keep you posted. 

Monday, November 13, 2017

Matra MS 640: just the glass missing now

Ooof. Wheels are on and the paint still looks OK even after a couple of coats of clear. (The clear that gave me fits was a dull clear, and is in the garbage).


For a curbside, an awful lot of effort.


There is also a tiny little wing, actually more of a flap that is meant to hang off the back of the rear cowling, that needs paint and assembly. It's a fiddly bit made up of a thin sliver of resin and two photo-etched brackets, and may get dropped. Some photos of the current car (the so-called 640B) show it installed, others not.


An oddball little car next to the cuddly and utilitarian Chevy, the muscular and brutal Audi and the lithe and svelte Jag. My last four builds were all resin kits, and all a challenge, but I am happy with the results. Subsequent builds will be better!


I will be moving out of my place in a week for a couple of months of renovations. As I'll be couch-surfing or renting AirBnB digs, I am guessing that spray paints will be frowned upon. So there might not be much to write about for the next while, unfortunately. Stay tuned.

Sunday, November 12, 2017

Matra MS 640: Finally got the paint to stick

I have never had a paint job fight me this much. Although to be fair, most of my painting problems in the past have been either,

  1. self-inflicted due to impatience or sloppiness, or
  2. resulting from the challenges of working with resin, or
  3. both of the above. 
This was probably a case of #3, and the picture below shows a monumental screw-up that arose after putting on the white and taping up for the blue, then shooting a quick coat of clear to seal the tape. The clear, a Tamiya clear, immediately attacked the Tamiya spray paint underneath. Ugh. Back into the alcohol bath for a second time. (The first time was documented recently.)


An extensive conversation on the Model Cars How-To forum on Facebook didn't come up with any clear reason for the problem, except possibly off-gassing from the resin. As there were several coats of primer and two of white on it at this point, I find that a bit of a stretch as I would have expected this to arise earlier. Anyway it looks good at this point and I will let it sit for a day or two before buffing the blue around the base of the fins and putting on the decals. 


There was no bleeding or seeping of the blue onto the white, which is a big relief, although the blue I decanted and brushed on is a bit darker for some reason. 


Will I dare to try clear again? Hard to say. But progress is being made and what is left on this curbside is pretty simple: decals and lights, then the chassis and glass go in. I've also got some photo-etched grilles to put adapt. 

Stay tuned!

Friday, November 10, 2017

Matra MS 640: Paint take 2

OK so I am starting this over, just as I had to start over with the Jaguar D-Type (click here). There is a pattern here ... I need to be more careful and patient, and I also need to be more careful around cleanup of the resin bodies.


So further cleaning up of the resin (maybe I wasn't aggressive enough the first time), followed by multiple coats of automotive primer-sealer to close up the porous resin body, followed by a couple of coats of light grey Tamiya primer, followed by 5 or 6 very light coats of Tamiya TS 26 white sprayed about 20 minutes apart, seems to have done the trick. (Only the fins will be white; the rest of it will be French blue). Now to let it harden before taping it up for the blue. 

Stay tuned!

Wednesday, November 8, 2017

Matra MS 640: Paint gremlins

For a curbside model, this one has been giving me fits. Did someone say this hobby is supposed to be relaxing? stress-relieving? Well, let me tell you THIS, Buddy: I am PLENTY relaxed. Yessiree, NEVER been SO relaxed, GOT THAT? Now where's my drink.

Anyway some of it was the usual resin off-gassing which sometimes looks fine after primer but resurfaces after the topcoat goes on; some of it was me being impatient and trying to put the paint on too fast. All issues that, in retrospect, I know all about, having been there and done that many times before.


So finally I got fed up trying to fix various little screwups and tossed it all in a propyl alcohol bath to strip all the Tamiya paint right back to the resin (and incidentally to work on cleaning up the resin a bit more). I did not take any pictures of said screwups; this was a deliberate decision.


So it's back to the automotive primer tonight; it looks like I'll need a bit more putty, and some more primer, before attempting the top coat again. I'm going to watch a movie and go to bed, and maybe this will all look better in the morning.

Friday, November 3, 2017

Matra MS 640: Saga of the mold release agents

A couple of coats of Dupli-Color sandable primer showed no problem with mold release agents trying to poke through the paint. An additional coat of Tamiya Fine Primer (light grey, over the dark grey Dupli-Color) likewise showed no problem. However it is clear that there is a spot at the top of the left front fender that is actively repelling Tamiya TS-10 French Blue paint, even through multiple coats of primer.


So once it is good and hard, in a couple of days, I'll start with light sanding and another light coat of blue. If that fails, I'll sand that fender top down to the resin and apply some acetone locally using a Q-Tip. Then I'll build the paint back up by spraying primer and colour from a distance (all on rattle cans). Seems Murphy was watching and didn't buy my subservient attitude...


Meanwhile the rest of the car looks good, and the panel gaps look good even without washing in a thinned lacquer. The stance is also fine, which would be easy enough to fix given the axles are two metal shafts just like the old AMT system.


In fact the stance illustrates the wasp-waist approach taken by the designer, which extends into the floor pan. Was this part of the aerodynamic error that launched Pescarolo into the scenery?


More to come!

Thursday, November 2, 2017

Matra MS 640: initial review

Matra was a French airplane manufacturer with an automotive branch. They made a couple of rather odd-looking little sports cars, of which probably the best looking was the Djet; the best that could be said of its successor, the 530, was that it was homely.

Of greater interest to this blog is the fact that they also supported a serious racing program in both F1 and at Le Mans. The F1 program involved producing complete cars (1967 to 1972) and engines only (1975-1982); Jackie Stewart won the championship in a Matra-Cosworth in 1969.

They did well at Le Mans as well, with outright wins in 1972, 1973 and 1974. Henri Pescarolo drove to the win in all three years, with either Gerard Larousse or Graham Hill as co-driver. The car was the MS 670 with Matra's in-house V12.

A series of road racers predated the 670: 620, 630, 650 and 660. All were successful in their various classes. The history books skip over the MS 640, and for good reason: the only prototype ran once in practice at Le Mans, crashing heavily due to aerodynamic lift at high speed. The driver, Pescarolo, was almost killed. A second car has been built recently by fans from original drawings.

So if you were going to build a model, would you pick the successful MS 670? If you are a quirky French firm, you might also model the quirky MS 640.


Profil 24's model of the MS 640, bracketing their MS 630 and MS 650, is unfortunately curbside, and includes just 28 resin parts. A small photo-etched sheet rounds out the kit. While it would be nice to build up a Matra V12, perhaps there is time to complete a curbside kit before I have to move out so the contractors come in and trash the place.


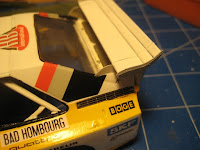
As there is no engine detail, there will be no excuse for not lavishing extra time on a perfect finish, and in that context I am going to attempt to highlight the panel lines. This starts with the panel scribe to widen and deepen the very narrow molded-in gaps, being careful not to slip out of the existing groove and create new ones.


One question will be the potential for damaging mold release agents, which have plagued me in the past. This time I used a brief bath in acetone, rather than isopropyl alcohol, combined with vigorous scrubbing. There are blotches on the underside of the rear fenders and front lip that are suspicious to me, but that did not appear to soften with brief exposure to acetone. (I was unwilling to risk wrecking the kit with extended soaking). Next was a couple of coats of Dupli-Color sandable primer, which has proven to be better able to handle small amounts of release agents than the Tamiya primers.


Fortunately there is pitting but no wholesale lifting of the paint, at least not yet - the application of the final top coat will tell the tale. (That is the sound of me bowing to the Prophet Murphy, who swoops down on overly-confident people and causes unbelievable screw-ups. Hail Murphy! Behold, I am your Servant! Please Have Mercy.) So next will be a bit of putty, some sanding, and another coat of the Dupli-Color. Once that is all good, I'll move to Tamiya primers and the French Blue that was too dark for the Gulf Oil cars.


So another quirky, oddball kit of a quirky, oddball car. Stay tuned!

Audi S1: Complete

Getting the wing on was a challenge but there is a relatively easy path through it, if you are brave (or foolhardy) enough to tackle this kit: glue the rear deck cover onto the body over the radiators (you can use temporary glue here if you want to be able to remove the cover); glue in the two vertical supports for the wing (sandwiched between the resin body and the deck cover); add the three wing pieces sequentially, starting with the largest one at the front and ensuring the vertical support slots into the groove in the underside of each wing, and that the wings are all the same length; add the end-plates. The photos illustrate the process:


I'm calling it done, with just an air dam and four mud flaps, all photo-etched, left to finish it. The kit includes six big spotlights mounted on a pair of flimsy photo-etched tripods in front of the grille; one of the tripods escaped and got eaten by Mr Carpet, so unless it reappears intact, the spotlights will go in the spare parts bin along with the stone guard under the oil pan.


It was a challenging build, and I could have been a lot cleaner on the paint. These resin and metal kits are all tricky; for example I finally succeeded in making wipers out of photo-etched parts after multiple failures in previous kits.


I am guessing this is the view competitors would have had of it ...


Overall no regrets, though; the flaws are mainly of my own doing and this is a useful learning step as I get better at multi-media kits with the goal of (eventually...) getting back to the 908/03. Next: I'll tackle the glass on the D-Type, which will finish that up, then time to wrap it all up in bubble wrap for storage as I head for home renovations over the next 2 to 3 months. Once I get back to it, probably early in February, maybe I'll tackle a nice simple Tamiya kit for a change ... In the meantime, I am counting on you, my Faithful Readers (if any), to carry the modeling torch forward!