Sunday, April 30, 2017

917 K Gulf Oil: Paint, Part 2

OK, so I have been through this before, with the 908/03 and the 956 pickup truck. The Tamiya light blue (TS-23) is just too dark while the Testor's light blue (1208C) is pretty close to the classic Gulf Oil blue. You'd think I would have learned by now... The difference between paints is much greater than might be guessed from the difference in the colours of the caps.


The pale lime green that the kit is molded in is nowhere near the correct colour, see the air cleaner housing at bottom right in the photo below.


So the body went in for a respray and it will be a week or more before I can get back to the polishing that will be needed given the orange peel that came from using a dirty nozzle. (My excuse: there are no sources of Testor's paint within easy walking or public transit distance; the closest is a minimum 30 minute drive through the ongoing construction nightmare.) So here is the Tamiya paint in a picture from the last post:


Yes, yes, I should get an air brush and mix my own Gulf Oil blue. Here is the Testor's:


Meanwhile engine and chassis are progressing well and will be reported separately. Never a dull moment here at the Hobby Nook & Cranny.

Friday, April 14, 2017

917 K Gulf Oil: paint

So I decided that what the shelf really needs is a 917. I've got five kits of this iconic racer; three are resin or multimedia, of which one is of the 1969 LH and another of the later 917 PA that looks so much like the 908/03. I decided to stick to styrene, and to the short tail 917 K. I have two copies of the Fujimi kit on the shelf, so out came the Gulf Oil version as raced in the 1971 Monza 1000.


The box doesn't list the drivers, but my good buddy Rick E. Pedia tells me the winning car, entered by John Wyer, was driven Pedro Rodriguez and Jackie Oliver. Rodriguez was known to be completely fearless, and especially quick in the rain as a result; he was also one of the few drivers who managed to completely tame the 917.

The kit comes molded in a horrible shade of pale green, see below; this is quite a long way from the pale blue associated with the Gulf Oil cars. I went for Tamiya light blue, TS 23, rather than the Testor's pale blue I picked for the MFH 908/03. The Tamiya is perhaps a bit dark, darker than the cap on the can might indicate, but it is pretty close and will do.


When I got the kit, I ordered the more detailed engine from Historic Racing Miniatures, so this will be part of the adventure. I will be away for 10 days so the paint will have plenty of time to harden. Stay tuned!


Wednesday, April 12, 2017

BRM H16: final assembly

So I let this sit for a week or two, so the paint would set good and hard and I could try something new for me, namely polishing with the Detail Master set of 3,200 to 12,000 grit cloths. I will leave it to you to distinguish between the parts I polished, and those I didn't... I think it only works if you are prepared to obsessively polish every square millimeter repeatedly, multiple times with each level of grit, while avoiding edges and high points where it is too easy to buff down to to the underlying styrene or resin. Boring in other words.


In a fit of pigheadedness I decided to paint the leading edge of the nose cone orange instead of using the series of little decals that are provided with the kit. This however proved ineffective and I will have to strip and repaint the cone. Other than this the model is pretty much ready for display.


Below is the view they hoped the competition would see. Unfortunately this was not the case, generally speaking; the Cosworth DFV was simpler, more reliable and lots faster, so that was that.


First observation: what a tiny little thing. Every step required my 4X desk magnifier, and even then it was a challenge.


Second observation: The little spun-cast bits are easily bent, and fits between dowels and sockets are critical. A bent lower A-arm, combined with a poorly cleaned-up dowel and socket joint where it meets the chassis, will lead to a lot of camber on the associated wheel.

Third observation: tools are critical. I've listed a few as I've gone along, but the following are absolutely critical:

  • High quality tweezers, both conventional and cross-locking;
  • Digital caliper (my old analog device works fine, upper right in the photo above)
  • Drill bits #78 to #55 
  • Stash of brass rod in 0.5, 1.0 and 1.5 mm diameters for pinning things together
  • Desk magnifier of 4X power or equivalent glasses
  • I'll think of other stuff and will update this post as I do so
Finally, this is an extraordinarily well detailed kit. I have done a decent job but I can see where I could have improved. Brownie points if you can spot the sloppy bits. 


Next in this scale: the Ferrari 312, which finished third in Belgium in 1967, and the Gurney Weslake, which actually won the race. End result will be the three podium finishers from this race. Stay tuned!

Tuesday, April 11, 2017

MFH's 908: engine complete, mostly, finally

I spent another hour on the left side throttle return spring today before finally giving up. The PE sheet provides excess trunnions so if you lose a couple, there are more, but after losing two with no progress or obvious approach to avoid losing more, I decided enough was enough.

So on to the air cleaners and the fitting of the engine to the rear subframe. The tie-down straps for the air cleaners were a bit of work, involving threading 1 mm wide sticky tape through PE buckles, but the result is very nice, More drama arose when fitting the engine into the tube frame as nothing lined up, and the little pins provided were too short to join the engine mounts to the chassis. Some fabrication with 1.0 mm brass tube saved the day.


Below you can see the two coil wires pointing forward to the coils, located in the cockpit just under the drivers' seat. One is completely hidden but the other will be visible so the wiring will need to be done right.


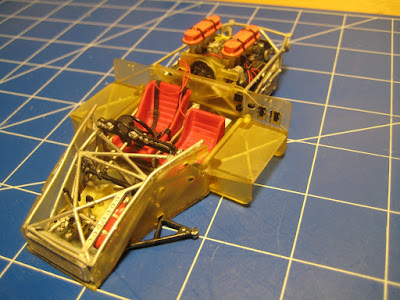
I next posed the engine and rear subframe up against the tub. The fit is poor and there will need to be filing, especially since this is the primary point where the chassis is joined together -- a flaw here will mean a sag in the chassis.


But what a well detailed kit! The shot below is particularly good, showing the little sockets at intersections of tubes in the frame where rear suspension components will hopefully fit. Besides a 4X desk magnifier, a full set of number drills, from about #78 (0.4 mm) up to #53 (1.5 mm) is absolutely essential for this sort of work.


Of course the 12-plug distributor is a surprise, and it is possible that this came from the 917 kit which had a pair of these. I attach a photo from a couple of years ago showing the problem, which I obviously missed at the time even as I was drilling out the distributor to take plug wires.


So all this to say that progress remains positive but excruciatingly slow. I don't understand how 'professional model builders' can make a buck at this. At this point I think I'll park it again for a while, although hopefully not for two and a half years like last time! There are Fujimi kits of the 917 ready to go on the shelf, and I even have one of HRM's detailed 917 motors. Time to see some progress again.

Oh, and the trunnions that got fired off into space? Both reappeared in the little pile of scarf and shavings as I cleaned up my cutting mat. So I have saved them, stuck to a piece of tape inside a baggie, in case I ever get the urge to try again.


Never a dull moment. Stay tuned!

Monday, April 10, 2017

MFH's 908/03: exorcising the demons

Have I gotten over my irrational fear of this kit? Maybe. I got stalled in November 2014, over a throttle return spring and a few other issues. Since then I've completed another MFH kit (the much simpler Abarth OT 1300) as well as the Profil 24 kit of the Aston Martin DBR1. I've also wired up a bunch of distributors for both multi-media and styrene kits, including manufacturing distributors from scratch for the DBR1. So my skills are getting there. With that in mind I dug it all out and refreshed my memory as to where everything goes. Fortunately I put it all away neatly in little plastic bags, so this wasn't too difficult.


I started by completing the tub. The previously assembled dashboard and rear bulkhead went in along with seats and a few other little bits. So far so good, although the steering wheel sits a little low, and the front suspension looks to be a bit of a bear to assemble. One little quibble is that the driver's seat obscures one of the two ignition coils; the wires will probably just get pushed down under the seat and left there.


I had assembled the plug wiring harness for the left side before putting it all away over two years ago, so I put that on. Each cylinder has two plugs, one with a black wire and the other a red wire. I arbitrarily put the red one on the forward plug of each cylinder.


I also put in the injector tubing for the right side cylinder head, which is the yellow tubing visible in the picture above. At least one tube is a little short, but it will all be hidden by the lovely little orange air filter housings. And I will skip installing the spun-cast injectors, choosing instead to jam the tube into the holes that I drilled in the sides of the intake horns back in 2014.


The throttle return spring is still dangling there, as you can see in the photo above, but I can see an approach going forward to fix the problem. When I bailed in frustration, I was smart enough to save the teensy-weensy little trunnion that goes on the throttle slide control rod.

A bit more work under the 4X desk magnifier got the second bank of injectors hooked up, and a second plug wire harness ready to go. This is when I discovered that the distributor only has room for 12 plug wires! I carefully wedged the four extra wires down in behind the distributor next to the cooling fan where no one will see them.


Here you can see the bracket for the right-side throttle return spring, attached to the throttle slide body between cylinders 3 and 4. Once I sort out these springs, all that is left to complete the engine is the two air filters with their little tie-down straps.


So all in all it is moving again. Again, though, if I were to choose a multi-media kit to start off with as a first attempt, it would not be this one, or MFH's similarly challenging 917K. Looking through the stash last night, MFH's Ferrari 250 GT SWB looks to be a lot easier, mainly due to fewer chassis tubes made of bendable white metal. The Profil 24 kits are also simpler, as well as significantly cheaper, but more filing and test fitting is needed to get them right.

On a separate note, if you are interested in the MFH kits at 1:24, you should make a beeline for the MFH website (here) because they are moving to 1:12 scale in a big way, and the 1:24 kits are going fast. With 1:24 kits running 25,000 to 35,000 yen (probably $350+ US), they are pricey, but the 1:12 kits are pushing 80,000 yen -- figure $1000 per kit after shipping and, maybe, duties. And any OOP stuff on eBay is getting completely out of hand. Buy it now and stash it if you think you might want it someday. The 1970 908/03 described here has just been reissued (here), and the 1971 version is still available here,

So progress has been made, and who knows where this will lead. Stay tuned!

Previous post: 2014-11-02. Continued 2017-04-11 and 2018-12-26.

Blog organisation

A while back I decided to split out the 1:43 and aircraft posts into separate blogs. The reason was to keep things manageable in the absence of any obvious way to sort things by anything but post date.

I have now brought these two blogs, including all past posts, into this one. This is because I have discovered that I can apply labels to posts, and put a bar at the top of the page listing the labels. Clicking on the appropriate label ('Aircraft', for instance) will show all posts with the label Aircraft. I think this will be an easier way of allowing readers to quickly zoom into specific content.

So there are a few labels that are either-or propositions (1:24 or 1:43) while others may apply to several blogs (1:24 hot rods, for instance). Perhaps the only either-or proposition that I did not implement is resin versus styrene; I have not labelled the styrene kits and won't unless there is an uproar.

As always, comments are most welcome.

Sunday, April 9, 2017

Porsche 907: Complete

This turned out to be a very quick and simple build, which is just what was needed as a break after working through some of the more complex kits on the bench.

It's very similar to the Heller model of the Alpine A210 in more ways than one. As a kit, there are fit issues in a couple of places, in particular the rear tires not really fitting inside the rear bodywork all that well. This was a problem with the Alpine as well, and in neither case is there too much camber or track due to an assembly or fit issue -- the rear track is simply too wide, or the tires too big for the scale.


There are also issues around lack of detail. The gas caps, for instance, are molded in the forward body section, but there is nothing in the chassis below them. As well the engine is very short of detail, only partly alleviated by my addition of plug wires. Some scratch building would have fixed these problems, but then it wouldn't have been a quick build. Unfortunately there aren't a lot of underhood shots online to start from.


As race cars, the two are very similar in concept: a relatively small mid-mounted engine which still manages decent top speed due to a low, aerodynamic profile and a long tapered tail. While Ford was running 7-litre Galaxie motors, with buckets of torque and ~450 hp from 427 cubic inches (say 65 hp per litre), these little tiddlers were making well over 100 hp per litre -- 123 in the case of the flat 8 in the Porsche, giving 270 hp from the 2.2 litre. I am not sure what the A210 had available, but given the biggest motor was a 1.3 litre outfit, I am guessing 130 to 140 hp is probably not too far off the mark.


From an aesthetic point of view, the 907 is probably one of the least appealing of the Porsches from this era. The little upswept side windows, combined with the overall profile that rises in the front to a peak then drops slowly to the rear, do not scream speed. The Alpine, while featuring a greenhouse that is taller and wider than the prototype-inspired 907, is remarkably attractive in this context.


Aesthetically, the view from the forward three-quarters is probably the best angle. (Obviously I missed a couple of sinkholes in the sides of the front fenders just behind the headlights). I think I'll live with it.


Overall, this a useful addition to the Le Mans shelf which now includes 12 cars, ranging from the 1959 Aston Martin to the 2006 Audi R10, and including cars from the slower classes. Only 20 more Le Mans cars in the stash, ranging from a 1930 Blower Bentley to a 1997 McLaren F1 GTR.

So what's next? Well, the weather is improving so I may be out more. Starting with right now!

Thursday, April 6, 2017

Porsche 907 chassis

The 907 turned out to be an excellent pick for a quick build with decent results. It is clearly a classic Heller kit at heart, in spite of the Japanese packaging; a lot of the bits go together in a way that is very reminiscent of Heller's Alpine A210 that I put together some time ago.


The engine is pretty simple. I added plug wiring; the engine has a pair of 4-cylinder distributors driven off the back of the motor and one plug per cylinder. The 908/03, as modeled by MFH, has the 3-litre motor, twin plug heads and a single distributor driven off the front of the engine.


Once installed, the chassis tubing is interesting, but locations for it all are poorly defined. The classic Tamiya kits of Le Mans cars all have much better dowel and socket arrangements. There are no ignition coils; I am just going to fake it by running coil wires forward to the bulkhead.


All in all, a nice, quick build that will look good in spite of the low parts count and the relatively simplistic representation of major components. Next up: the initial coat of white on the body shell is drying; it will need taping and a coat of red around the front bodywork. Not bad for having opened up the box less than 6 hours ago.

Porsche 907, 908/01 and 908/03

With the 1/43-scale BRM H16 from Model Factory Hiro coming along quite nicely, and with the completion of the Aston Martin DBR1 from Profil 24, I am beginning to think it may be time to get back to the 1/24-scale 908/03, also from MFH. (Updates on the H16 are posted here)

Regular readers, if any (you are a silent bunch! Is there anyone out there?) will recall this got bogged down over a throttle return spring, click here. Lurking immediately beyond the spring in terms of complexity were the distributor wiring and injection plumbing. With twin-plug heads and a single distributor, there are 16 plug wires, alternating red and black, leading into the distributor, plus two coil wires. As for the injectors, they are minuscule little spun-cast bits that need to be inserted into the air intakes just right and the clear fuel line then slid over them. At the time, I figured this was a disaster waiting to happen, but since then I have made my own distributors and wired up several engines, so it may be that I am ready to tackle this monster of a kit again.

On the other hand the last couple of efforts have been quite challenging. The H16, at 1/43 scale, has been built entirely while peering through the 4X desk magnifier, and the Aston Martin came with its own challenges. So I decided it is time for a quick break. I dug this kit of the Porsche 907 and 908 out of the stash.


The kit is an odd one which I probably got from eBay. Built by the Japanese company Union Model Company Limited, with an address in Tokyo, the instructions are the usual Japanese with poorly translated English notes. So far so good, but the box art is mainly in French and the floor pan has the name Heller molded into the sill where it is hidden once the chassis is assembled. So I am guessing this is a reissue involving Heller molds being shipped to Japan, and intended for sale in France, although how the instructions, in English and Japanese, were going to play out there is anyone's guess.


The 907 was the successor of the 910 (a rare case of Porsche project numbers not being sequential, at least up to the 996) and was succeeded by the 908/01. Both cars were streamlined coupes with long tails, the differences being mainly in the engine compartment. (The later 908/02 and 908/03 were open bodies with short tails). The streamlining meant high top speeds, even with the 220 to 270 hp available, and while there were some mechanical issues that cost them wins, the cars did reasonably well at Le Mans and elsewhere in 1967 and 1968. (This was smack in the middle of the period when Ford dominated Le Mans with the 7.0 litre push-rod motor out of the Galaxie; it would take the 917 to beat the Fords.)


According to Wikipedia, the 907 was run with both the 2 litre flat 6 as well as the 2.2 flat 8 from the old Formula 1 program; the 908/01 had the flat 8, possibly in 2.2 or 3.0 litre form (the Wikipedia entries for the 907 and 908 are not entirely consistent). Later 908s eventually got a new 3 litre flat 8 making something like 380 hp, which is what is modeled in the MFH kit.

This kit, which can be built up as a 907 or 908/01, has a generic 8 cylinder motor which is clearly a 2.2 in the 907 version: fan mounted on the top of the block, two 4-cyl distributors, and only one plug per cylinder. There isn't enough detail to tell if it is a 3.0 in the 908 version, which (at least in 908/03 form) would have had a fan mounted at the front of the motor, twin plug heads and a single distributor with 16 plug wires.


The kit will be a nice distraction as it is pretty simple (the box says 102 parts) and should go together easily. I'll go for the 907 version since the accuracy of the 3-litre motor is poor. The chassis paint is drying as I write; stay tuned!

DBR1: Complete, finally

The decal sheet having re-surfaced, I completed the DBR1. This is only my second completed non-styrene kit, and the first from Profil 24 (the first was the Abarth OT 1300 from MFH). All in all a very nice kit which reproduces an historically significant car, and which is a pleasure to build if you accept it will be, as I said in my last post on this kit, an exercise in artisanal fabrication rather than assembly. And to be fair, it was a lot less work than getting a Jimmy Flintstone body to fit an AMT donor kit.


Quality of the build, from an appearance perspective, is obviously only fair. As I get better at these kits I expect the appearance to improve, and one of these days I'll start focusing on paint quality.


Looking closely at the photos, I see one of the dashboard decals has fallen off since I put them on last night ... I'll have to look through the parts bin.


The engine worked out quite well, even if the plug wires don't run inside a tube the way they are supposed to. Fabricating distributors was a lot of fun and in perfect keeping with the artisanal nature of the kit.


The paint still looks better in real life than in the photos, for some reason to do with lighting and my old point-and-shoot Canon SD 1000. Other colours all seem to work out nicely. In this case it is Tamiya TS-78, Field Gray, which is a flat military colour that is really green rather than gray. It went on over Tamiya light grey primer, and a coat of clear afterwards was meant to increase the gloss, but realistically a lot of polishing would have helped.

All in all a great addition to the Le Mans collection. So what's next? I have some ideas; stay tuned!


Wednesday, April 5, 2017

Monster trucks part 2

Back in July 2015 (click here), I spent some time in Iceland and was impressed by the monster trucks that are commonly used there for off-road and glacier expeditions. I was back in Iceland again recently and took a ride in a very impressive piece of machinery, which would make an interesting subject for some intrepid kit-basher/scratch-builder out there. Let me know, using the Comments box below, if you are interested; I have lots more pictures, in higher resolution, than what is posted below.


Built by the German truck company MAN, it is a surplus NATO missile launcher, with the missile launching bits removed and a cabin for about 40 people added. According to one of the crew, the diesel motor makes about 400 horsepower and well over 800 ft-lbs of torque. This makes crawling along in low gear through just about any kind of slop a breeze.

The view from the second row of passenger cabin over the top of the engine compartment and cab was pretty impressive as we crawled up a glacier in blizzard conditions. The photo below was taken at lower elevations where it wasn't blowing quite so hard and we could actually see something.


Once on the glacier, we all stood around briefly before taking a tour through tunnels drilled through the ice. The photo illustrates the impact of the onboard tire pressure control system, which involves a tube running from the fender to the wheel hub. The guide said it was controlled by an app on the driver's phone, but I would have guessed a knob in the dash would work as well if not better.


I foolishly didn't get the size of the tires, which are made by Michelin, but note the studs. Outside diameter is at least 36 inches.


On the way back down, we passed another one of the company's trucks heading up (they have three in all).


The slop was pretty heavy and the lack of wipers on the passenger cabin windows was probably the only disappointment.


Also on the way back to the parking lot, we passed some poor bus driver who unwisely tried to climb up the same route and got himself thoroughly stuck. Our driver stopped to chat but apparently there was a heavy hauler on the way to dig out the bus, so we pressed on; the winches front and rear probably would have gotten him out, but our crew had another batch of tourists waiting their turn. The passengers on that bus will have a good story to tell, although I am sure they didn't see the advantage at the time!


Finally there were a few other so-called Super Jeeps (common terminology in Iceland even if the vehicles aren't technically Jeeps) in the parking lot, no doubt preparing for some off-road business. Note the snorkel air intake and the extended linkage on the sliding side door.


A fascinating country, Iceland; unfortunately the 330,000 inhabitants look like they will be overrun by 2.5 million tourists this summer.

P.S. if you go, please note it is illegal to drive your farm tractor on main highways around Reykjavik. However, this prohibition only applies during rush hour, so it's OK otherwise.


Skál!