Tuesday, October 31, 2017

Audi S1: Wheels on

Wheels are on! This required some work as resin bits tend to be relatively inaccurate -- in this case the axle shafts are not really round, or even cylindrical.


An aggressive little beast. It's looking pretty good at this point although as always I can see the flaws.


Next up: dashboard, glass, air dam and mudflaps; then the rear wing which is sure to be a challenge as it consists of 7 pieces: two supports, two end pieces, and no less than three wing sections, all without a single doweled joint. Devising some sort of jig to keep it all straight while the glue sets will be interesting.


No need for a rear-view mirror -- the trunk and wing are stuffed full of radiators.


Stance and track are good and reproduce what you can find online.


I've got a week or two to finalise this, as well as the glass on the D-Type; then I need to pack everything up and move out while my 98-year-old home is gutted and rebuilt. There won't be a lot of model work going on until well into 2018, unfortunately, as I'll be couch-surfing and renting temporary accommodations where paint fumes will not be welcome. Keep on modeling!

Tuesday, October 24, 2017

Audi S1: Decals and grilles

Got all the decals on. Now I just need to keep my fat fingers off it for a day or two before putting on a coat of clear.


A decent effort if not show quality. This was the first resin kit I started, and eventually set it aside for a year while I built up the skills to deal with resin's quirks.


A trunk full of radiators. The longitudinal engine, with 5 cylinders instead of four, leaves no room ahead of the engine for a radiator. The production 5-cylinder cars, Audi 100 and 200 (4000 and 5000 in North America) all had the radiator to one side, with the cam belt essentially right behind the bumper; eventually Audis were built on the VW/Audi corporate transverse engine platform. I guess 450 hp requires lots more radiator, and I am guessing the extreme front weight bias, combined with the very short wheelbase, must have made it a bit twitchy; so moving weight to the back makes sense for several reasons.


Dashboard, lights, glass, and a few more photo etched bits remain to be finished up. The monster rear wing, made up of 9 bits (three spun-cast, six photo-etched), will likely be a challenge. Stay tuned!

Monday, October 23, 2017

Audi S1: Chassis

Chassis assembly was relatively quick once everything was painted. Some minor fit issues were easily overcome.


The underside has decent detailing, although the exhaust pipe and transmission are molded in.


In the absence of a strip of fabric to go with the photo-etched hardware, the seat belts are strips of painted Tamiya tape.


The stance looks reasonable; the rear track seems a bit narrow, although this is consistent with period footage (click here). It was a short little thing, too, with quite a bit taken out of the wheelbase of the production quattro.


Body work is next, including approximately 20 photo-etched wire mesh screens. Seems there was a lot of heat to dump...

Sunday, October 22, 2017

Audi S1: Picking up after a long break

The last time I posted about this model was just about exactly a year ago, on October 10, 2016. The blog is very useful in recording what paint I used, etc., as I have forgotten by now. So getting back up to speed should be pretty simple.

The S1 was the first implementation of Audi's quattro 4WD system, and, combined with a turbocharged 5-cylinder motor making 450 hp, took Walter Röhrl to a number of wins in the rallye world. When the Group B monsters were banned, the S1 (now making close to 600 hp in E2 form) and Röhrl went to Pike's Peak and continued their winning ways.


The kit is another Profil 24 effort. With the Jaguar D-Type and Aston Martin DBR1 under my belt, I feel it's time to get back to this one, which was the first Profil 24 kit I bought.


The body, with the integrated roll cage, requires some care in detailing. I recall the turbo needed some fiddling to get it to both sit straight and fit under the hood.


The underbody also makes some compromises, with transmission and exhaust system molded into the floor pan.


Nonetheless this is looking good and it should be a nice addition to the Monte Carlo shelf. Stay tuned!

Friday, October 20, 2017

D-Type: Complete, except for glass

... and glass always makes me very nervous, especially the vacuum-formed sheet that you have to cut out, so it is on hold until tomorrow, maybe.


A very interesting car. XKD 606 was one of the last ones built; with the long nose and the fin, it stood out and was successful at Le Mans and for a number of years afterwards.


A very interesting kit as well. It is well done, as you would expect given the price, but the usual resin challenges arise. Lots of fiddling and fabrication are needed to get it right. Problems I ran into included the rear axle not being straight (unglued and modified the right rear trailing arm assembly), and the front suspension which is too high (not fixed). Finally the instruction sheet should not be followed in sequence as there are bits that are not mentioned until too late; you should read it carefully and plan your own route through it. Nonetheless this is a particularly well made kit and is among the best I have seen from Profil 24.


I also scratch-built a couple of additions. The engine is wired, using a Parts by Parks 8-cylinder distributor with two wires cut off. The hood and the fuel filler cap are hinged, with hinges fabricated from various Model Car Garage packs and the parts bin.


Overall I am very happy to have it on the shelf, where it fills a critical gap in the Le Mans lineup. Most of the collection is safely in storage as I plan home renovations, so there are currently no pictures of it with the DBR1 (1959 winner) until I move back in, hopefully early in the winter.


What's next, apart from the glass? I'm not sure, but if the contractors turn up in a week or two to start demolishing, maybe nothing until mid-winter. Ciao!

Thursday, October 19, 2017

D-Type: gluing up the monocoque shell

This took some bravery as the rear wheels won't fit over the spindles once the upper half of the monocoque is in place, due to the way the rear fenders obscure the top of the wheels. I much prefer putting wheels on last to prevent problems like snapping axles off while wrestling with something else, or in the interminable handling that comes of finishing up, but in this case the rears have to go on early.


In turn this required resetting the rear axle, which was tilted such that one of the rear wheels was off the ground, by removing and regluing the right side trailing arms; it also required making little thin-wall tubular spacers out of brass tube because the wheels are loose on the spindles. There remains a problem of the rear track being significantly narrower than the front, in direct contradiction to my good friend Mr Google who states unequivocally that track, front and rear, was 50 inches. I'll leave this alone however; the appropriate fix would be to sand down the rear inner fenderwells which are thick due to the nature of resin casting.

Following the mating of the two monocoque halves, the first step was final coats of blue and clear, which in  turn required more taping. The photos unfairly make the finish look sloppy, although to be fair it isn't exactly show quality.


The under hood area was then completed, including fuel injection, exhaust manifolds, subframe, radiator, oil tank, water and oil plumbing, etc. It's all coming together, slowly but surely.


Oh and I also had to make another hinge for the fuel filler door, because the first one came apart after too much fondling :). I updated my last post to reflect this and to propose a solution. Apart from not fondling it, I mean ...

Monday, October 16, 2017

D-type: making a hinge for the fuel filler cap

A while back I ordered a couple of different types of hinges from Model Car Garage, and I decided the Jag's fuel filler cap (a separate part in the Profil 24 kit, and built into the tail fin) would make a good guinea pig for a first try.


I had previously watched a series of 3 videos online (first one here) which laid out the basic principle of using the piano hinges. (MCG also makes door hinges for hot rods which appear to be quite different). The video is highly recommended, at least the first one; the presenter is very good but does tend to ramble a bit, and the videos drag a bit.


In particular pay attention to the calculation around the length of the hinge fingers versus the circumference of the pin. Best to be a bit on the short side so the finger doesn't interfere with the hinge plate that will be the glued surface. The wire in the kit has a diameter 0.016"; the circumference would be 0.016" times 3.1416, but you probably want 0.016" times about 3.


Next, if you are an old guy like me, you'll want a 4X desk lamp or a pair of those dorky magnifying goggles with the integrated lamp to see what you are doing. This goes well beyond what the trifocals can accomplish!


So it turned out fine in my view; next is sorting out the cosmetic appearance. The question is obviously how often can I open and close this without it breaking...

UPDATE: The hinge did indeed fail, partly due to enthusiastic handling on my part, and partly due to the issue of which way you will fold the hinge. See the drawing; there is clearly one direction in which the hinge tongues have to fit into the space between the opposing tongues and the hinge plate, and this direction, the probability of bending the tongues in the wrong way is high. So I installed the new hinge in the opposite direction.


Hopefully this is clear ... drop me a line if not.

Sunday, October 15, 2017

D-Type: Chassis, so to speak

Jaguar made life very confusing for car collectors when they put a "chassis" serial number on what we would call the front subframe, and a separate "body" serial number on the monocoque tub that we might call the chassis. The front subframe carries the front suspension and the engine mounts, but can't really be built into a rolling chassis without the tub, which carries the rear suspension. (This method of construction carried over to the E-Type). Conversely, the monocoque tub can't be built up into a rolling chassis either. You need the two halves, which are bolted together at the forward bulkheads and inside the transmission tunnel, to build a rolling chassis.

Fortunately the Profil 24 model has portions of the front subframe molded into the monocoque tub, so it is possible to build up a rolling chassis.


The solid rear axle is well located, with four trailing arms and a linkage involving an A-arm for lateral location. Springing was torsion bars front and rear; in the front they are built into one of the A-arm mounting bushings while they are mounted transversely in a tube under the driveshaft in the rear. The cramped passenger footwell is visible here, where the exhaust manifolds are threaded through the floorpan; the extra wheelbase on the E-Type was partly to allow two full footwells.


Unfortunately the rear axle, which hangs on some very nice photo-etched trailing links, appears to be crooked, and the car won't sit flat on its four wheels if this isn't sorted out. The source of the problem, which is obvious in the photo above, is not clear at this point.


It is all looking like a car, though, and while all the usual issues with resin are apparent here, this is a particularly well-done kit. Stay tuned!


Wednesday, October 11, 2017

D-Type: Paint, take 2

So having stripped all the paint off the body following a disastrous first attempt at painting, I primed it again (this time with Tamiya primer), followed by several coats of Tamiya's TS 53, Deep Metallic Blue. The original colour wasn't right, although the clear blue looked good on top of the gloss aluminum; this is much closer to period photos of the Ecurie Ecosse livery, and is not quite as purple as the picture (taken with my cell phone) looks on my screen.


Taping it all up so it would hang together was no mean feat, and supporting it on a stand was a non-starter because the floor pan is part of the monocoque and thus gets painted. I wanted it all together because some bits were getting more paint than others and were thus of different shades.


It all came out looking pretty good if I do say so myself... and the colour, with my little Canon point & shoot in macro mode, looks much closer onscreen to what I see when I look at it.


Next steps: cleaning up the overspray where the blue got onto the aluminum, which I sprayed first. The assumption here was that I could fix minor issues by putting aluminum on with a brush, but that fixing the blue would be challenging without a lot of taping. But first: Let it sit for a couple of days!

Tuesday, October 10, 2017

Tips for beginners: let paint sit!

Of course, being an impatient idiot, I couldn't let the paint sit on the D-Type. Instead, I decided it needed another coat which promptly ran and created long rivulets of wet paint dripping onto the floor of my 'paint booth'. In a panic to hold it up and force the rivulets to flow in other directions across the rest of the body, I dropped the body onto some paper towels, which promptly stuck all over the wet paint. Of course I knew this would happen, having done it before; it just goes to prove the old saying that if you don't learn from history, you are doomed to repeat it.

After pondering the options, I decided not to try and make small localised fixes but to strip it all off and start over. This was at least partly due to the fact that the blue, while nice, is not entirely right for the Ecurie Ecosse cars. So it all went into my bath (described below) with lots of 99% isopropanol to take off the Tamiya paint. (Tamiya thinner is mainly isopropanol with some n-butanol and isobutanol thrown in for good measure; it is also a lot more expensive than straight isopropanol from the pharmacy which seems to work well.) After soaking overnight I went at it with a toothbrush. Surprisingly, once the Tamiya paint was gone, the primer too began to lift, so it is back to the resin. At least there will be no mold release agents after all this!

I'll post more as I recover from this setback, but the items you should have on hand for this sort of thing include:
  • A fine mesh strainer to put your bits into so they don't disappear down the sink;
  • A shallow pan (non-aluminum metal baking tin) which should be just a bit bigger than the strainer to hold the solvent;
  • A box of disposable latex gloves from the pharmacy to protect your manicure;
  • Toothbrushes which you should keep away from the bathroom so there is no confusion! and
  • About a litre of the appropriate solvent (isopropanol for Tamiya, lacquer thinner for enamels);
  • A funnel with a coarse strainer for putting used solvent back in the bottle or can for future use or for disposal. 


You should pay attention to safety here as well. Solvents and their fumes can be bad for your health as well as flammable. Do your best to trap and recover used solvent, but any solvent that accidentally winds up going down your sink drain should be accompanied by dish soap and lots of warm water to dilute it and get it to the sewer system without pooling in drain traps. And note that some solvents (I am thinking of Easy-Off oven cleaner or other very caustic stuff that is used to strip chrome) may corrode through aluminum pretty quickly, and can make a significant mess if left where a spill won't be contained. A stainless steel utility sink is a good place to put your pan if you are going to let it sit overnight, and will capture spills while pouring the used stuff back in the bottle. If it is going to sit for any length of time, I also enclose the solvent bath in a large Zip-Loc bag to minimise fumes and smells, and to keep the solvent from evaporating and disappearing.

One step forward, two steps back ... stay tuned!

Monday, October 9, 2017

D-Type: Finally a decent kit!

For most of my life I have dreamed of owning a D-Type... unfortunately real ones change hands, on the rare occasions when one actually comes up for sale, for tens of millions of dollars, euros, pounds, whatever. Profil 24's recently released resin kit was a nice surprise as there really hasn't been a decent kit of this iconic sports car. 


What a gorgeous car! Almost as nice as the Lusso next to it. Oh and the big blue glob behind it? No contest. Although it might be useful to chase parts when the Jag or Ferrari is not cooperating :). 

In 1957, Jaguar dominated road racing, with D-Types taking 5 of the first 6 places at Le Mans. (The kit reproduces the 1957 winning car driven by Ron Flockhart and Ivor Bueb). Jaguar managed 5 wins at Le Mans with the classic 6-cylinder motor, in 1951, 1953 and 1955-56-57. Aston Martin's DBR1 took the race in 1959 (see my model, also from Profil 24, here), and that was that for British cars at Le Mans until Jaguar managed it again in 1988 with a 7-litre V12. Arguably the next 6 wins went to Ferrari because Ferrari finally adopted disc brakes; the D-Type's long stroke, prewar engine design was no match for Ferrari's high-revving, big bore motors, and Jaguar only won because the disc brakes were so much better than the drums that Enzo clung to for far too long. Carroll Shelby, who drove the Aston with Roy Salvadori in 1959, ended the Ferrari run by means of a 7-litre Galaxie motor, but that is a story for another day.  

So getting right to it, the usual resin cleanup, involving soaking in 99% isopropanol, was followed by a couple of coats of DupliColor primer-sealer. There were few if any of the usual resin flaws, except for the odd bit of flash, and it all looks like it will go together well. Note the cleanup is critical, because a couple of smaller parts still had paint issues in corners and had to be cleaned up again. 


Next was a series of coats of paint designed to mimic the dark blue of the 1957 Le Mans winning Ecurie Ecosse team cars. Tamiya TS 17 Gloss Aluminum went on first as this is the colour required on the forward half of the body, which is actually the subframe. Then the subframe portions got taped up and the body got a couple of coats of TS 10, French Blue, followed by multiple coats of TS 72, Clear Blue. You may recall from past discussions in this blog that Tamiya's French Blue is darker than the classic Gulf Oil colours; it is lighter than the Ecurie Ecosse livery. Fortunately the clear blue top coat, which gets darker as you add coats, is very nice and does a good job of approximating the original metallic dark blue.


Now I just have to keep my big fat fingers off it while the paint sets! This will be challenging. 

Sunday, October 8, 2017

3D printed LS3 V12 motor Part 1

I washed the components in a bit of dish soap, as per Ron Olsen's instructions (here). No mold release agents means no aggressive degreasing is needed. The picture shows how the head and valve cover are joined by a couple of very fine 'sprues'.


Then I glued up the oil pan, front cover and bell housing.


Superglue works but takes a bit longer than usual to stick. (I am using Bob Smith Insta-Cure+, in the gap-filling medium formulation with 5-15 second set time.) I am not sure if this means longer term challenges, but it all seems solid now. 


The parts have no dowels or locating ribs, so you either have to eye-ball it really well, or drill and pin. The block has a number of very small holes, and the front cover has little bosses where bolts would go, so these could serve as starting points. Being in a hurry, I didn't bother, but note the milky, semi-transparent nature of the material (some kind of Nylon?) makes it difficult to see edges. Furthermore, the edges of the crankcase where the pan attaches consist of very thin walls, which is realistic but hard to see for an old guy like me. It might be easier to primer first, then scrape and glue. The picture shows the block viewed end-on with the crankcase ribs pointing at about 2 o'clock.


I will wait to put the heads on as I would like to have the proper intake manifold in my hands to ensure the heads are centered properly. As mentioned in my last post, I wound up with the wrong manifold (1/32 instead of 1/24) so I have ordered a replacement. Once that is all in hand I'll move to primer and paint.

There will be some bits required to complete this, mostly from the parts bin: accessory drives off the crank, water pump, oil filter, starter motor, motor mounts. The engine probably has no distributor, although the plugs are molded into the heads on the exhaust side under the headers. I'll probably put the transaxle on it with an eye to building up a wicked mid-engine device around it.

There aren't a lot of pictures of this motor online, but if you Google "Running V12 LS Spotted At SEMA #TENSEMA16", you will find a post from about a year ago. The people making this motor also have a website where they are offering long blocks for $35,000, and you can see some details such as oil filter placement there.

Stay tuned! This could get interesting.

Saturday, October 7, 2017

Styrene, resin and 3D printing

I got a couple of packages in the mail recently, courtesy my good friend Mr. E. Bay. In particular I got a couple of resin kits and my first batch of 3D-printed parts, so I thought this would be a good opportunity to review the pros and cons.

I am assuming anyone reading this has some familiarity with styrene: large companies like Tamiya or Round 2 crank out large numbers of kits that they think will sell well. This is because styrene requires expensive molds and injection molding systems, so you'd better be able to amortise the cost of a mold over many kits. Parts are usually good fits with minimal part lines or flash, and the best are all doweled together so assembly really is pretty simple. So I won't dwell on styrene any further.

Resin parts can be cast at low temperatures and pressures in your garage. The necessary silicon molds take time to make, and they wear out fairly quickly, so bits will be costly due to the labour and cost of the silicon. There is a huge number of small resin casters out there, typically catering to specialised markets and providing the interesting odd-ball stuff some of us want. The variability from producer to producer, however, can be enormous.

To wit the first of my recent acquisitions: a Rolls Royce Merlin V12 from a Dutch company called Firerods. The $20 kit came in a baggie, with no instructions, and the parts are going to require an awful lot of fiddling to get them right as you can see by the poor fit of the two halves of the block. No surprises here, given the price. The motor will go on the shelf awaiting a suitable chassis.


Next up is a more detailed motor for the Tamiya Subaru STi kits, from Hobby Design. At $100, the kit comes in a cardboard box with a colour instruction sheet and a photo-etched detail sheet. Parts detail is very nice. There will still be large sprue sections to remove, but it looks good and I expect it will fit in the engine bay of a Tamiya kit quite well.


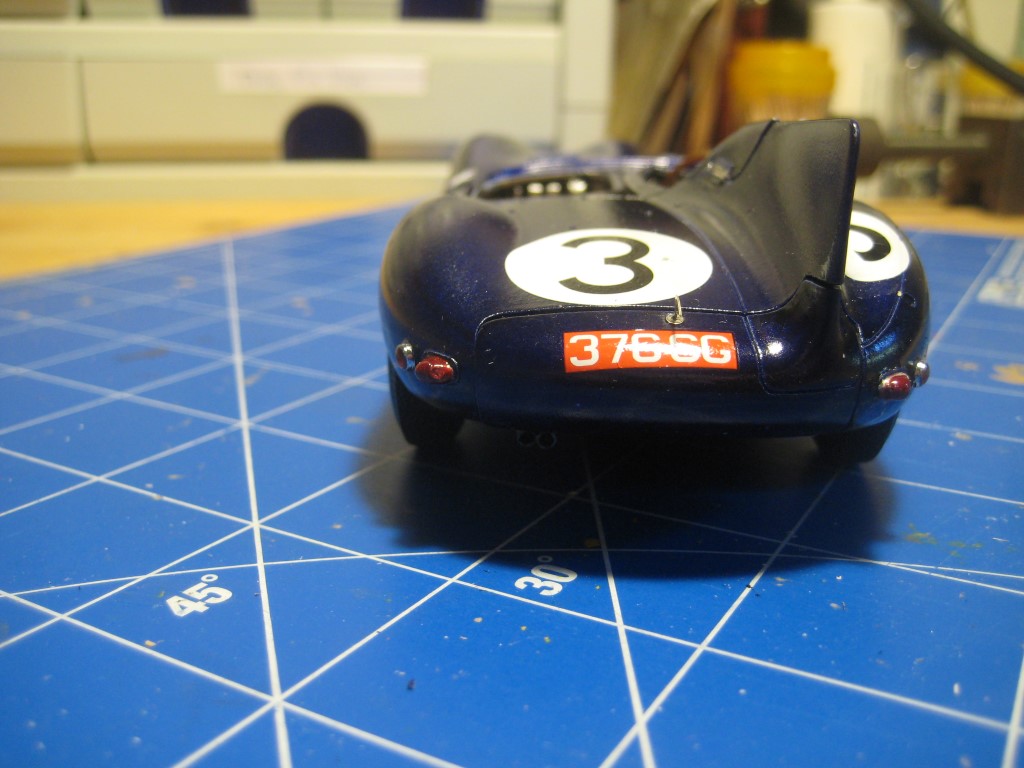
Next up is a complete resin kit of the Jaguar D-Type from the French company Profil 24. At 200 euros (about $250-$300), this is not cheap, but it will build into a complete car. The detail of the lovely Jag six is great and while there is trimming to be done, it should not be huge.


Now we come to the disruptive technology: 3D printing. I ordered some bits from Shapeways (click here) just to see what the quality is like. The site offers 1/24 parts to make a V12 LS3 motor -- essentially a one-off stretched Chevy small block motor -- which includes block, a tree including heads, valve covers, front cover and pan, and a separate tree with two headers, for about $35. I added a couple of transaxles (not Hewland but they look great) and a few other items to come to about $60.

The quality is just astonishing, and I hope the pictures show this. The first one illustrates one interesting point: once a shape exists as a computer file, you can print it, on demand as needed, at any scale. The LS3 is offered in scales ranging from 1/6 to 1/32 (including either 1/24 or 1/25). I accidentally ordered the 1/32 inlet manifold (to the right of the block), and this will be replaced by a 1/24 part.


Pistons, rods and a crank would not be impossible!


The next picture shows the heads, valve covers, front cover and oil pan, all on a very delicate web of 'sprue'.


One last picture shows the 3D V12 block next to a Ferrari V12 made of spun-cast white metal from Model Factory Hiro. The metal bits require drilling out dowel holes and filing of surfaces to make them flat, but the result can be stunning. Nonetheless the complexities of pouring molten metal into a spinning mold make this an unusual and expensive approach.


Obviously I will need to paint and build the LS3, and will report on any challenges. So the next question is quality of an entire body. I am getting my nerve together to order something, perhaps the Ferrari 166 MM Barchetta from TDR Innovations (click here), to see what it looks like. At $90 it is not cheap, but if it is significantly better than the resin stuff, it may well be worthwhile. Surface quality and warping of a thin shell are two items I worry about, as well as how exactly the computer file reproduces the real thing. But look at the upside: no out-of-stock issues because it is print-on-demand; no scarf or flash because there is no mold; cheaper and faster than resin again because there is no mold; and the possibility of making all kinds of really interesting oddball stuff. If I were a resin producer, I would be very worried. Stay tuned!