Sunday, December 31, 2023

Ossa 250 Monocasc: First impressions

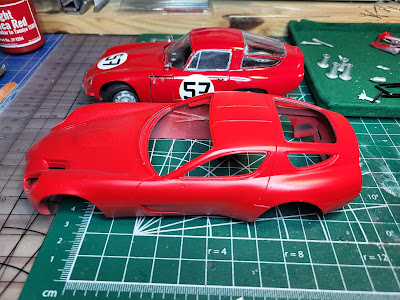
An interesting kit. Judging by the minuscule holes drilled through various bits, I suspect a lot of it is 3D printed, not moulded. Detail level is huge, and there is very little flash or other flaws found in moulded parts.


But there are some issues. Parts are not numbered according to order of assembly; nor are they ordered according to where they are located on the sprue or in the baggies. A short section of sprue might include parts 27, 33, 37 and 44. These are not all needed at the same point in the assembly sequence; furthermore, that sprue is in a sealed plastic bag with sprues carrying parts 14, 22, 23, 24, 26, 27, 28, 33, 34, 49, 73, 74, 75, 76, 77, 80, 86, 87, 88 and 89, of which only a few are required in any given assembly stage. Some parts have numbers beginning with a letter, e.g. R80. But not all numbers from R1 through R79 exist. A lot of bits are minuscule pins, dowels and rivets. These are easily knocked off the sprue, broken or lost. I've already pinned three or four parts with brass where the resin pin is missing or inadequate. 


Some components are made of a lot of stacked bits, such as the clutch with 5 discs and 6 plates. I had to leave a disc and plate out for it all to fit inside the housing. I will leave other adjustments for the Alert Reader to identify.

So finding anything, if you don't make an index, is very time consuming. 


Stay tuned! This will continue to be interesting.

Saturday, December 30, 2023

Ossa 250 Monocasc: Overview

And now for something completely different: this Ossa 250 Monocasc was ridden by Santiago Herrero.


The single cylinder 250 cc 2-stroke made 42 hp, not enough to compete with the Japanese bikes, but the novel monocoque chassis was stiffer and lighter than the competition, making up some of the shortfall. The chassis was in fact my main reason for buying the kit.


Having finished 3rd in the 1969 GP series, Herrero sadly was killed while riding in the 1970 Isle of Man TT. The kit is resin at 1/12 scale from Brach Models and replicates Herrero's 1970 Isle of Man TT bike. (My other bike, already on the shelf, is Mike Hailwood's 1966 Isle of Man TT bike, the Honda RC166 with the 250 cc inline 6.) 
 

Detail level is high and it looks like there will be some cusswords involved in assembling the individual rollers in the chain, among other things. Stay tuned!

Tuesday, December 26, 2023

Alfa Romeo TZ3 Corsa Zagato: Complete (#9 for 2023)

My first and so far only Studio 27 kit: it's a decent resin body with metal and photoetched bits, but no engine or chassis detail. 


Seen here with the original 1964 TZ (car #57) and 1966 TZ2 (not started), both from Model Factory Hiro. 


This was another attempt to get comfortable with the airbrush. All in all the finish requires work due to orange peel, and the fact the airbrush-specific paint goes on matte; and the 2K clear everyone raves about is finicky as it involves a hardener that turns the paint to sludge in about 30 minutes. Plus the cleanup is more involved than with cans. So far the main benefit I can see is the availability of essentially any colour imaginable, unlike rattle cans where you are limited by what's on the shelf at the local hobby or hardware store. 


PS I absolutely detest vacuum-formed windows. But the result is usually worth it. 


Stay tuned!

Wednesday, December 20, 2023

Alfa Romeo TZ3 Corsa Zagato: Paint

More practice with the airbrush: The original Alfa Romeo Giulia TZ (dubbed TZ1 in retrospect) of 1964 is shown here with the 2010 tribute TZ3. This version of the TZ1 managed 1st in the GT 1.6 litre class (13th overall) at Le Mans, driven by Roberto Businello and Bruno Deserti. 
 
 
The TZ2 of 1966 had the same classic Alfa twin cam, twin plug engine in a slightly longer body. My kit of this is on the shelf awaiting a slot in the build schedule. 


The airbrush paints from Zero Paints (as on the TZ3) go on matte; the TZ3 will get a couple of coats of gloss clear once I've sorted out few little issues. 
 
 
It's worth noting that the name TZ refers to Tubolare (as in the tubular chassis) Zagato (as in the carozzeria that designed the body), and while the TZ3 was also designed by Zagato, the chassis is a modern carbon fibre monococque tub.

Tuesday, December 19, 2023

Alfa Romeo TZ3 Corsa Zagato: Introduction

A while back I bought a job lot of oddball kits, because I wanted some of them; others were sold on because I already had them, or wasn't interested in the particular model. I decided to keep a couple that weren't originally on the keeper list, such as this Alfa TZ3. After all, I have kits of the TZ (built) and TZ2 (awaiting building), so why not?


This Studio 27 kit is a curbside model (no engine or chassis detail) made of resin and metal. The TZ3 Stradale (of which nine were made) was built on a modified Viper chassis and included the 8.4 litre V10. The Corsa version (of which one was built) had a 4.2 litre V8, presumably from the Ferrari-Maserati stable, and prettier bodywork than the Stradale. (Both were bodied by Zagato). 


Parts are washed and the can of Tamiya TS-8 Italian Red is ready to go. Stay tuned!

Saturday, December 16, 2023

Alfa Romeo 8C 2300 Monza: Complete, sort of (#8 for 2023)

Complete, except for the cam covers which I melted in lacquer thinner, that is. Fortunately Italeri's spare parts department was able to mail me the cams (and maybe the entire sprue, to be seen) for the princely sum of 6.00 for shipping. 

This is a frustrating kit, in some ways. Some parts are not shown on the instruction sheet; and it seemed to me that some of the decals were mis-numbered. There are huge numbers of those little sprue remnants attached to everything; and the position of some of the metal screws makes it such that you can't really turn them with a screwdriver without risking scratching the adjoining paint. And the level of detail, in a kit that retails for $250 to $300, is substantially less than that of a Model Factory Hiro kit. Granted these are 3 to 4 times as expensive, but arguably the detail could have been improved in some areas.


To be completely fair, I built this in a fairly large hurry, and more patience would have led to better results. 

On the other hand this is a classic prewar race car, and builds on the P2 of 1924. The Italeri instructions state that this version was driven to a win at Monaco by the great Tazio Nuvolari in 1936, but Wikipedia disagrees, stating he was 4th in 1936 (following a Mercedes and two Auto-Unions), and that the 1936 car was the 8C 35 Type C, a true single-seater with a completely new engine. It is likely that the actual car modelled here is the 1932 Monza GP winner, also driven by Nuvolari.


The engine, another masterpiece by Vittorio Jano, is a 2.3 litre straight 8 with two overhead camshafts and a single-stage supercharger; it was essentially the proven 6C 1750 with two added cylinders. Wikipedia gives the power output as 165 hp, which seems low as the Miller 91 (a supercharged 2 litre of similar design) was routinely making 200 hp. 


Comparison with the 1938 Auto-Union Type C is inevitable as the German cars, benefiting from enormous financial support from the Nazi government, ruled the Grand Prix world through the second half of the 1930's. The German supercharged V16 of 6 litres made in the range of 520 hp and was a beast to drive, but it was very, very fast. 


That's it for now. Stay tuned!

Friday, December 15, 2023

Alfa 8C 2300 Monza: Overview, engine and chassis

So the 1/12 scale 1938 Alfa Mille Miglia 8C 2900B Spyder from Model Factory Hiro is now on the shelf. This requires a specific shade of red paint, called Alfa Corse, available from Zero Paints. The fact that this paint is formulated for airbrushes leads to further snowballing as I haven't, so far, owned an airbrush. 


So the next step, after ordering the Zero Paints, was to order a small hand-held air brush from Amazon. I used this to paint the 917K, using a well-thinned bottle of Testor's; it all seemed to work OK. But I figured I should try out the airbrush and Zero Paints on a larger, 'cheaper' 1/12 scale kit such as Italeri's 1936 Alfa 8C 2300 Monza. Hence this post. 


The paint went on well, but slowly! I used Tamiya dark red primer, which may in retrospect have been too dark; I'll probably step back to the pink primer for the 2900B. 


I put decals on over the base red coat, probably a mistake as they don't slide around very well on the rough surface; Zero Paints recommends at least one coat of clear before decals. In my haste, I didn't put on sufficient mist coats of clear (TS-13) over the decals, and several of them bubbled; this is a rookie mistake and I am working on fixing them using sandpaper followed by Tamiya X-2 White with a fine brush. More sanding and polishing will follow, with more Tamiya TS-13 Clear to follow that.  


The engine is nice but the level of detail is not much better than a good 1/24 kit, and nowhere up to the level of MFH. The instructions provide an incorrect firing order (1-2-3-4-5-6-7-8) which I looked up and corrected (1-4-7-3-8-5-2-6, for the keeners).


In another rookie mistake, I tried painting the cam covers, decided I didn't like it, and dunked them in lacquer thinner where they promptly melted. Italeri, fortunately, has spares at a cost of 6 euros for mailing, so replacements are on the way. 


The chassis involves some fiddly 1 mm screws and nuts. The little 'wrench' supplied is useless; you'll need a 2 mm socket or wrench. Furthermore the screws require a flat head screwdriver, so it is easy to slip and scratch the paint. A Phillips or better yet an Allen head would have been appreciated. The steering "works" but will be stiff by the time you've assembled it all.


The aim is to complete this, with the exception of the engine covers so the cam covers can be installed, hopefully by year-end. Meanwhile I have Italeri's 1/12 kit of the oddball 1927 Fiat 806, with a pair of inline sixes on a common crankcase, which I am considering selling. If you are going to build at 1/12, go for the MFH level of detail.

Saturday, December 9, 2023

Aston Martin DB3S: Complete (#7 for 2023)

This car finished 2nd overall and 1st in the 3 litre class at Le Mans in 1955 driven by Peter Collins and Paul Frère. 


And the paint does look pretty good if I do say so myself!


Tuesday, December 5, 2023

Aston Martin DB3S: Still more paint learnings

Step 1: A couple of coats of Zero Paints primer on both the DB3S and a sacrificial resin bit from the boneyard. Wait 20 minutes.


Cleaning the airbrush was particularly challenging here. Lacquer thinner may not have been the right solvent; I see Gravity Paints (a competitor) recommends acetone for cleaning up their primer. Seems a bit much to me. (I  didn't write it down, but I seem to recall that I used Tamiya primer the first time around.)

Step 2: A couple of coats of Zero Paints colour coat, again on the DB3S and the test coupon. Wait a day or two for it to harden properly. The surface doesn't seem to be as rough as it was the first time I put the colour coat on. (I still have about 1/3 of the bottle in case of further 'issues'.)


Cleaning the airbrush is turning out to be the biggest hassle out there. Clearly one should use this only when the spray cans aren't providing the necessary results, mainly in terms of custom colours. 

Step 3: A heavy coat of TS-13 on the test coupon. Looks fine so far. 

Step 4: Light sanding to get the DB3S smooth, then decals.


Step 5: TS-13 clear, starting with a couple of very light mist coats, ten minutes apart, to keep the decals from reacting, followed by a couple of flood coats. 

 
Now to keep my filthy mitts off it until it hardens! And hopefully this brings this saga to a close.
 
By the way, the colour I used for the DBR1, Tamiya TS-78 (Field Grey) with a top coat of TS-13, is pretty close to the Zero Paints colour if one ignores the metallic component. 


Stay tuned!

Monday, December 4, 2023

Aston Martin DB3S: More paint learnings

Hobbies: A never ending source of frustration learning. Today I learned that:
 
1) Zero Paints 2 Pack Clearcoat System Diamond Finish can generate orange peel (surface roughness in the paint) if not put on correctly. 
 
2) Zero Paints 2 Pack Clearcoat System Diamond Finish is very, very hard once dry, and is difficult if not impossible to sand down to take off the orange peel. 
 
3) Zero Paints colour paint, if sprayed on top of Zero Paints 2 Pack Clearcoat System Diamond Finish, will dissolve said Zero Paints 2 Pack Clearcoat System Diamond Finish and lift it right off, even more effectively than a dunking in a bath of lacquer thinner.
 
4) Lacquer thinner will strip all of this right down to the resin in no time. I don't know if it damages resin; I hauled the body out quickly and give it a soaking in hot running water. 
 
 
So it's back to Square One! Gotta love this lifelong learning s#!t.

Sunday, December 3, 2023

Aston Martin DB3S: Zero Paints and an airbrush

When I bought the kit of the DB3S, the vendor kindly included a bottle of ZP-1406, the pre-thinned airbrush paint from Zero Paints that allegedly reproduces the exact colour of the 1955 Le Mans car. This left me in a quandary. On the one hand, there are no rattle cans anywhere near this particular metallic green; it is nowhere near British Racing Green. 


On the other hand, you need an airbrush for this, something I have resisted so far. Is this turning into a slippery slope? In a word, yes. 


Following on discussions with several people, I purchased a handheld airbrush, consisting of a small compressor and a battery pack with USB-C charging port. No compressor, no fancy airbrush, no hoses, just a double action brush.  

Next was to source Zero Paints primer and a clearcoat pack, the former from a local hobby shop with some limited supply, the latter from a friend who doesn't use it. (More on this later). The primer went on well; and Testor's 1108C Light Blue (thinned with Canadian Tire paint thinner) went on the Porsche 917K with no problems. Of course cleaning the airbrush is a pain but I am getting better at it. 


So the time came to tackle the DB3S. The first coats of green involved some learning around how far back to pull the trigger (the adjustable stop is a help once you know how to use it). After putting on about 15 mL, the surface was noticeably rough to the touch. I waited 24 hours, then went over it very lightly with 4000 grit paper wetted in water and a little Dawn dish soap. This improved things, and an additional 5-10 mL paint didn't hurt. These paints, however, go on matte; and you have to clear coat.


A few days later I decided to tackle the clear pack. While Zero Paints says Tamiya TS clears work fine, I decided to tackle the 2K pack. This consists of one bottle each of a clear paint, a hardener, and a thinner. Recommended ratios are 2 parts paint to one of hardener, and an additional 10% thinner. So 10 mL paint + 5 mL hardener makes 15 mL, and an additional 10% is 1.5 mL. (I'm going to need to pick up more eye droppers at the pharmacy). One issue is that the presence of hardener means you have about 30 minutes before it clogs up your airbrush. I mixed 6 mL paint + 3 mL hardener + 1.5 mL thinner, the higher dilution rate for thinner recommended by someone who does this regularly. The result of three coats over 30 minutes is shiny but looks like there is a bit of orange peel. I now see the hardener has a shelf life of 6 months once opened, and I don't know how long my friend had it; this could be part of the problem. I'll let it set and try polishing to see what happens.  


By the time I was done, the airbrush was well and truly clogged with hardening clear coat. Lacquer thinner did the trick and I am learning to do this in the fume hood/paint booth with the fan on high. 

Separately I have ordered (from England) the Alfa Corso red needed for the Alfa 8C 2900B and a couple of other prewar Alfas, as well as some metallic colours. (The snowball is gathering momentum down the slippery slope...) One advantage of an airbrush is the possibility of mixing custom colours... The paint seems to go on fine, and I can use Tamiya primer and clears according to Zero Paints. Stay tuned!