Saturday, November 28, 2020

Ferrari 156 Sharknose: Chassis and suspension complete

I got brave and assembled the rear cradle around the engine, then the front chassis tubes were glued to the cockpit chassis, and finally the rear cradle attached to the cockpit.


The cockpit chassis section, which is made of large stiff flat pieces, was used to ensure the engine cradle stayed straight while the epoxy set.

Then the forward chassis section, which takes the front suspension, was assembled. The instructions had the entire front end, including suspension, radiator and various other gubbins, all assembled before fitting to the cockpit section, but that struck me as extremely foolish -- after a lot of gluing and fiddling, the probability that it wouldn't all line up was high.

 
Once the forward chassis was attached to the cockpit, I went and attached the engine cradle and drivetrain as well.


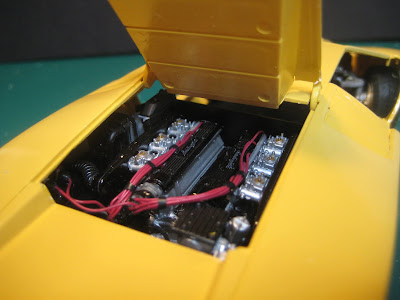
Some time ago I purchased a temperature-controlled soldering iron for this purpose, but chickened out and used 5 minute epoxy instead. No risk of melting priceless white metal bits into a little puddle, but it was still a stressful 5 minutes! But it's all relatively straight and it looks like it will sit pretty much square on its four wheels.

.

At this point I used machinist's blocks to assemble the front suspension in such a way that even if the chassis is a bit crooked, the wheels will all sit flat. 

Stay tuned! This basking shark is moving right along.


Thursday, November 26, 2020

Ferrari 156 Sharknose: Engine compartment and rear suspension complete

Boy does 1/12 scale allow for a lot of detail. I added starter motor wiring and the low-tension side of the coils, but the kit included high tension wiring, fuel lines, throttle linkage, brake lines, coolant overflow and transmission breathers (both of which just dump onto the pavement behind the car, much to the surprise of the guy following!). The photos speak for themselves. 


Stay tuned! There is lots more to come. 

Monday, November 23, 2020

Ferrari 156 Sharknose: Getting back into the groove

This 1/12 scale kit is,well, BIG. And detailed. 

Last update was August 2019 (click here), where I went to great lengths to ensure the chassis would all be straight. The pause was to decide whether to solder or glue the chassis tubes. Solder requires a temperature controlled iron and low-temperature solder; I acquired both and got one or two pieces to stick but mostly it didn't work; I suspect I was afraid to put in enough heat. 

So I'll be going for the 5-minute epoxy where strength is critical. Here is the central cockpit all glued up and ready to go.

Transmission assembly includes the inboard brakes and the clutch and associated bits. This is all needed prior to assembling the rear chassis assembly, which will lean partly on the completed central chassis assembly for keeping it all straight.


With the engine and transmission assembled and glued/screwed to the lower portion of the rear chassis tubes, next step is to finalise the upper portion of the chassis as in the second photo. But first I had to drill out a load of holes for screws and rivets holding A-arms, uprights, shocks and whatnot. Then it will all need to be painted. Once ready for assembly, I'll use 5 minute epoxy which means I'll have to work fast to get it all lined up before the glue seizes up. Some jigs may need to be built or improvised. Stay tuned!

Saturday, November 21, 2020

Lamborghini Countach: Protoype bodywork and chassis

What a fiddly kit! Getting the chassis to sit square on its 4 wheels will be a challenge. 

But the body mods to reproduce the LP500 prototype have turned out reasonably well. 


I did not cut out the vents in the engine lid, as seen in several period photos of the prototype; but I did manage to put in radiator mesh from Detail Master. The "periscope" rear view mirror has also been cut into the roof.


Final assembly looms large. I've slowed down since finishing the Toyota 2000 GT about a month ago; so I am hoping to finish this before the end of 2020. Stay tuned!

Wednesday, November 4, 2020

Lamborghini Countach: Background

 The prototype Countach was exceptionally pretty, but the factory soon figured out the V12 was going to cook back there without some added cooling. Thus the first in a long, sad line of tacked-on scoops, vents, flares, wings, ducts, tabs and other aero additions of dubious aesthetic benefit. 

Bertone's body may have been impractical but the pure lines of the prototype were spectacular; I am therefore going to build up this Fujimi kit to resemble the prototype as much as possible.


Here I've started filling in the vents and scoops on the flanks.Next will be a series of gill-like slits, and to fill in the NACA duct in the flank.


The V12 looks good but the two intake camshafts are too far apart. I'll probably flow some black paint into the valley between the banks to hide this. 


A classic shape. Stay tuned!