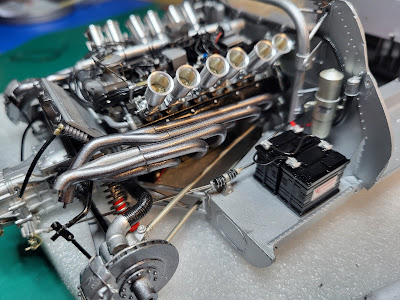
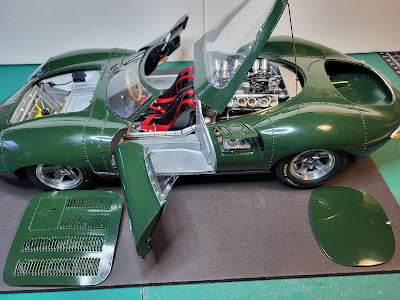
The motor is complete. I like the little clutch return spring on the slave cylinder and took advantage of the large scale to put in alternator and starter wiring.
Stay tuned! More to come.
A blog devoted to sharing my adventures building 1/24 (and 1/25) scale model cars, whether styrene or resin. Enjoy!
The motor is complete. I like the little clutch return spring on the slave cylinder and took advantage of the large scale to put in alternator and starter wiring.
What a strange little cylinder head, with the inlets between the cams! Yet it appears Abarth made a large number of these (50 cars at least for homologation). Possibly the relatively narrow bore spacing imposed by the Fiat 600 engine block, combined with the need for really big Webers, meant the carbs wouldn't fit side by side as in a conventional setup. In any case it means the plugs are well off to one side, not to mention inaccessible, and water piping is external.
Stay tuned, more to come.
First step as always is to identify, sort and wash all the bits
Do yourself a favour and get the little 12V drill from Amazon.
It's beginning to look like an engine...
But I will admit I have never seen, in real life or in photos, an Italian 4-cylinder engine with intake ports in the top of the head between the cams. Not only that but they are mounted horizontally on long tubes, one each side of the engine.
Calling this one done. Some last minute screwups around the body, which I will leave for my Alert Reader to identify. No need to point them out, I know where they are. Seen here with the 1964 Le Mans version of the TZ (a.k.a. TZ1) and the chassis from the Lotus Elan. Perhaps the next step would be a lift or jacks to get the body off the ground.
For those that haven't seen this, here is what you get when you order an MFH kit. The 1/12 scale kit of the Abarth 1000 SP clocks in at 1.456 kg, relatively light by MFH standards -- the Alfa 8C 2900B kit (complete in the box) weighs 2.368 kg.
Here are the resin bits lined up.
Bag #2 has some chassis bits, more parts of the brake calipers, inner door frames (the outers are resin), more chassis and suspension bits, and some unidentified doodads (UDDs).
Bag #6 (which I didn't photograph) contained more UDDs. Here it all is parted out into a small parts bin, more or less by category.
If my intention was only to exhibit the naked chassis, then I'm done and this is #3 for 2024.
Rear suspension and chassis structure is complete.
In late 2018 I completed the Model Factory Hiro kit of the Alfa Romeo TZ, later known as the TZ1 (click here for details). In retrospect that was a very nice kit of a lovely little production race car.
I started by straightening and shaping the various components making up the chassis, then painting them gloss black. Other bits are also called out as black but I'll be playing with colours to ensure the shape of the chassis stands out. Overall the kit is very similar to the kit of the TZ.
Then the basic engine and drivetrain was completed to verify decent alignment in the chassis.The pair of Webers, de rigueur in an Italian race car of this era, and the headers go on after the engine is installed permanently and the forward chassis tubing is complete. Still some ways to go!