Tuesday, April 28, 2020

Porsche 904 GTS Carrera: Overview

I built this one a long time ago, as I was starting to get back into modeling. I did a decent job at the time but decided it was worth having another go at it.


There are two Monogram kits of this unique little car, one very simple and designed for slot car use. I built the more complex Monogram version way back when; this time out it's the same kit but in the German Revell packaging. The paint and numbering scheme is for the 1964 Targa Florio winner, driven by Colin Davis and Antonio Pucci.


The floor pan still has the name Monogram moulded into it.


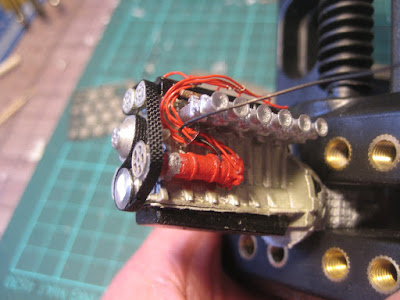
I stripped the chrome from the valve covers and carburetors, and wired up the twin distributors. The engine in the Fujimi kit of the 356 is much nicer, but this is pretty decent as well.


The chassis is an interesting approach used by Porsche for just this one car. A pair of steel rails (in black) are buried in the door sills and are wrapped in two large fibreglass units, one the undercarriage (shown in the picture) and the other the interior floor and bulkheads.


A third large moulding, consisting of roof and fenders, wraps up the chassis. A hood, two doors and the engine cover wrap up the number of body panels, making it very simple to build (but likely a major pain to restore if rust has gotten into the chassis).


The engine compartment was designed for the new six-cylinder as premiered in the 901 (later renamed 911), but most of the 120 cars made had the proven 4-cam unit, with excess space between engine and bulkhead. The twin distributors take up a fair bit of that extra space. 


Stay tuned! This should be finished relatively soon.

Sunday, April 26, 2020

Rondeau M379B: Complete (#10 for 2020)

After taking a break to build a couple of OOBs and a hot-rodded Land Rover, time to get back to the Rondeau. The vacuum formed windows are the biggest part of what is left, and also the scariest because it is all too easy to cut out just a little too much. I really dislike vacuum formed windows.


A proper little Batmobile, especially in black.


Sadly I managed to damage a couple of decals. I'll see if I can get replacements.


Like all multi-media kits, there is a collection of excessively simplistic bits, combined with extreme levels of detail elsewhere. This is my first experience with Le Mans Miniatures and I am nut unhappy overall; any mistakes are my own.


Minimal wings on this 1980 Le Mans car. The 956 and its successor the 962 had a full-width unit. The Cosworth DFV has an excellent reputation in the F1 world but reliability over 24 hours was another challenge entirely. Car 15, shown here, blew a head gasket around about midnight, and overall the DFV didn't have the success in long-distance racing that it had in F1.


So what's next? Well, there's a Ford F3L aka P68, also with the DFV, on the bench. But stay tuned, who knows what could surface.

Saturday, April 25, 2020

Land Rod: Complete (#9 for 2020)

Paint went on very nicely: Tamiya primer followed by a base coat of TS-48 Gunship Grey and a top coat of TS-100 Semi-Gloss Bright Gun Metal.


I decided to keep the standard windshield but tilted back a bit more than stock.


The tonneau cover may get painted a different colour. I'm not sure the off-white works here.


The big fuel filler cap was  bit of a kludge to cover up some damage to the paint.


What's next? Hard to tell. Stay tuned!

Wednesday, April 22, 2020

Land Rod: chassis is complete, now to the body shop

Lots of detail work was needed to get it to the current state. Basically the chassis now consists of two complete sub-assemblies that will get glued into the body shell at the last possible moment.


The floor pan and transmission tunnel are done. This was all fabricated from 0.030" styrene sheet. The photo above shows the work in progress. The passenger side footwell will be severely cramped by the exhaust system but hey, who cares. Style before substance.


Giles seems to be settling in quite nicely. The cockpit is all the way over to the left, with the driver's feet under the fuel injection and up against the left side inner fender. There is a simple flat dash in preparation.


In the rear I may build up the boxes around the rear axle or I may just put a tonneau cover over it all and be done with it. Being lazy, a tonneau cover sounds like a good idea.


I dithered over the rear axle but finally decided to pull out the rear fenders and space out the rear wheels. The 3D printed axle is just a bit wide, and even with lots of filing the rear wheels were going to be jammed up in there.


I may need to work on getting the hood to close... the rear fenders will get mesh grilles on the leading edge to lighten it up, and the rear wheel will get pulled out a bit. Two millimetres per side at scale, 2 inches at 1:1, should do it nicely. Some form of minimalist windshield, possibly folding, will round it out.


I think it's all looking good. Body work looms large, however. The colour still needs to be decided and, given the difficulty in sourcing new paint at this time, will be partly dependent on what paints I have in the stash, but a neutral dark gray or black, possibly semi-gloss or flat, will set off the red alloys nicely. Stay tuned!

Sunday, April 19, 2020

Land Rod: Chassis details

Got the floor opened up to allow the rear axle to sit where I want it. It is very tight in terms of width and I might need to consider pulling out the rear fenders a millimetre or two.


Sadly the quick change rear end and inboard calipers won't really be visible once the floor is back in.


This is the approximate ride height I am aiming for.


The hood has also been removed and the front suspension is now ready to install. Engine mounts have also been fabricated from stock styrene.


Giles rather likes it. Stay tuned!


Thursday, April 16, 2020

Land Rod: Overview and planning

The Italieri kit of the Land Rover fire truck has very nice chassis details and lots of fire-related bits, but has no engine detail.


As well the body struck me as a very interesting base for a lowered rod of some kind.


So I raided the parts bin, including the stack of aftermarket bits I have accumulated over the last few years, in order to use only the body from the Italieri kit. The idea would be to save the chassis for future use under some other body.


It started with chassis and front suspension from the '51 Belair of which I have three. One has been used for the Belair wagon; a second is essentially complete but was cannibalised for the lead sled; and the last one is being saved as I want to build the Fleetline relatively intact.


A range of bits came from Ron Olsen's 3D printed bits posted on Shapeways. The IRS (here) with inboard discs is a nice one, if wide. The engine is a big OHC 6 of indeterminate origins (which I can't find on Olsen's site), mated to a 5-speed transmission (here).


A magneto, also from Olsen's shop, was combined with a range of things like pulley face plates from Model Car Garage.


Wheels were from an add-on kit for the R34 Skyline that didn't fit my R32 tires.


Dialing in the ride height and stance are next, which will start with channeling the chassis into the bed of the truck. The chassis is a bit long which will be easily fixed. Stay tuned!

Saturday, April 11, 2020

Skyline 2000 GT-R KPGC 110: Complete (#8 for 2020)

A fairly simple kit but well designed. I particularly like the wire mesh grille, which sadly has nothing behind it.


The wheels are not the stock black steel rims but they did come in the kit. I should paint the spokes flat black to be completely accurate. Otherwise it is original, including white paint; a small handful were red. 


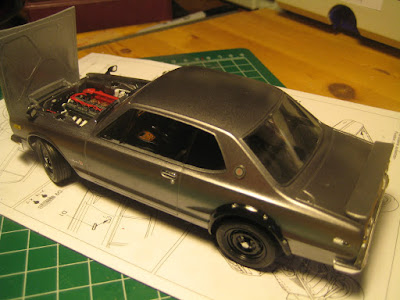
The engine is reasonably well done, even if the engine bay is not. Coil and battery added from the parts bin. 


Four generations of GT-Rs. (There were a number of other Skyline 2000s, with suffixes such as GT-E, but only four had the GT-R suffix).


A lovely selection of sixes! (The Prince kit did not come with a motor).


What's next? Stay tuned.

Friday, April 10, 2020

Forgotten Skyline 2000 GT-R: KPGC 110 overview

Still looking for an "easy" build ... the Fujimi kit of the forgotten Skyline GT-R, the 1973 model, turns out to be just such a build.

So everyone remembers the Hakasuka, known as KPGC 10 to the cognoscenti; and the R32 and successors turn up on Vancouver streets as imports with RHD. But few people remember the Prince Skyline 2000 GT-R, and fewer remember the successor to KPGC 10, also known as KPGC 110 or Kenmeri (because the ads featured two people named Ken and Mary...).

So the Prince Skyline had a four of about 1.5 litres in it, and for some reason the company decided to go to the expense of stretching the chassis to fit a lovely twin-cam six of 2.0 litres displacement. They didn't do anything about the dowdy exterior, however. It was available in two versions (S54A and S54B) which only the true fanatics can distinguish today. Prince was then purchased by Nissan who updated the Skyline series, in four and six cylinder versions. 


The 2000 GT-R (KPGC 10) of course is the famous one, having won loads of races in Japan. The fully independent suspension, reminiscent of the TR6 in the rear, with four wheel discs and that lovely engine made it a winning combo. However fuel costs and taxes on large-displacement motors means few were made.


Even fewer were made of its successor, KPGC 110, in 1973 before oil prices killed it. It's ugly, looking like a pumped up Datsun 610, and the big rubber flares with the black steel wheels implied sizzle rather than steak. And it was heavier than KPGC 10. But it is still a key part of the GT-R story.


The Fujimi kit has a complete engine, but the hood is molded in to the body, and the underhood area is not modeled.


So out came a new #11 blade.


The engine went together well. The engine bay was closed off with four pieces of sheet styrene but won't be detailed any further. I left the stock air filter on and will save the optional air horns for use elsewhere.


Body was painted white, taped, and the rubber trim painted semi-gloss black. Some minor problems of leakage will need fixing.


Stay tuned!