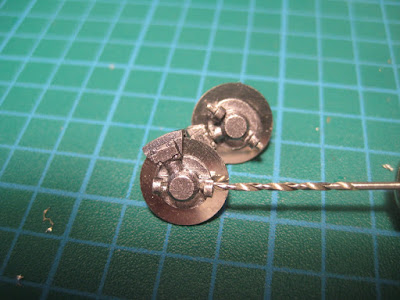
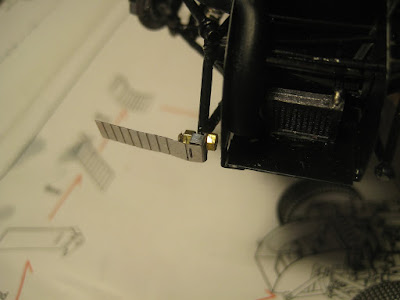
Frustrated with flimsy hood hinges or steering knuckles, I've discovered the joy of hinging stuff with #00-90 screws and nuts. This works nicely where plastic dowels are weak or non-existent.

For use at 1/24, you need a steady hand with the pin vise, a #65 drill bit (0.035") for the tap, a 3/64" drill for clearance, a #00-90 tap, and an assortment of screws and nuts. Nut drivers are available (5/64" hex head) as well as miniature screwdrivers; I find hex head bolts easier to deal with than flat or round head screws, but they are also more obvious. All are available at better hobby shops (especially model train shops) or online at Micro Mark or equivalent. Where metric is more common, you would probably go for M1.0 X 0.25, which requires a 0.75 mm (0.029") tap drill.

Note that at 1/24, the 5/64" bolt head works out to an inch and 7/8ths (1.875") at full scale, so these are big bolts. There is a smaller standard bolt available, #000-120, but parts are hard to find and I expect the tap and drill to be very fragile. So be aware you are modeling big stuff here, typical of bigger suspension bolts.

Pictures show where I drilled clean through the kingpin on a white-metal cast front suspension (Model Factory Hiro 1/24 kit of the Ferrari 250 GT Lusso) because the screws provided were way too short.

Lubricate the tap with cooking oil, and work it back and forth -- in a quarter turn, then back a half turn before digging in another quarter turn.

Use a longer bolt or screw than necessary, and once installed, snip the end off with a side cutter. Once in place, the nut or threaded part of the bolt can be locked in with a drop of CA glue.

Another option is to put a bolt through a kingpin, then snip off the head entirely and lock the bolt into the A-arms or knuckle with a drop of CA glue. That way the bolt head doesn't show at all.
I did the same thing with the Alfa TZ1, except here it was impossible to drill clean through the kingpin. Instead I threaded the upright and put in short pieces of bolts. First step: clearance drill through the A-arms. I drilled both at the same time to ensure it's all relatively straight.

Next I drilled the upright with a tap drill. This was a little harder to get straight and perhaps some type of jig would have worked.

The bolts went in well, if not entirely aligned.

Bolt heads were snipped off, and the threaded part locked into the A-arms. The upright rotates on the threads, but even if the threads wear out, the pin will still work. Sadly the kit does not come with a functioning tierod, so the two wheels are posed individually.

The next pictures show the hood hinge for the TZ1, which pivots at the front.


I expect this would work well with things like styrene big rigs that typically don't steer. Oh, and the 4X desk lamp came in handy! Have fun.
No comments:
Post a Comment